Cs-Cart Live commerce
Live commerce, or social commerce add-on for CS-Cart, refers to a combination of e-commerce and live streaming. Our addon provides the two types of streams 1. Live YouTube video stream and 2. Pre-recorded video stream. It allows businesses to showcase their products or services in real-time through live video broadcasts, while viewers can interact with the hosts, ask questions, and make purchases directly within the streaming environment. It's essentially a fusion of entertainment, engagement, and shopping.
Feature:
- Real-Time Interaction: One of the primary attractions of live commerce is the ability for viewers to interact with hosts and ask questions in real-time.
- Limited-Time Offers: The live format lends itself well to limited-time offers and flash sales, creating a sense of urgency and encouraging viewers to make quick purchasing decisions.
- Social Sharing: Viewers can share the live stream with their friends and followers, amplifying the reach of the event and potentially attracting new customers.
- Instant Purchase: Viewers can make purchases directly from the live stream interface, usually by clicking on the product being showcased and proceeding to checkout without leaving the stream.
- Social Proof: Viewer comments, reactions, and purchases during live streams serve as social proof, influencing others to make purchases.
- Live Streaming Integration: The addon could provide seamless integration with popular live streaming platforms, allowing sellers to broadcast their live commerce sessions on YouTube directly to their audience.
- Live commerce addon supports both CS-Cart Multivendor and CS-Cart Ultimate.
- YouTube Live stream: The addon provides the functionality to integrate the live YouTube video to your store.
- Pre-Recorded: The Addon allows you to pre-recorded stream video functionality.
Installation:-
How to install Addon
https://store.ecarter.co/blogs/how-to-install-addon/
Let's check how the addon works
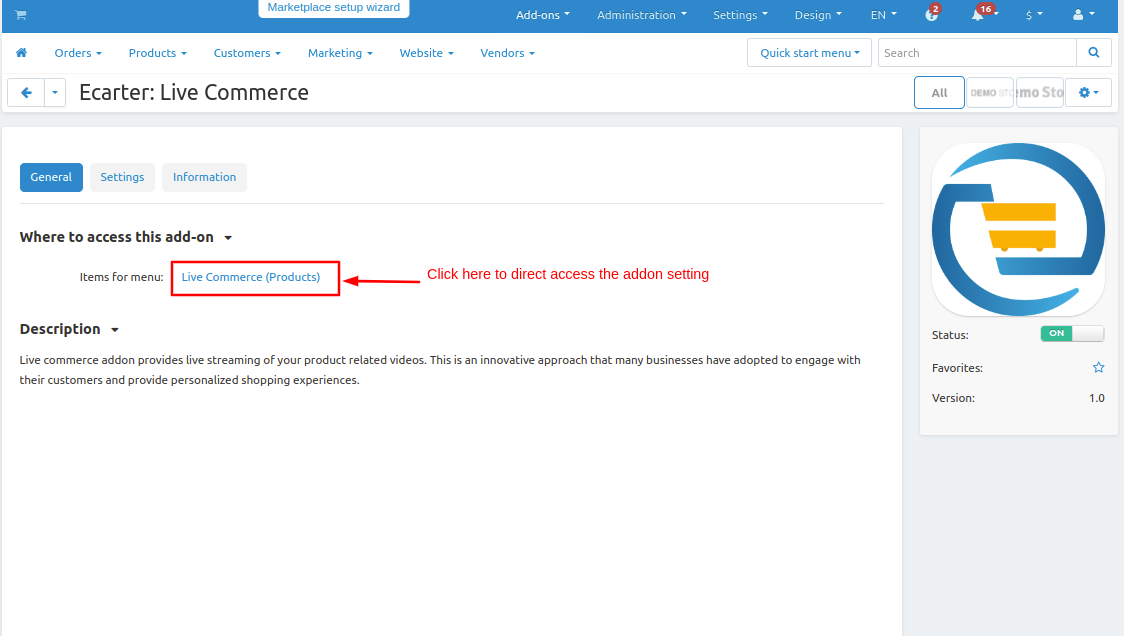
From here you can access the addon directly by clicking on the given link "items for the menu".
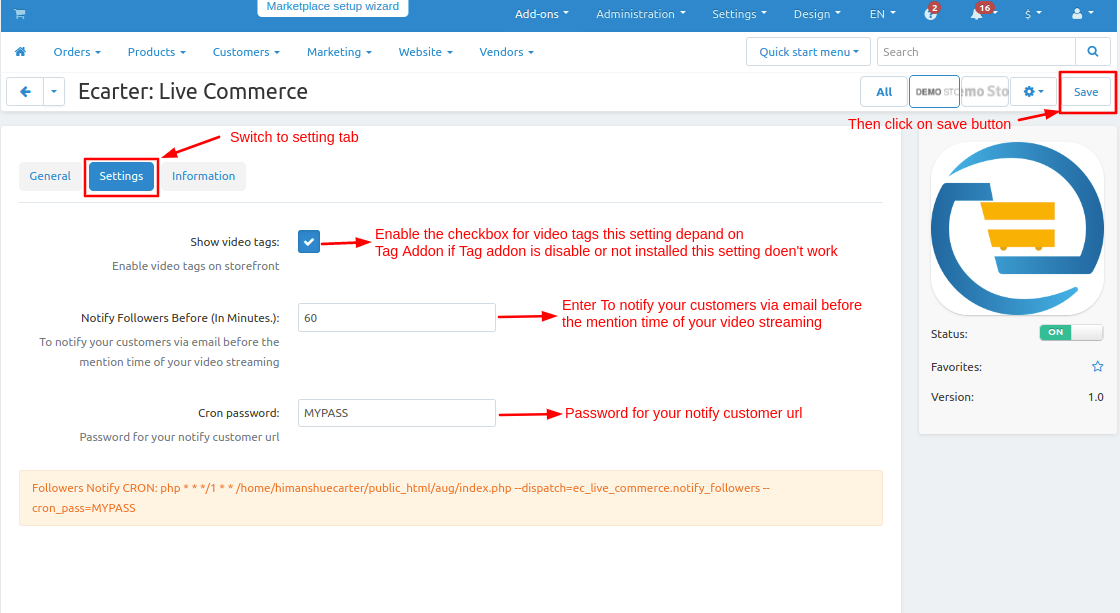
Switch to the settings tab and from here you can set the addon settings like--
- Show video tags: Enable the checkbox to show the video tags on live stream this setting depends on the "Tag addon" so you have to ensure that the "Tag" addon must be installed.
- Notify followers before(in minutes): Enter the time so notification will be sent to the customer before live streaming starts. Those users will get notifications who follow the live stream.
- Cron password: Enter the Cron Pass URL which is given below Whenever you hit the Corn Pass URL it will send a notification to the users.
- Then click on >> Save button.
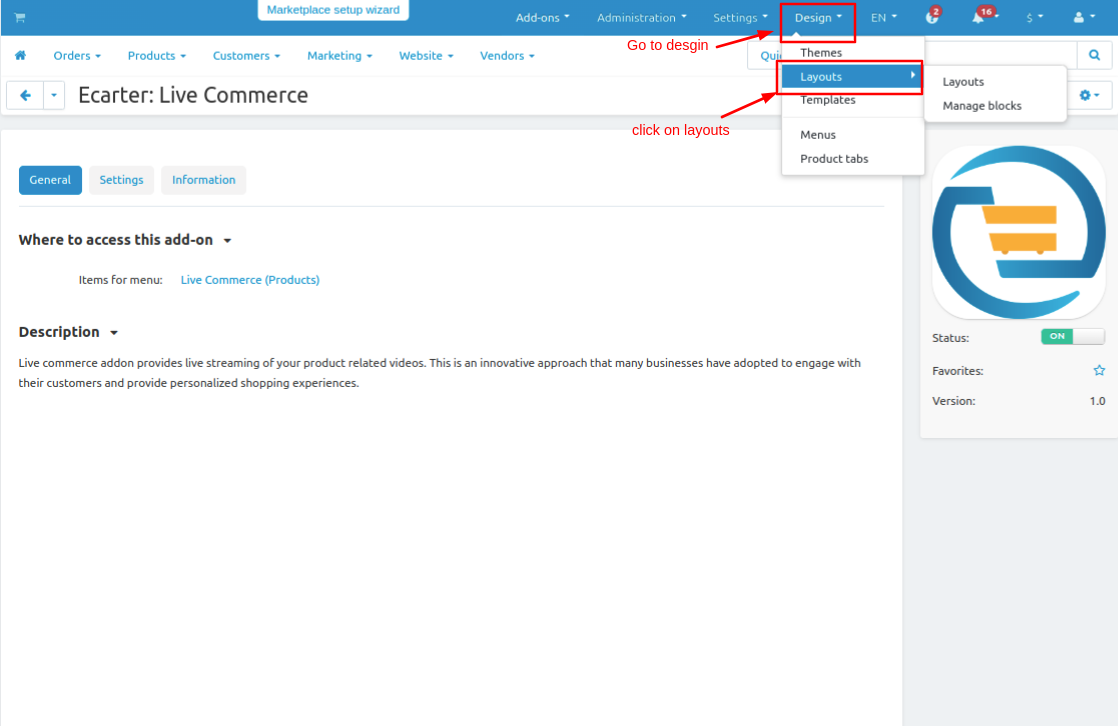
Now adding the block for live-commerce stream.
- Go to the design menu then click on >> Layouts.
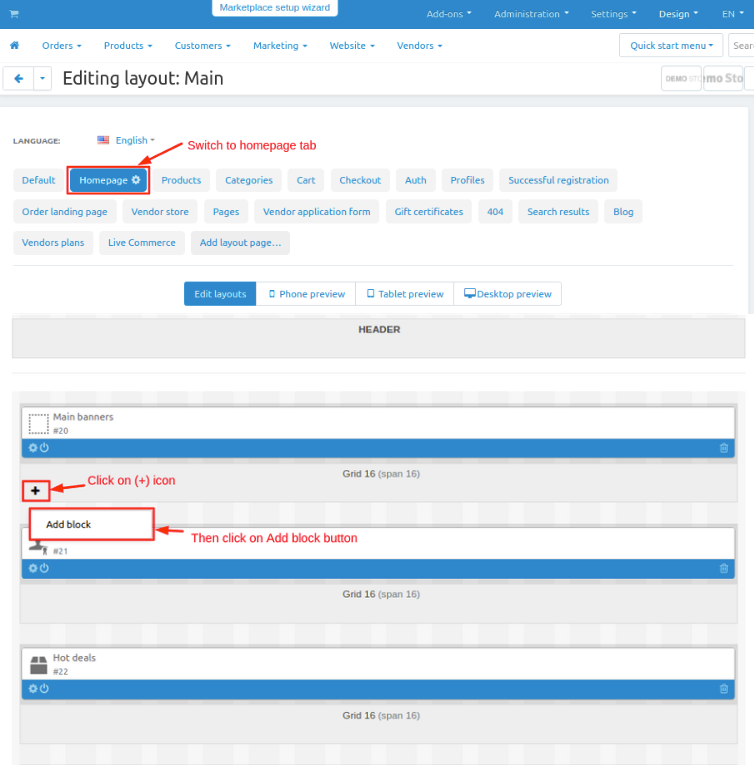
- Editing layout page will be open now switch to the Homeage tab.
- Adding the block click on >> (+) icon then tap on Add block button.
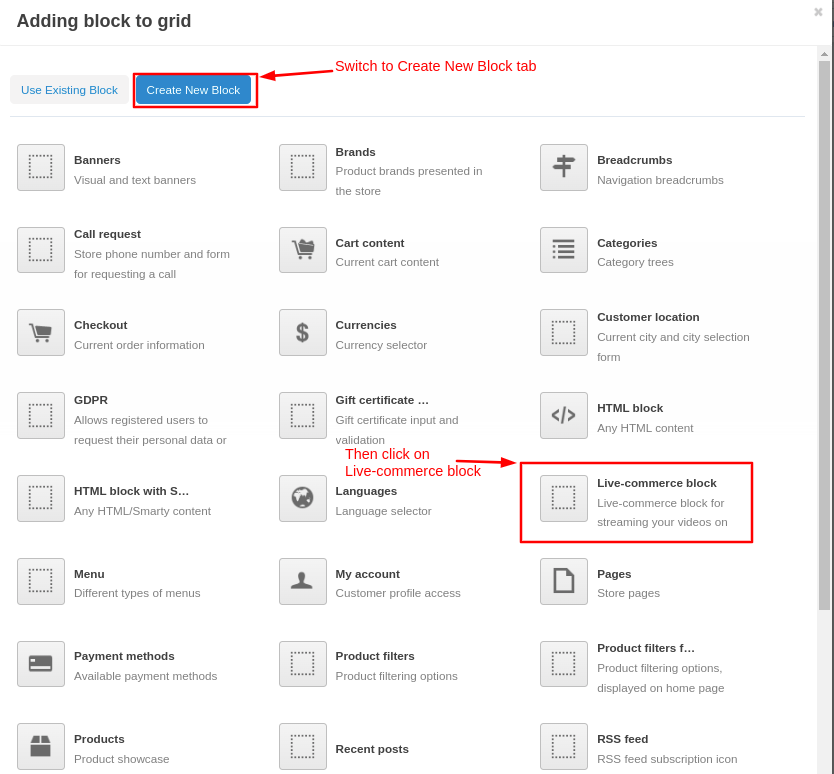
- Switch to Create New Block tab and then click on >> Live-Commerce block.
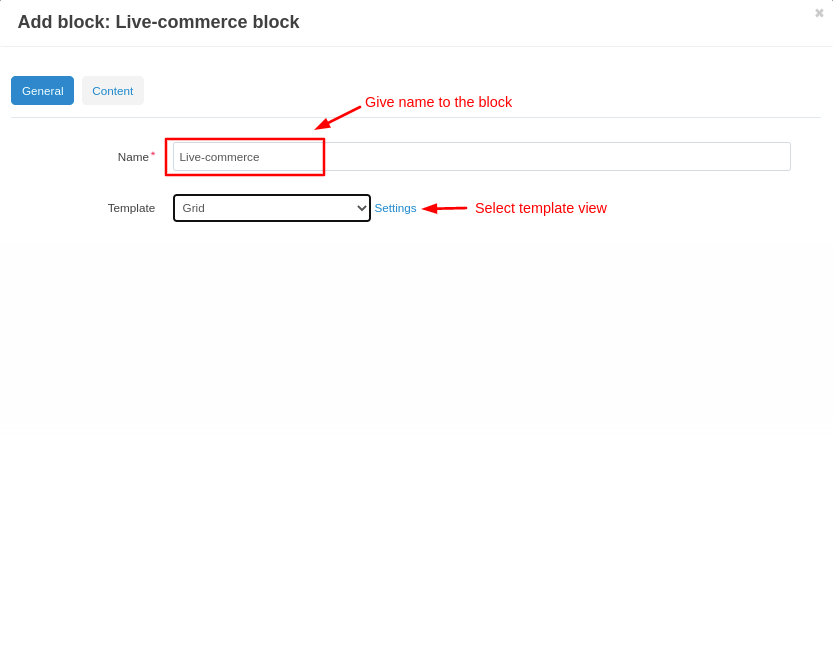
- Now add the name of the block as live commerce and then select a template.
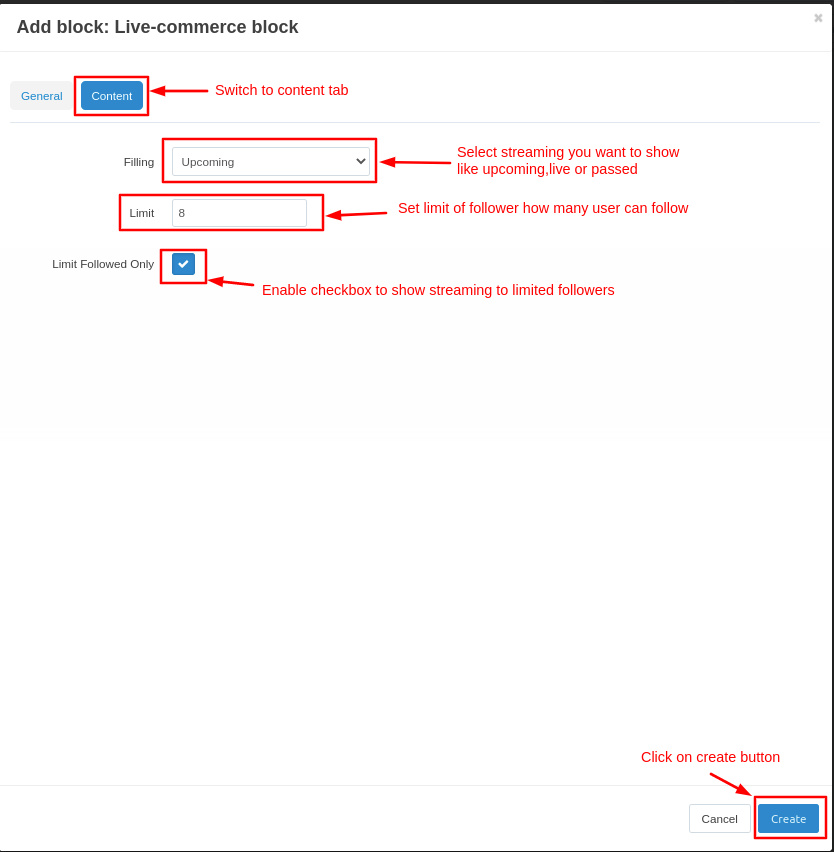
- Now switch to the content tab and select filling like which stream you want to show on the storefront like upcoming, passed, or live.
- Set a limit of follower how many users can follow the stream.
- Enable the checkbox to limit followers who can see the live stream for unlimited user can see disable the checkbox.
- Then click on >> Create button.
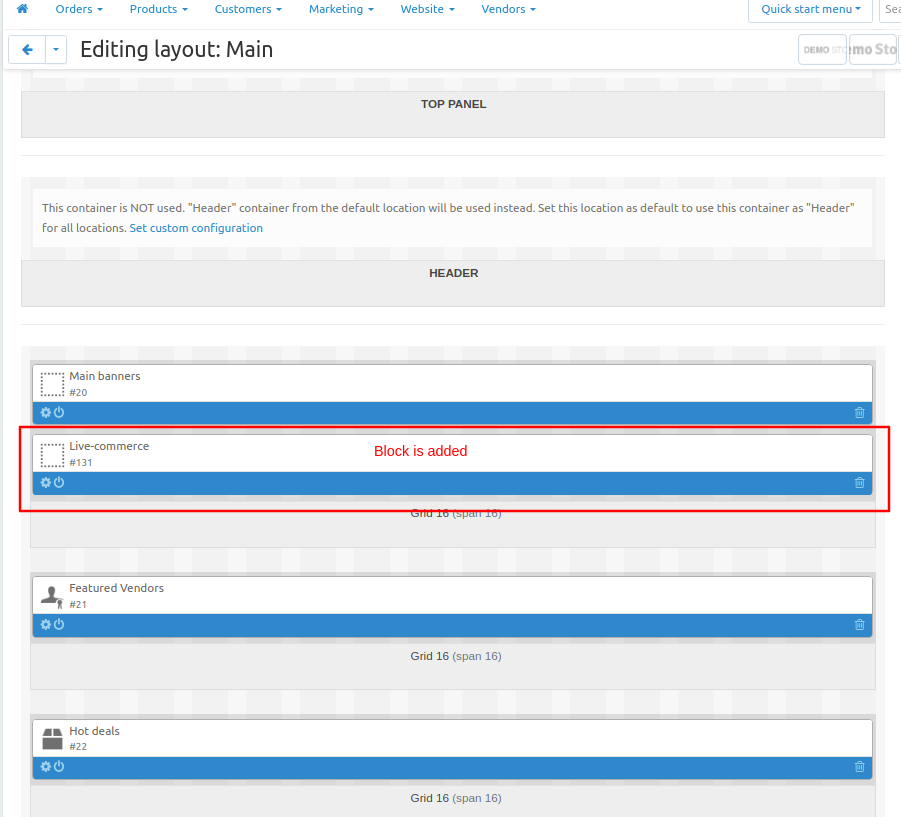
- Here you see the block is added.
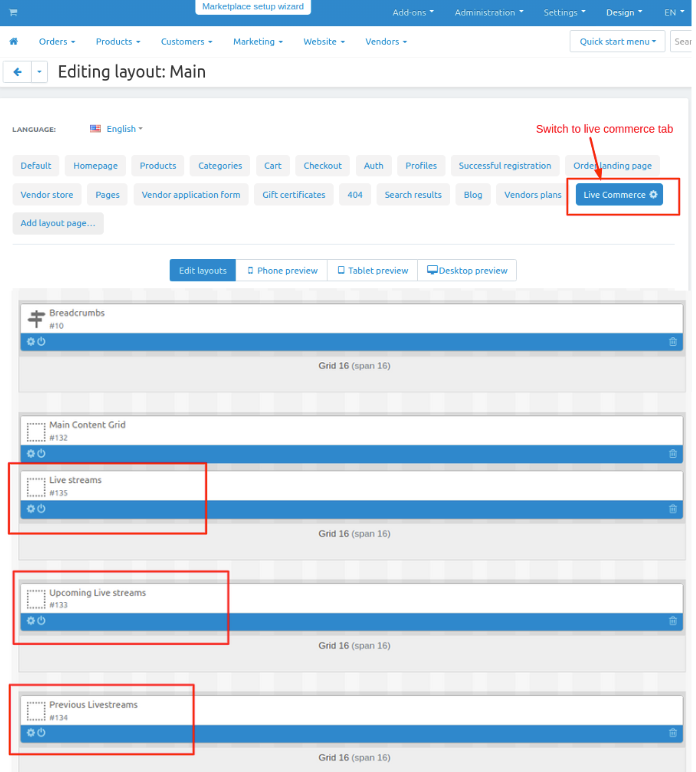
Now add the all live-commerce streaming blocks.
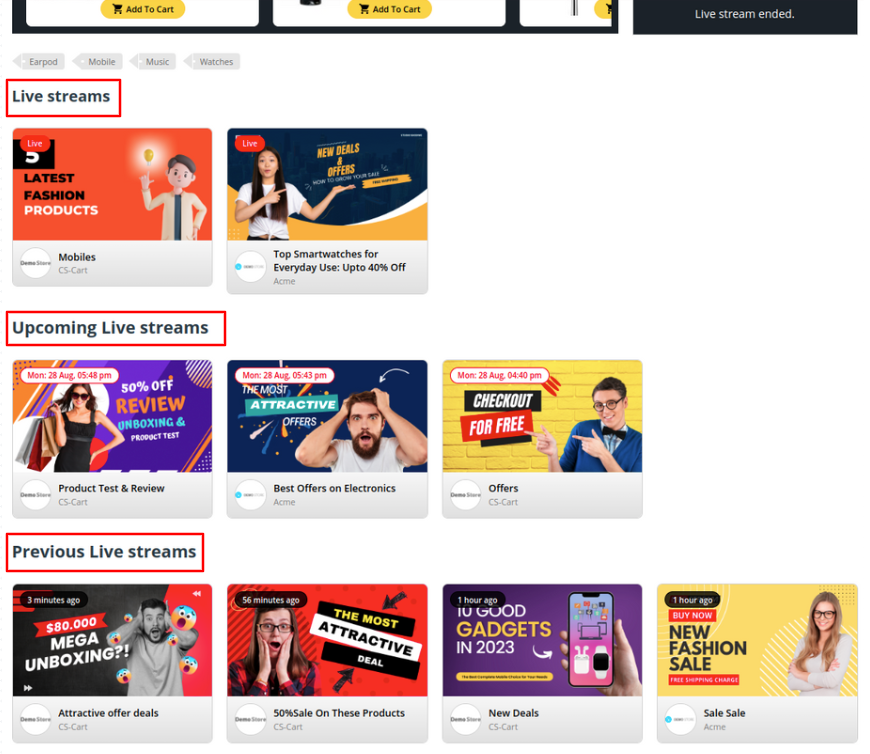
- On the editing layout page click on >> Live commerce tab. Here you see all stream blocks are added for pre Live stream, Upcoming streams and Previous streams.
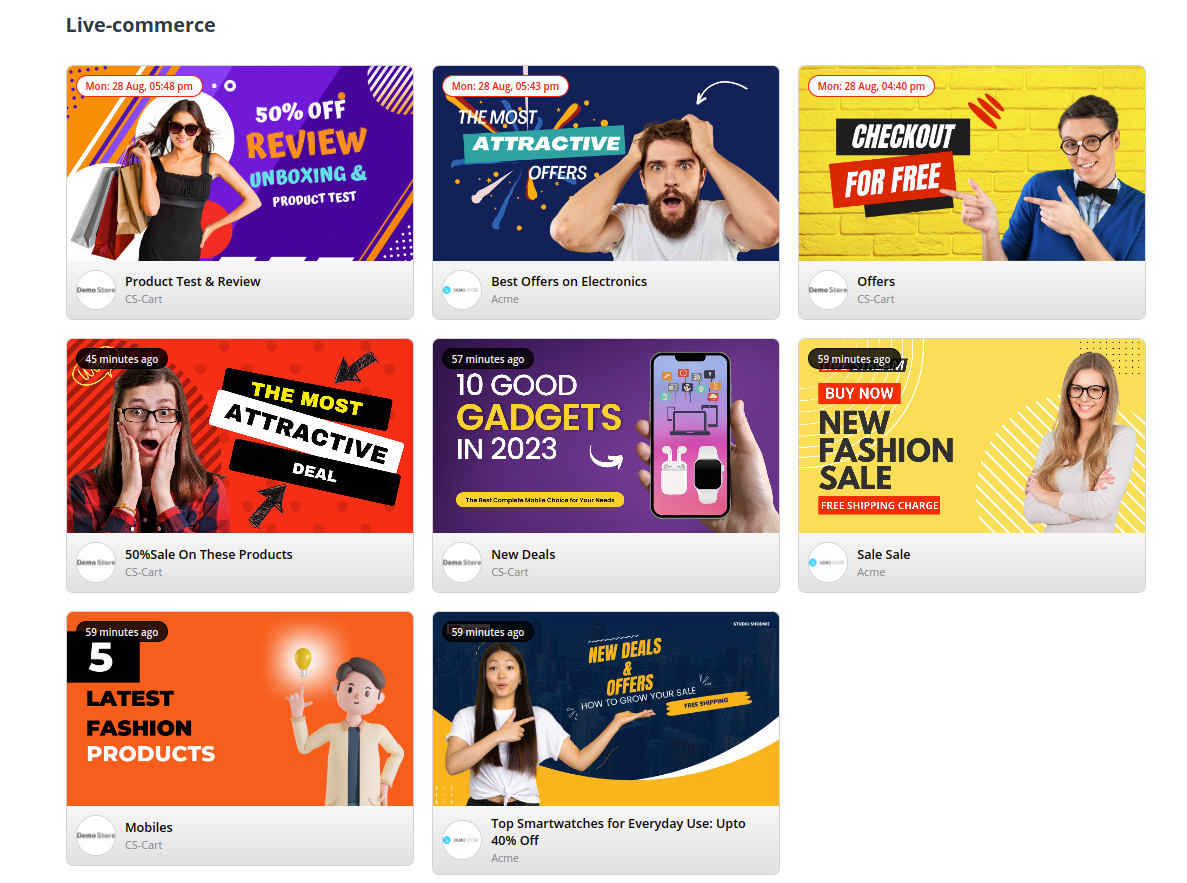
On Storefront it look like below image.
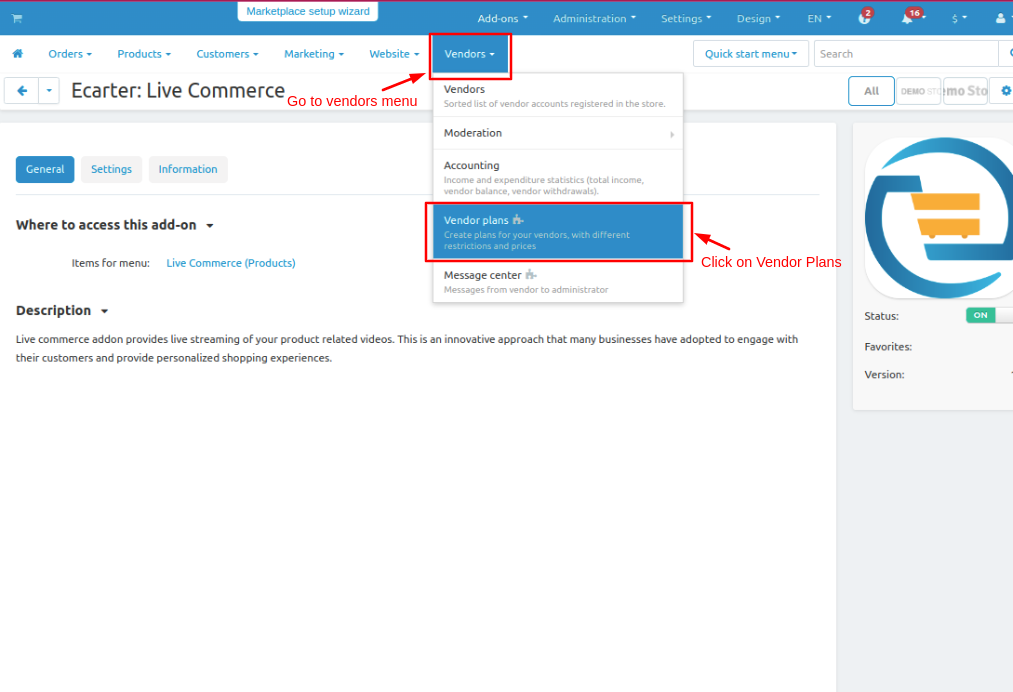
Now Enable live stream for vendor
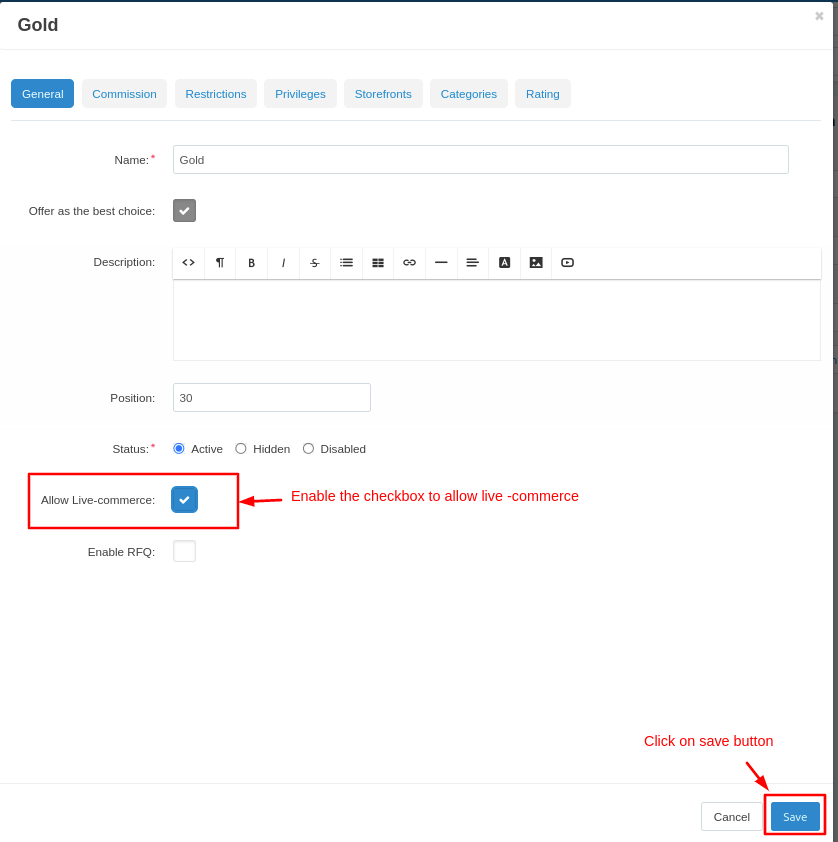
- Go to the vendors menu and click on >> Vendor plans.
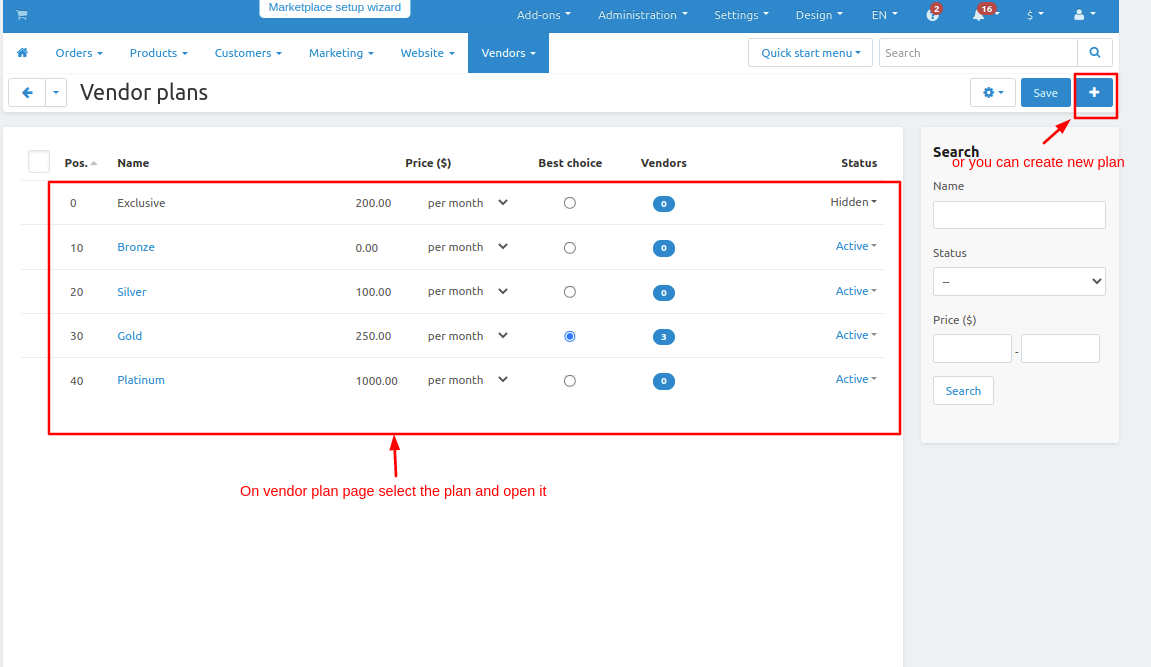
- Now there are multiple plans are already created so choose any plan click on it and open it.
- On the general tab enable the checkbox for "Allow live-commerce ".
- And then click on >> Save button.
Now first creating a Live video on YouTube let's see
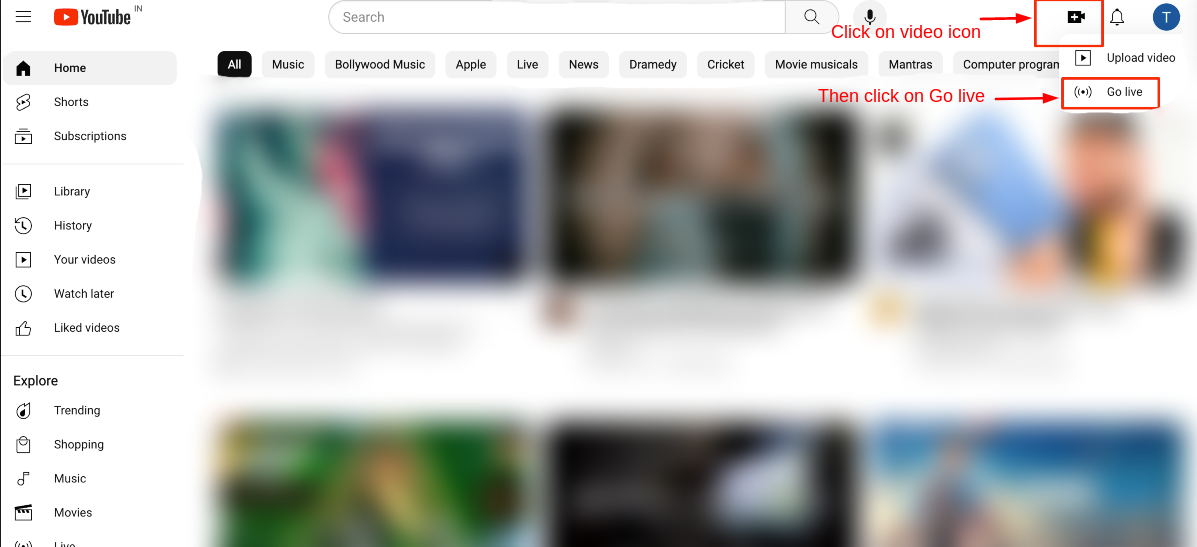
- Go to YouTube.com
- On home page on right corner click on >> video camera icon.
- Then click on >> Go Live button.
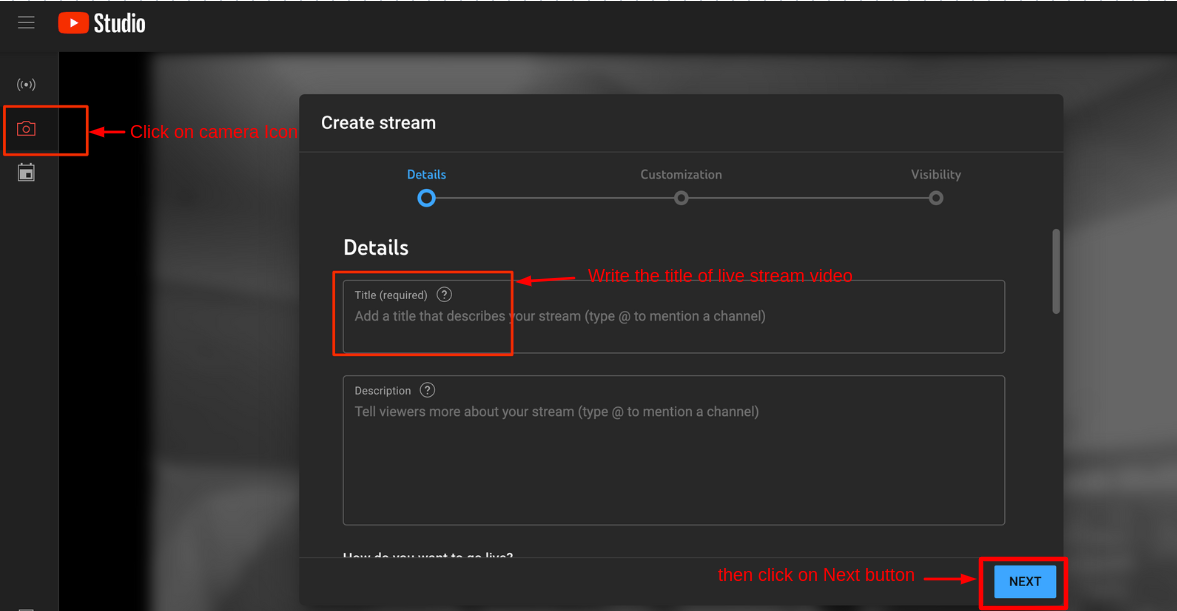
- After that the studio page will be open.
- By default the create stream window will be open if not click on >> camera icon.
- Then write the Title of the video and fill all the information and click on >> Next button.
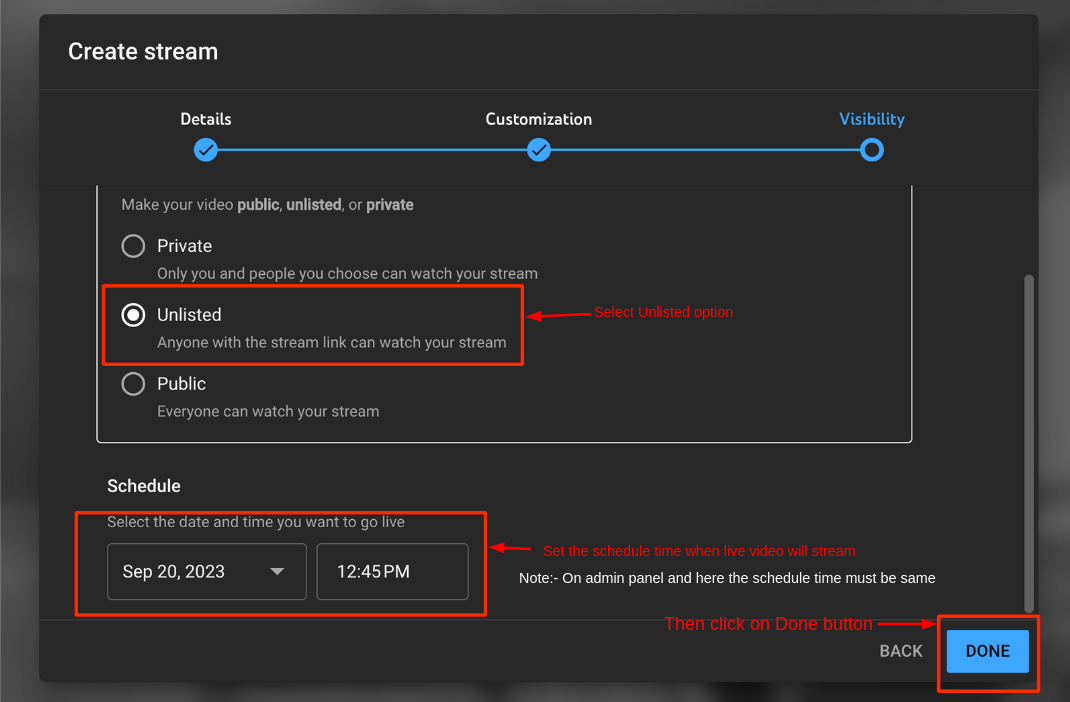
- On the visibility page make your live stream video unlisted so must select the >> Unlisted option.
- Now schedule the time when will live video start (remember that the scheduled time must be the same on YouTube and in the admin panel while creating the live stream).
- Click on >> Done button.
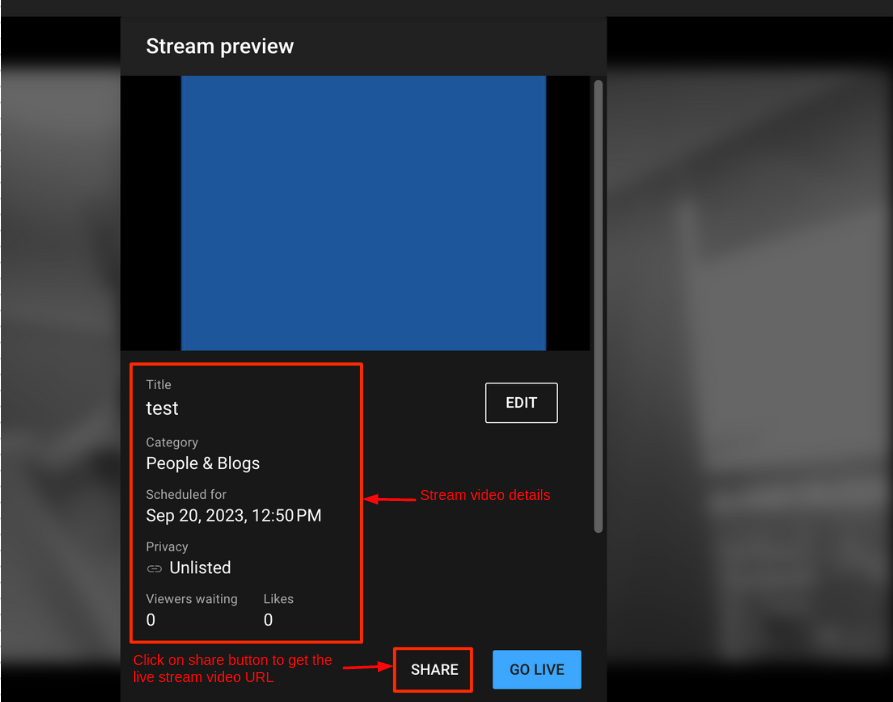
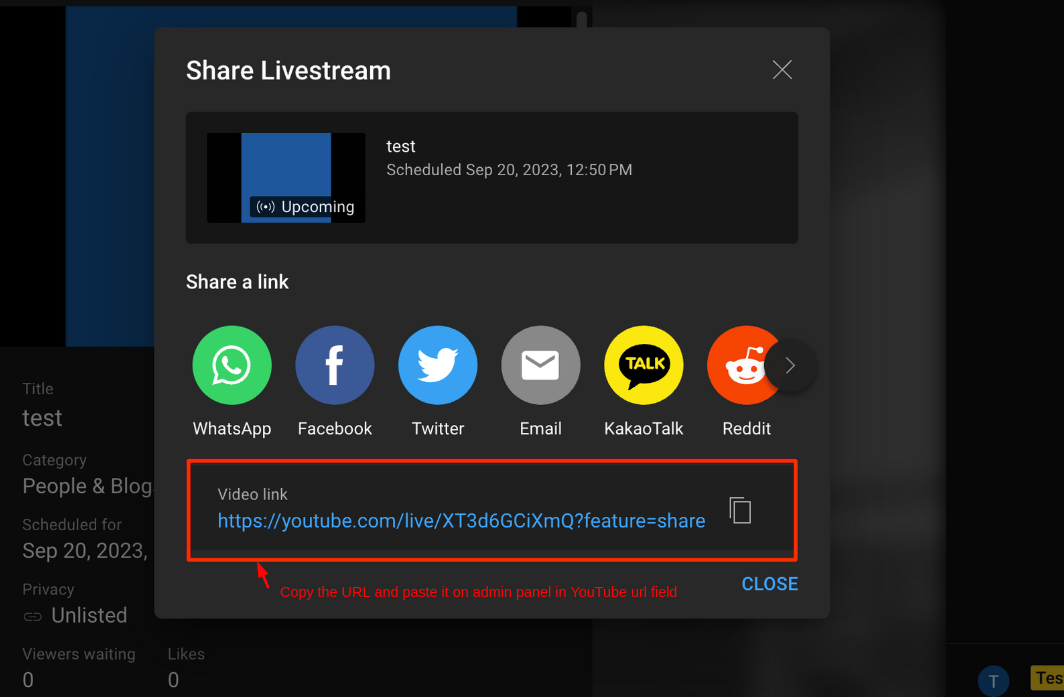
- Now click on >> SHARE button to get the URL of live video. And paste that URL in the admin panel in the YouTube URL input field.
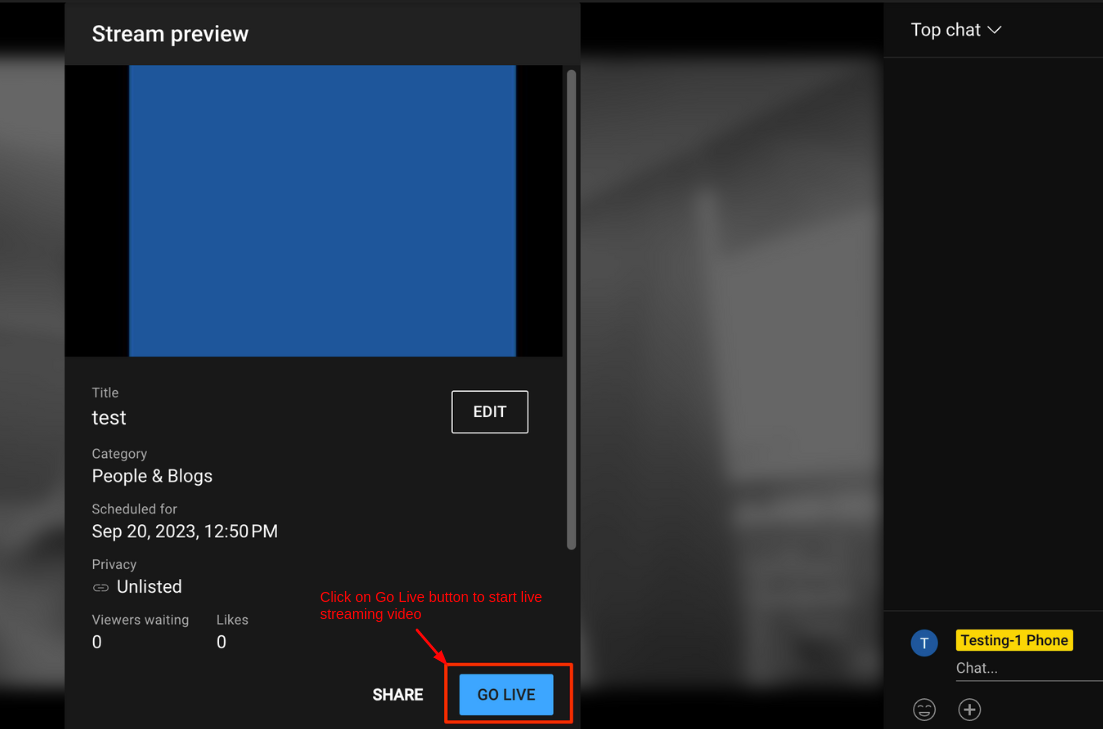
- After that click on >> GO LIVE button to start the live video.
Now Adding The Live YouTube Video Post
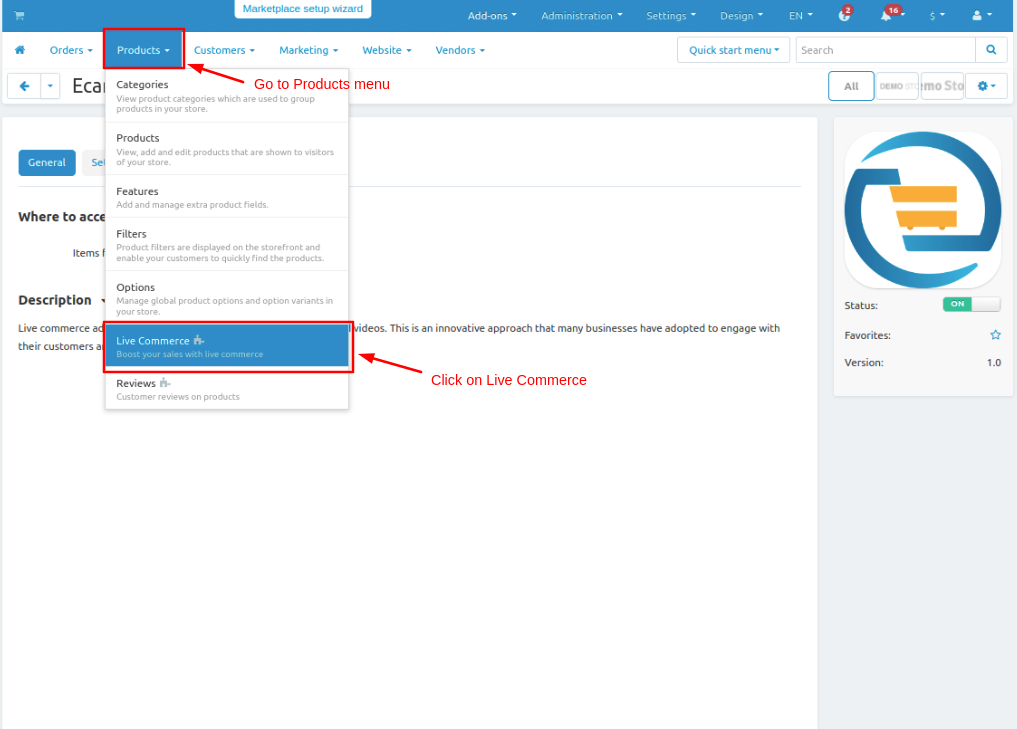
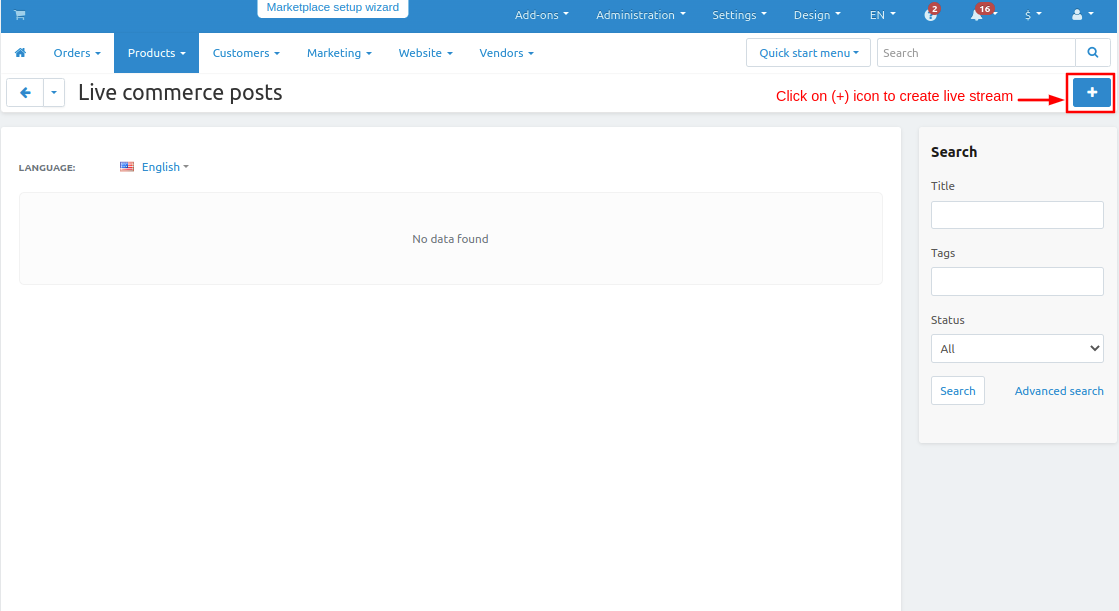
- GO to products and then click on >> Live commerce.
- Click on >> (+) icon to add the live commerce post
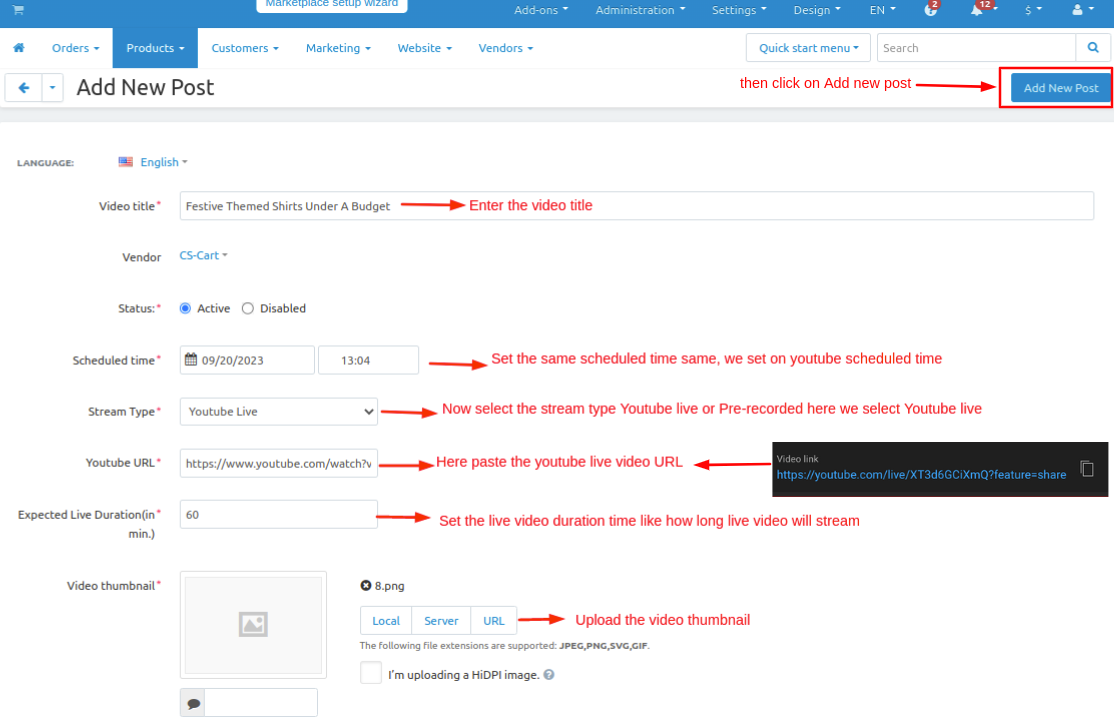
- On the general tab enter all details of the live stream
- Video Title:- Give live stream video title.
- Select vendor.
- Schedule Time:-Set the scheduled time remember that on YouTube and here in the admin panel the scheduled time should be the same.
- Stream Type:- Select stream type YouTube Live.
- In the YouTube URL input field paste the live YouTube video URL
- Expected Live Duration(in min):- Enter the expected time when will live video end.
- Upload the video thumbnail.
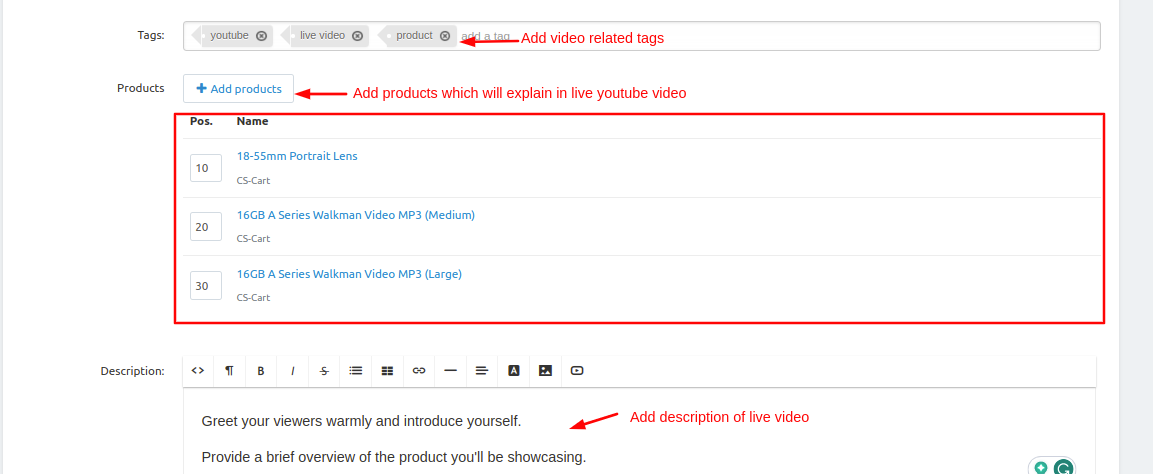
- Add the video tags so all stream videos will be visible related to the video tag.
- Now add the products for your live stream which will be explained in the streaming video.
- Add a description for your live-stream video.
- Then click on >> Add New Post button.
For live YouTube video
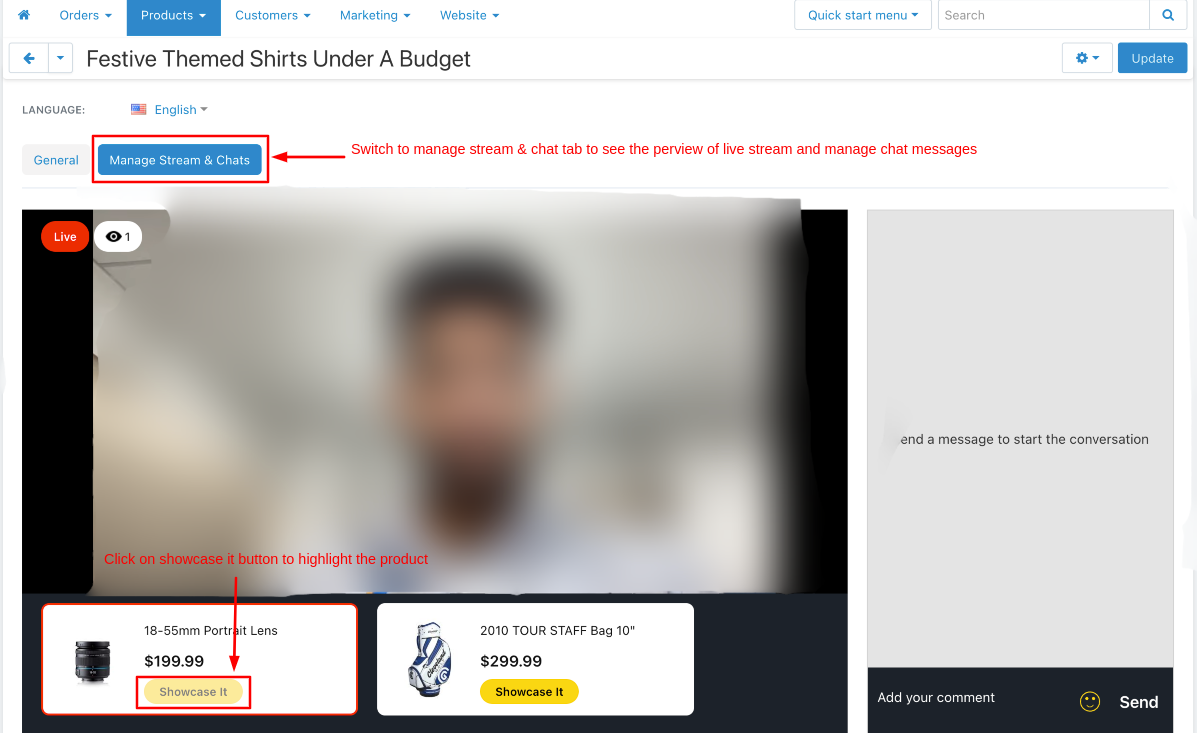
- Switch to the Manage Stream & Chats tab.
- Here you see the live video going on and you see the products which are explained in the video.
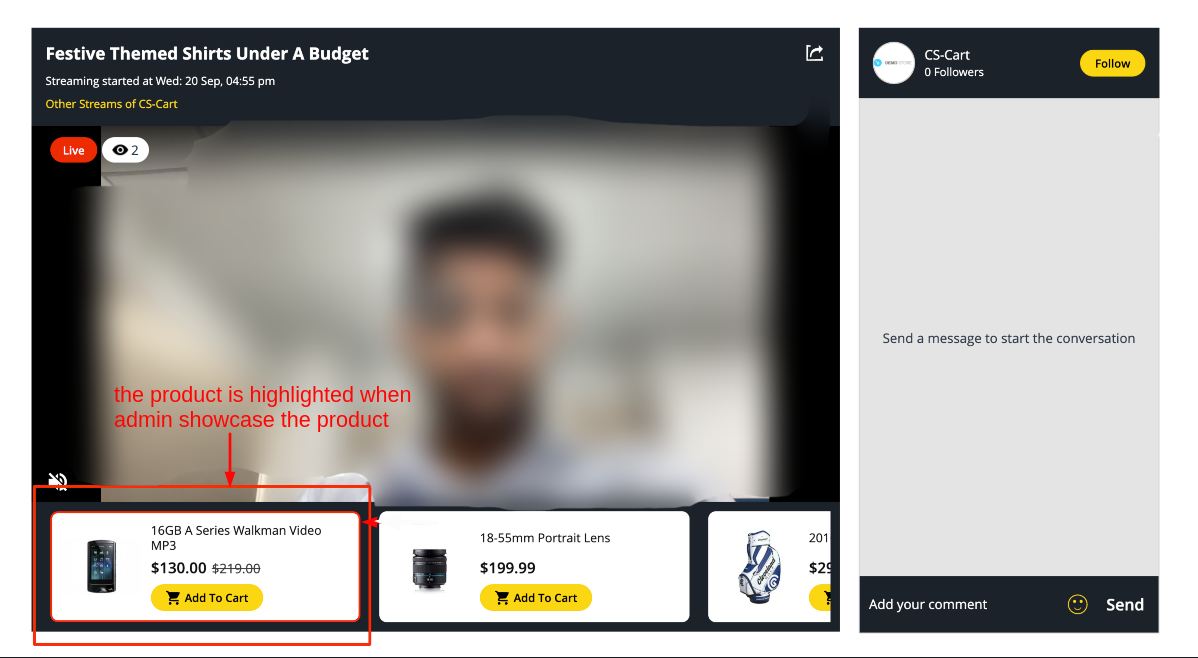
- Click on >> Showcase it button to highlight the product at the store so the user understands in the video this product is explained.
On Storefront
- Here the product is highlighted. click on Add to cart button to buy the product.
For Pre-recorded video
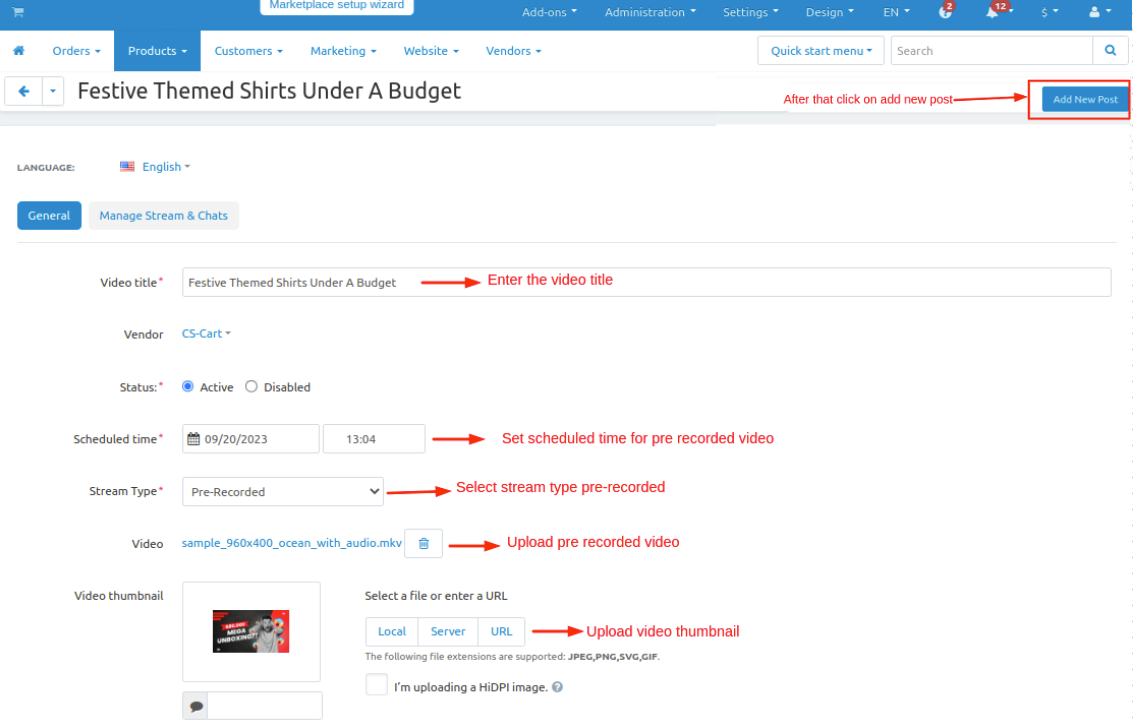
- On the general tab enter all details of the live stream
- Video Title:- Give live stream video title.
- Select vendor.
- Schedule Time:-Set the scheduled time.
- Stream Type:- Select stream type Pre-recorded.
- Now upload the video for your stream.
- Upload the video thumbnail.
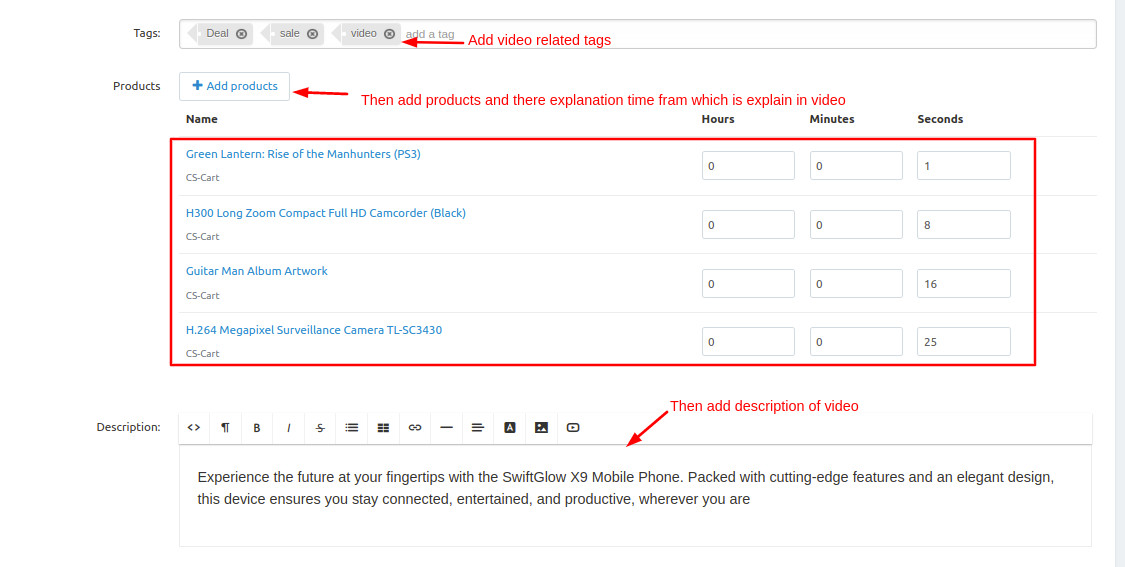
- Add the video tags so all stream videos will be visible related to the video tag.
- Now add the products for your live stream and set the time frame when the video play the product is highlighted at that time frame.
- Add a description for your live-stream video.
- Then click on >> Add New Post button.
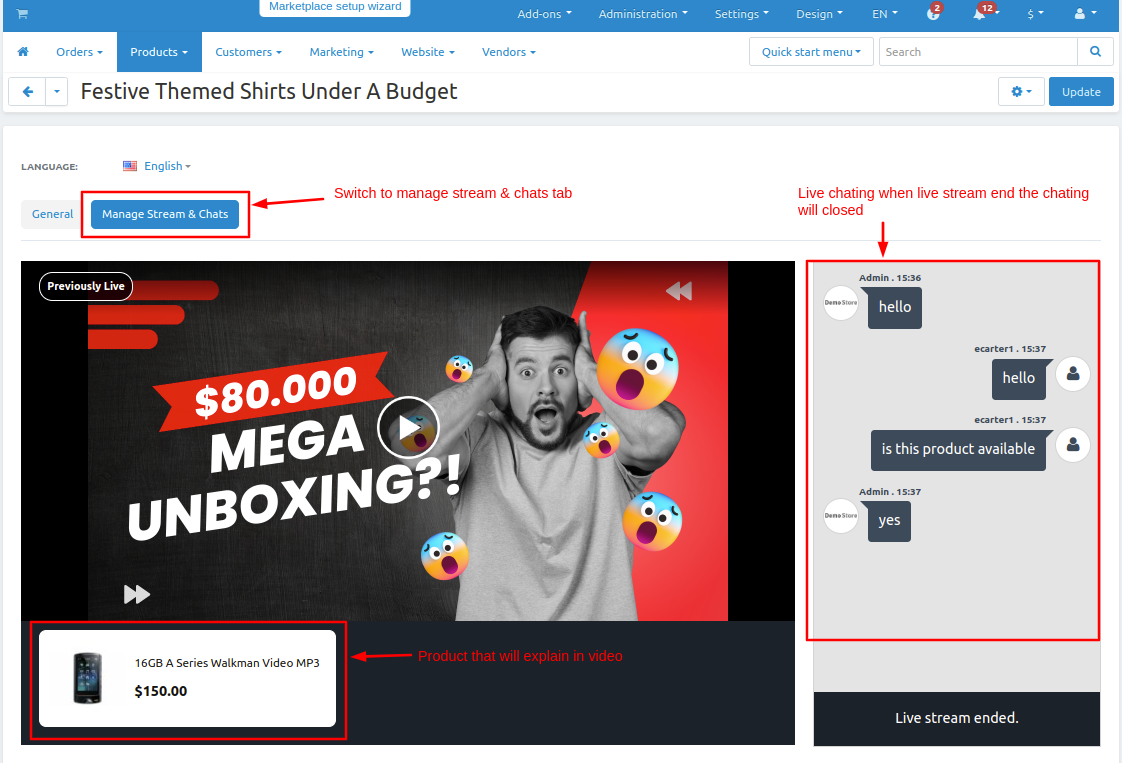
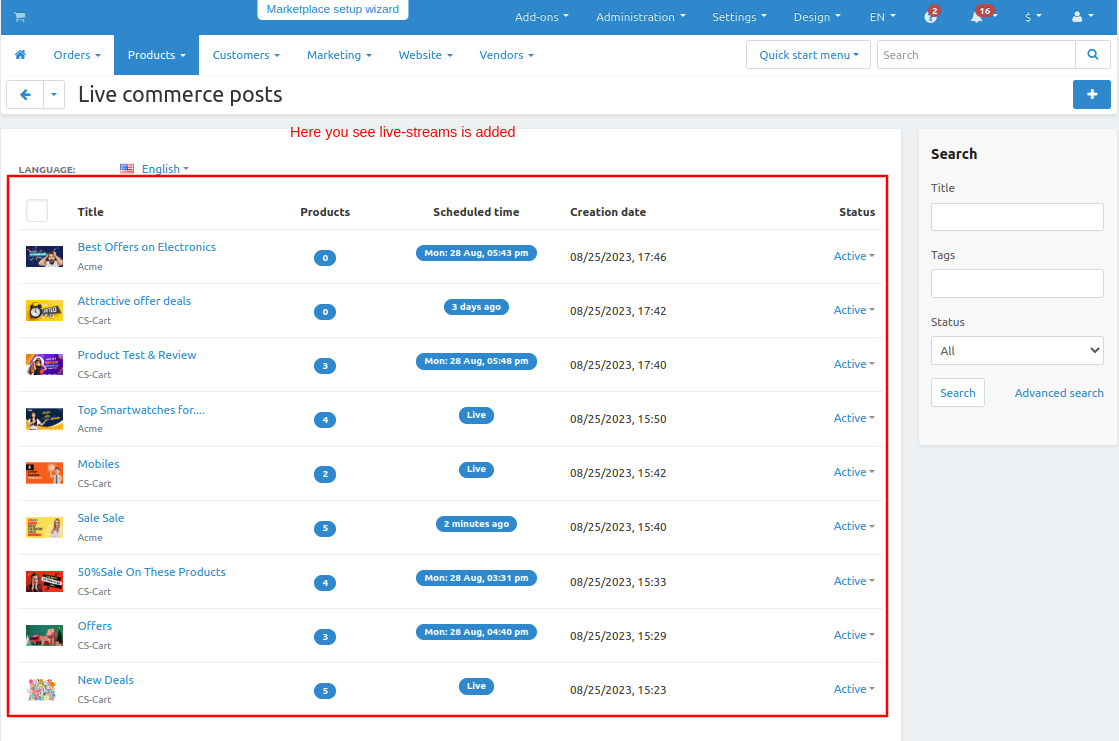
- Here you see the live streams are added.
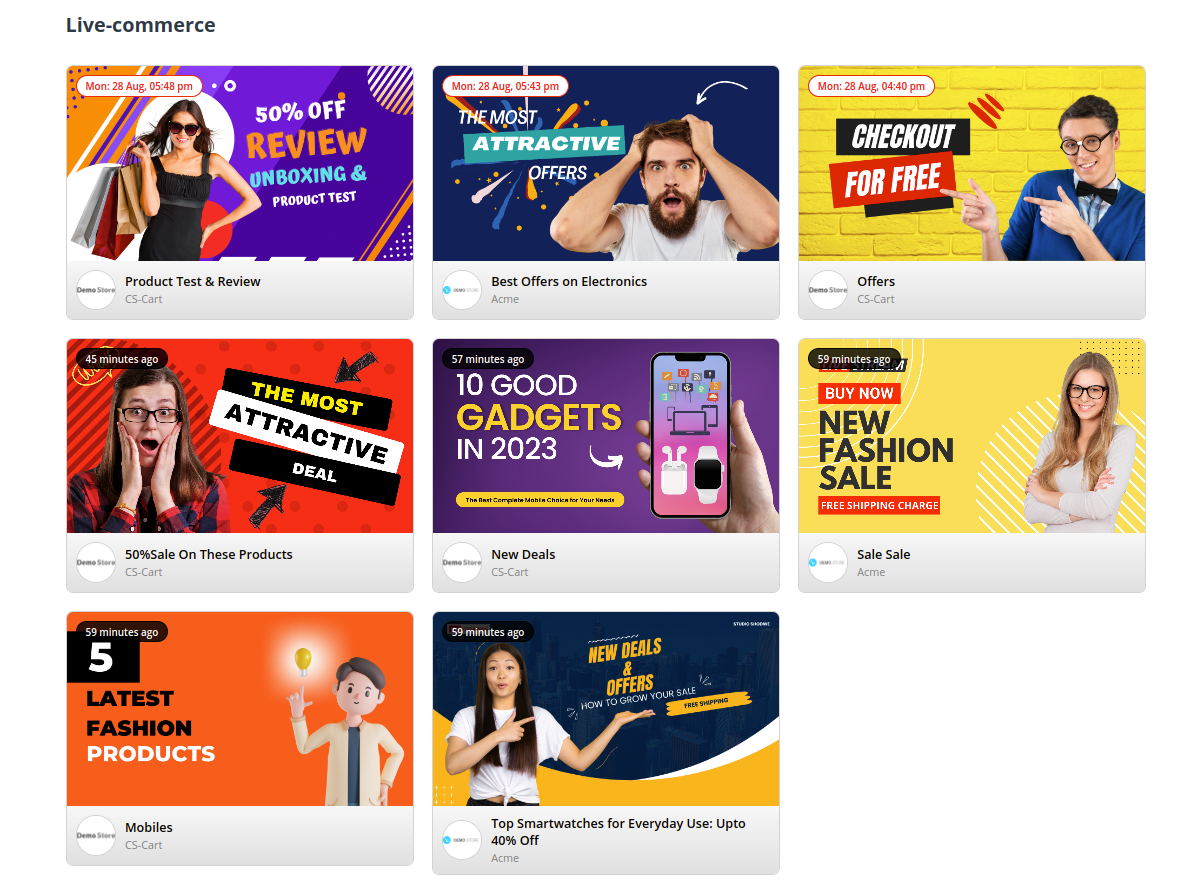
Now let's see how looks on storefront.
- Go to a storefront on the homepage here you see all live streams available.
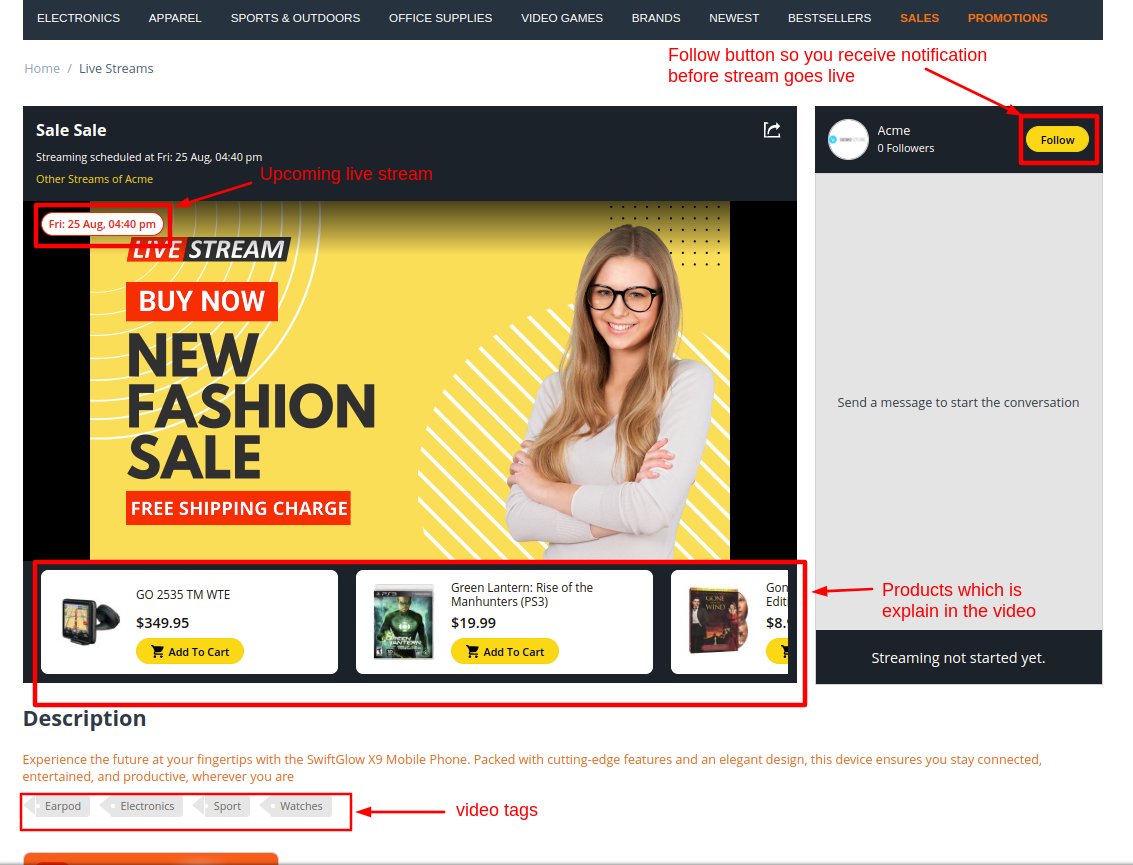
- User can follow the vendor by clicking on Follow button to see there live streams
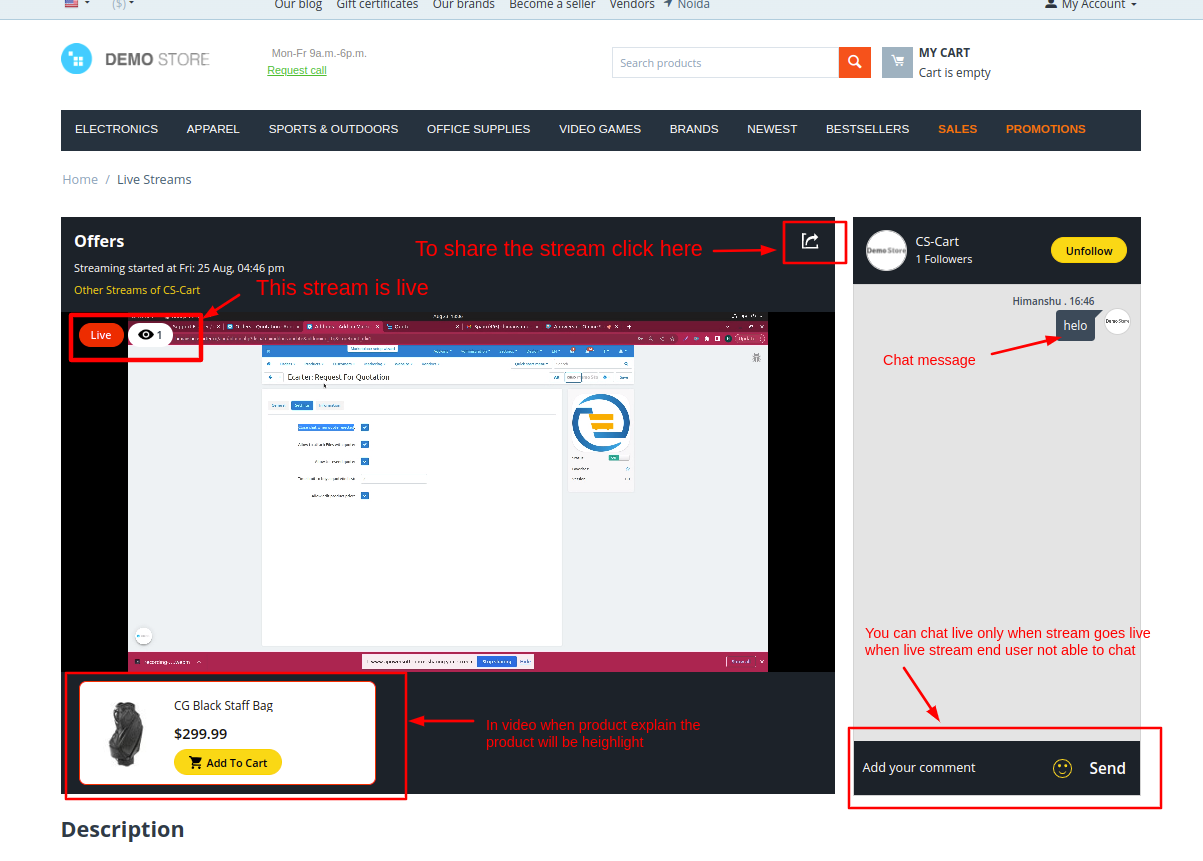
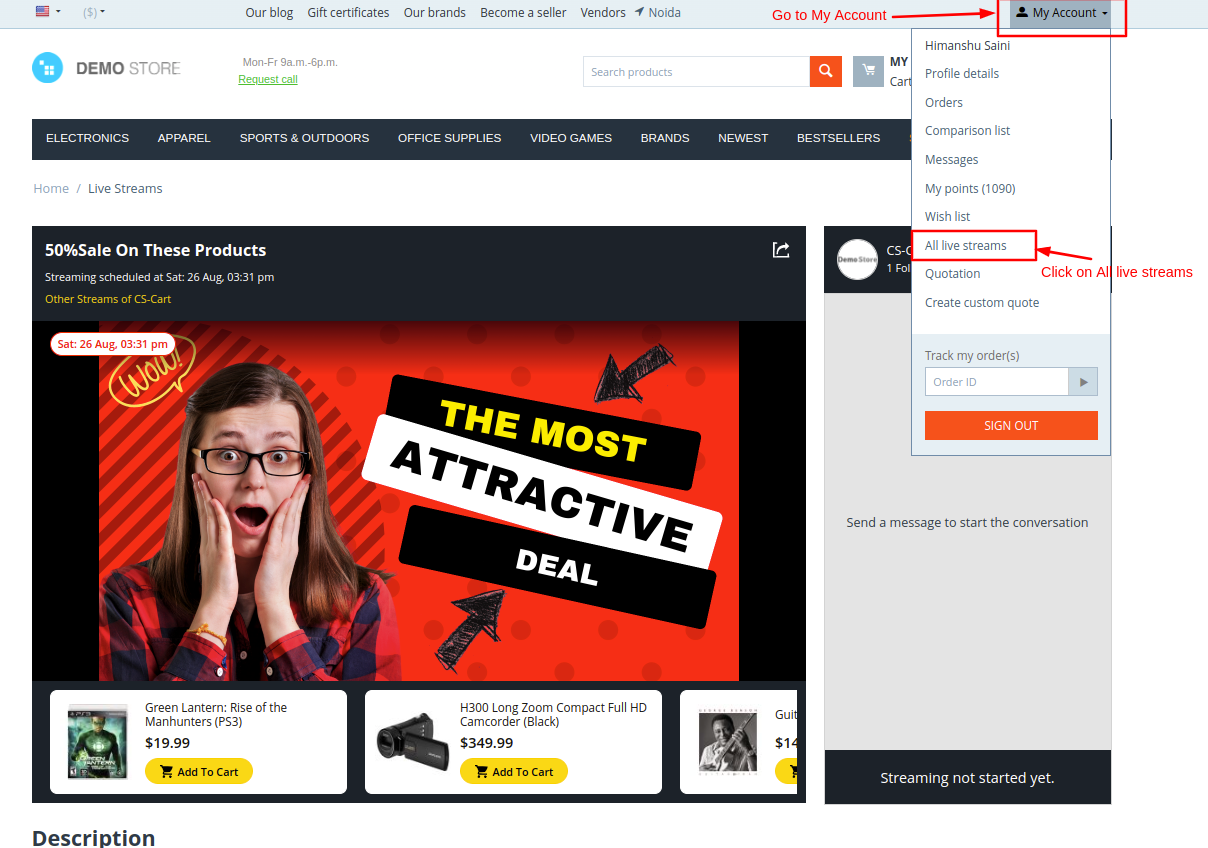
- To check all live streams go to >> My account and click on >> All live streams.
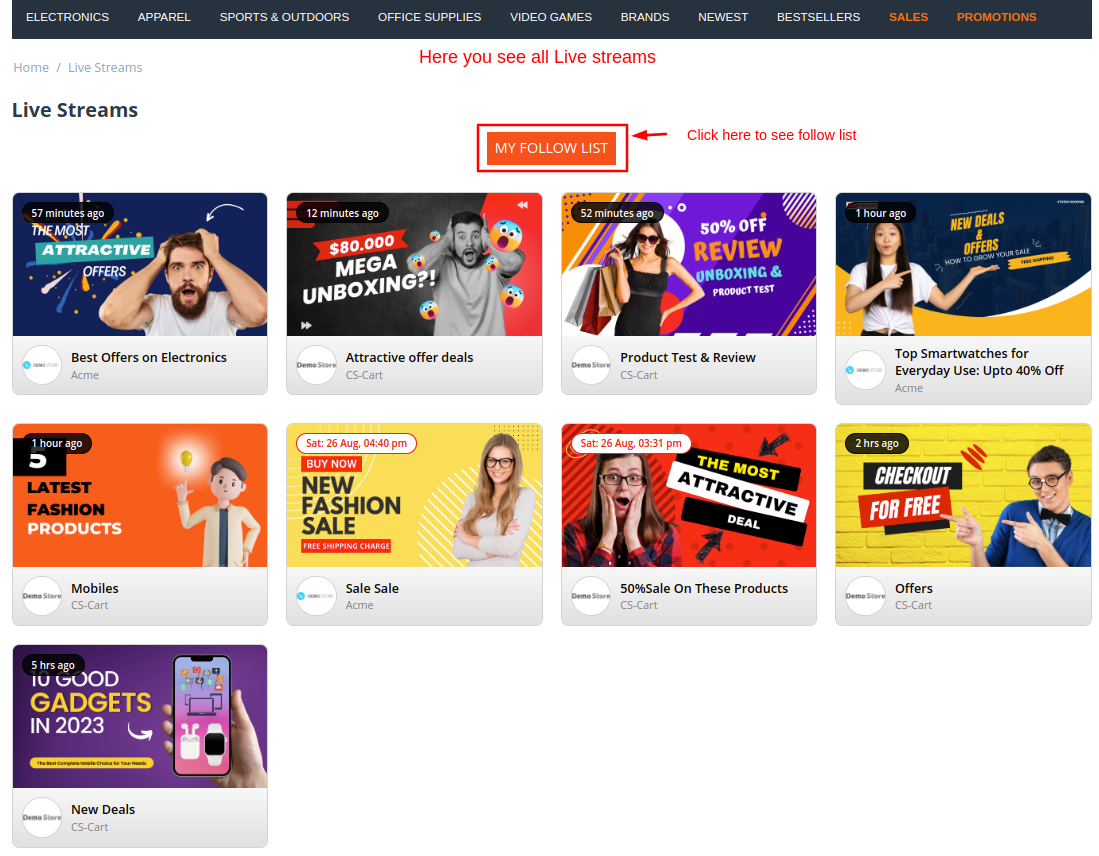
- The live stream page will be open to see your following list click on >> My Follow list.
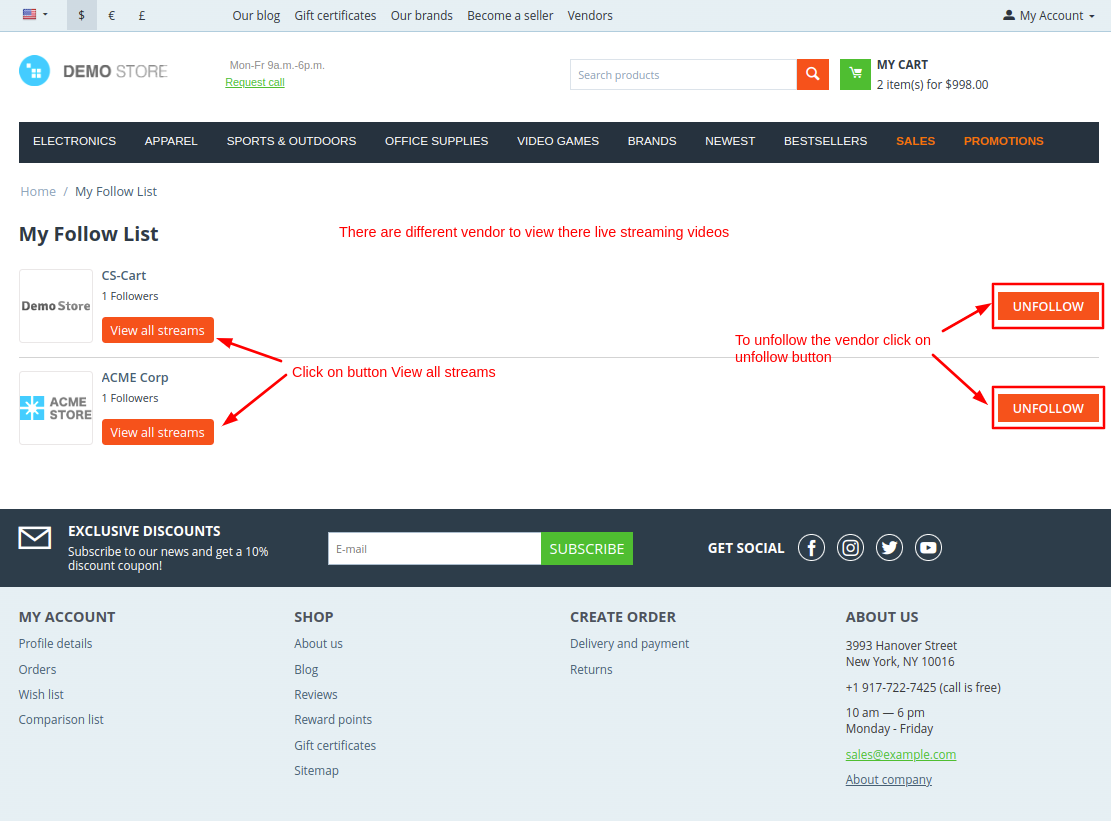
- Here you see all vendors you follow to see their live stream videos Click on >> VIew all stream button and click on the unfollow button to unfollow the vendor.
Addon-Version:
Version-1.0
Supported Versions:
CS-Cart, CS-Cart Multivendor 4.8.x, 4.9.x,4.10x,4.11x,4.12,4.13x, 4.14x, 4.15x, 4.16x, 4.17x, 4.18x
Support:
This app is developed and published by Ecarter Technologies Pvt. Ltd., a CS-Cart developer. You are guaranteed quality add-ons.


