

Support Ticketing System

The Support Ticketing Addon for CS-cartmakes it easy for customers, vendors, and the admin to stay connected and resolve issues quickly. Customers can raise tickets from the storefront, track replies, and communicate directly with the admin or vendor. Vendors manage customer queries from their panel, create tickets for themselves or on behalf of customers, and assign agents to handle conversations. The Admin oversees the entire workflow, from creating tickets to assigning agents, updating statuses, and managing internal notes to keep communication organized.
To keep everything organized, the addon uses ticket types created by both the admin and vendor. Admin manages common ticket types, while vendors create their own for customer queries. Both admin and vendors assign tickets to agents based on their needs. Once assigned, agents reply to messages, update ticket details, and handle the conversation smoothly.
Each ticket moves through clear statuses such as Open, Pending, or Completed, and updates instantly. The Admin, vendors, agents, and customers exchange messages, add attachments, and include others using CC emails. Email alerts notify users about new replies and updates. Internal notes support private team discussions, and priority settings help focus on urgent issues. All support requests stay organized and easy to manage across the store.
Feature
- Easy Ticket Creation: Customers, vendors, and admins can create support tickets directly from their panels using a simple form.
- Select Support Admin Usergroup: When a ticket is created for the admin, selecting an administrator user group to manage support tickets is required. Only administrator-type user groups appear in the list.
- Ticket Creation For Vendor: Enabling two settings allows customers to create tickets and reach vendors using the “Raise Ticket Query” button on product or vendor pages.
- Separate Tickets by Type: Both Admin and vendor can set up separate ticket types in their panels. Ticket types like Order Problems or Refund Requests keep tickets organized and easy to handle.
- Assign Tickets to Agents: The admin and vendor have different ways to assign tickets to agents, which helps manage conversations faster and more clearly.
- Status selection: Ticket statuses, such as Open, Pending, or Completed, update automatically and can also be changed easily by admin, vendor, and agent.
- Internal Notes for Team Chat: The admin, vendor, and agent can add private messages in tickets that are hidden from customers.
- Change Priority: The admin, vendor, and agent can change the priority of tickets according to the queries.
- Add Attachments to Tickets: Admin/ vendor/ Assigned agents/Customers can add attachments to ticket replies.
- Trash and Restore Options: Tickets can be deleted by the admin, vendor, or agent, but they go to the trash first. Only the admin can permanently delete tickets from the trash or restore them.
- Add Collaborators via CC Email: Admin, agents, and customers can add CC emails to include others in the support chat.
- Simple Vendor Support: Vendors can also raise tickets, reply, and chat with the admin or assigned agents from their panel.
- Email Notifications: In some cases, like new messages, ticket replies, and updates, customers, admin, and agents get instant email notifications.
How the Addon Works
✅ After installation, the add-on can be accessed directly from the “Items for menu” option in the General tab.

Now switch to the Settings tab, and see four main settings explained below:
- Support admin usergroup:
Use the down arrow to select a user group responsible for managing support tickets. Only administrator user groups are listed.
- Support admin Email-Id:
In the field, enter the support admin email ID that will be used to receive and send ticket-related emails to customers.
- Allow customers to create tickets for vendors:
Enable this option so vendor panel users can create customer tickets, manage ticket types, and let customers raise queries directly from the storefront.
- Number of threads to display from top and bottom:
Specify how many ticket threads or messages should appear per page in the ticket conversation view. The entered number of messages will appear at the top and bottom of the page.

Support Tickets Overview
Next, let’s take a closer look at what the Support Tickets menu provides and how tickets can be created, handled, and seen.
- In the website menu, you’ll find Support Tickets, vendor-customer tickets, and Ticket Types options.
- Click Support Tickets to see all general tickets created by customers or vendors. In this menu, admin can create tickets for customers, edit details, read replies, and assign an agent.
- To create a new ticket, simply click the (+) button in the corner.
Go to Website ➡️ Click Support Tickets in the menu ➡️ The Manage Support Tickets page opens with already created ticket and their details

Admin Ticket Types Creation
The Ticket Types option opens the Manage Ticket Types page. These Ticket types organize customer and vendor questions by topics like Order Shipping and Tracking, Returns and Refunds, and more. This helps to sort, manage, and reply to each question asked through the ticket easily.
The admin creates the ticket type, and customers or vendors use it to contact the admin or agent. They only need to select their ticket type when raising a ticket.
The admin and assigned agents can see the default ticket types and add new ones by clicking the (+) icon.
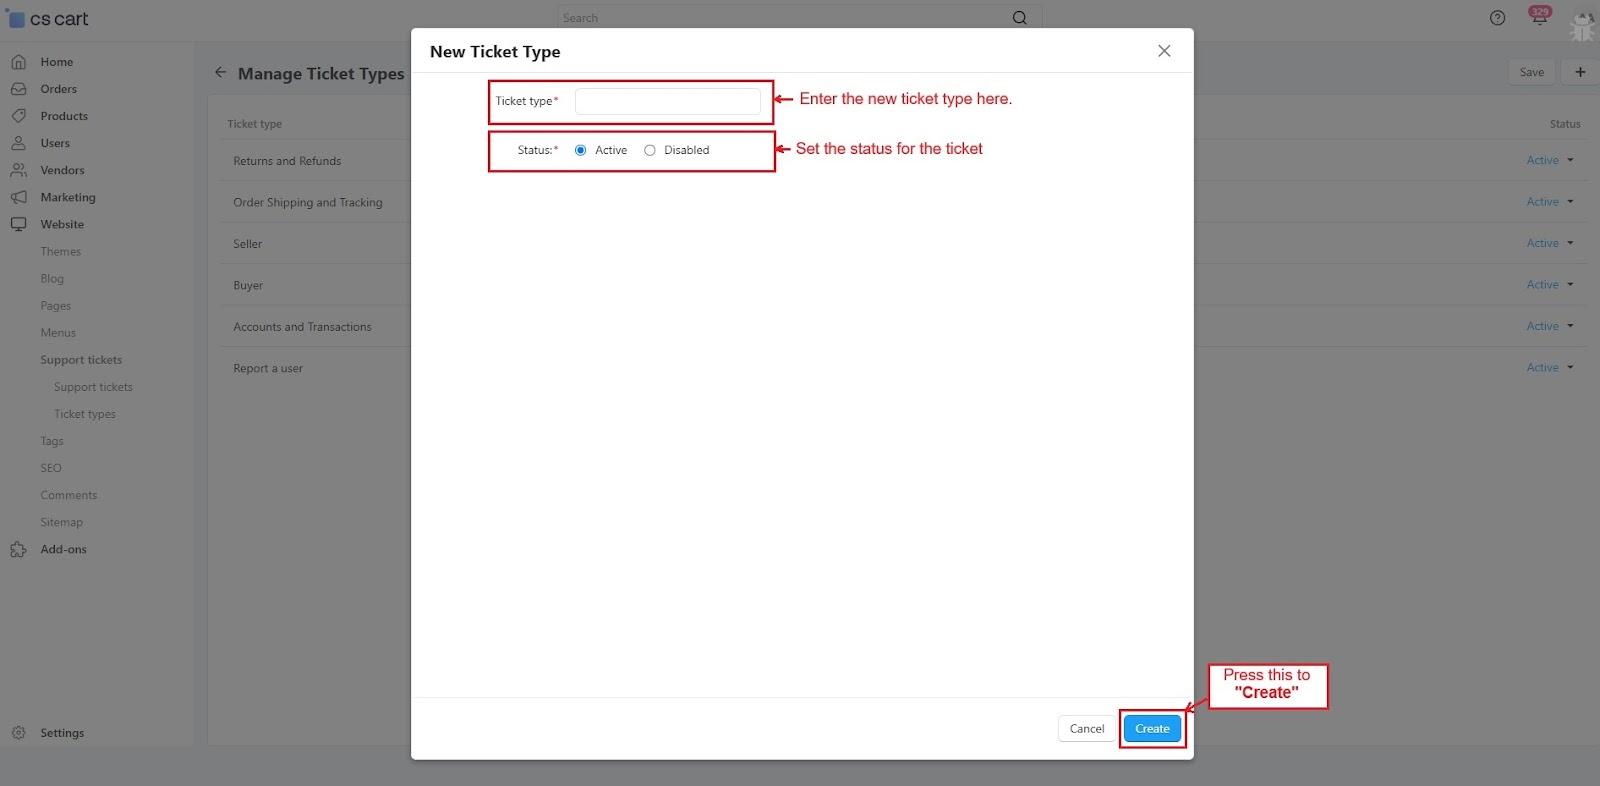
Go to the website ➡️ Support Tickets menu ➡️ Click Ticket Types ➡️ View default and created ticket types ➡️ Click (+) to add a new type.

- On the New Ticket Type page, enter the ticket type and choose its status.
- Then, press the Create button.
Admin Ticket Creation Process
The admin can create new tickets on behalf of customers or vendors. To do this, click the (+ Create Support Ticket) button on the Manage Support Tickets page.
Create New Ticket Process
In Create Support Ticket pop-up,
➡️ Click the (+) button to choose a user for the ticket, select one from the list, and press Choose.


➡️ Next, pick a ticket type from the dropdown.
➡️ Enter the ticket subject.
➡️ Write the message in the main field.
➡️ And attach a file if needed.
At the end, click on “Create Support Ticket”.

Support Tickets Dashboard and Controls
- You can find both recent and past tickets on this page.
- Ticket Statuses: Open, Pending, Answered, and others are the different ticket statuses. Tickets move to these status tabs during conversations, either automatically or when updated by the admin or agents. Also, the admin and agent can delete any ticket and recover it from the trash at any time.
- Use Ticket-ID or Replies to open the chats.
- The admin panel allows the admin to assign an agent using the Select Agent option.

Create a user group for managing support tickets
The admin must create a user group to manage support tickets created for them. Here's how:
- In the Users menu, select User group and click on New user group in the corner, enter the name of the User Group, and set the type to Administrator.
- Change the status to Active.
- Under Privileges, give full access to the required permissions.
Make sure to give full access to these two privileges:
- Ticketing System
- Ticketing Type
These are required for the ticket support system to function properly when tickets are created for the admin.
Once everything is set, click the Create button to save the user group.
Go to Users ➡️ User Groups ➡️ The page shows existing user groups ➡️ Click New User Group ➡️ Fill in the details in the pop-up window ➡️ Click Create


- In the addon’s settings, select the Support Admin Usergroup from the listed administrator-type usergroups that will be responsible for managing admin support tickets.

Set First Name as Required
Enable the first name checkboxes to require users to enter their first name. This ensures no admin, customer, or vendor registers without a name.
Go to Settings ➡️ Profile Fields ➡️ In Contact Information, enable the checkboxes for First Name (Show and Required).
Sub-admin Management for Agent Role
The administrators' menu shows all created sub-administrator accounts that will function as agents once their “Support admin user group” is activated.

Now, access any administrator account or create a new one.
Then, switch to >> User Group Tab within that account.
- Here, the admin must change the Support Admin Usergroup’s status from “Available” to “Active” so the sub-admin is set to work as an agent.
Note: Similarly, the admin can change the other sub-admins' “Support admin usergroup” status from available to active and set them to work as agents.
- Using the gear button, log in with this created sub-admin account, which is now an agent.

- This agent panel opens with no support tickets currently assigned to the agent.

Note: If the “Support Admin Usergroup” is not active in the sub-admin's profile, they will work as a regular admin. Once the admin activates it, the sub-admin will start working as a support agent.

How Customers Create Tickets from the Storefront
- After the customer’s successful registration, My Account shows a Support Tickets option. Customers can use it to contact the admin directly.
- Click it to open the support tickets page, where all tickets created by this customer will be listed with details like Ticket ID, subject, creation time, and more.
- To raise a new issue, click the “Create Support Ticket” button.


- Now, select a ticket type, enter a subject and message, and attach a file if needed. Then, press the Create Support Ticket button.

- The ticket page opens with the customer’s message and a text box to type their next message. They can reply to messages received from the agent or admin.
- The customer can also view ticket details like the number of replies, assigned agent, status, ticket type, and collaborators. These update automatically when the admin/agent makes changes.

Admin panel with all the tickets
The support tickets menu in the admin panel shows all tickets created by customers, vendors, or the admin. The admin replies to tickets and assigns an agent to handle them.
The page below lists all tickets. The newly created ticket is assigned to “Max Led” as the managing agent.

Admin Managing Messages
- After receiving customer’s message, the admin assigned an agent and replied to the customer. The admin also changed the ticket priority and used the Internal note feature for a private chat with the agent. Internal notes are only for internal discussions and are not visible to the customer.
- The left sidebar helps to manage tickets. It shows customer info like replies, number of pinned chats, and creation date. The admin can assign agents, set priority, update status, and choose a ticket type. Other email addresses (CCs) can be added for better support coordination.
- Pressing the “#” number copies the chat link, and opening it scrolls the chat up immediately. Also, the pin icon with it helps to mark a chat and opens only the chat once “Pin chats” number is pressed in the side box.
- Yellow-highlighted messages appear when the admin assigns, changes, or removes an agent; when internal notes are used for private chats by the admin or agent; or when the ticket’s priority, status, or type is updated.
In the Admin, Agent, and Customer panels, the Support Ticket chats page allows the following actions.
➣ Only in Admin Panel: The admin can reassign the ticket to another agent.
➣ Admin and Agent Panels: Both admin and agent can change the ticket’s priority, status, and type in their chats page.
➣ Admin, Agent, and Customer Panels: All three can add CC emails to include others in the conversation for better support.
- Load More: Based on the addon settings, the specified number of messages appear at the top and bottom of the “Load More” button. Use this button to view more messages.

Assigned Ticket in Agent Panel
The ticket is visible in the assigned agent’s panel. They can click on the Ticket ID or Replies to view the messages.

- In the storefront, you can see the customer’s ticket priority is set to High, and the chat flow between the customer, admin, and agent.

- In the storefront, open Support Tickets in My Account. Here you can see this customer’s created ticket with its details.

How Vendor Create Support Tickets
The “Support Tickets” option in the vendor panel allows a vendor to communicate directly with the admin and assigned agents regarding any issues or queries. To use it, log in as a vendor, go to the Message Center, and click Support Tickets, where the vendor can view all existing tickets created by this vendor. Click the (+) button to create a new ticket, then follow the same ticket submission steps used by the admin and customers.

- The ticket is created, but no agent is assigned to it yet. Now the admin can assign the agent to this ticket and allow the vendor to communicate with both the admin and agent.

Email Notifications Overview
Customers receive email notifications in these cases:
- When a ticket is created
- When an agent is assigned to their ticket
- When the agent replies to their ticket

Admins and Agents receive emails in these cases:
- When a customer creates a ticket (admin gets notified)
- When an agent is assigned to a ticket (agent gets notified)
- When a customer replies to the ticket (agent gets notified)

Customer received mail when agent replied to the ticket.

The agent received this email notification when the agent assigned to the ticket.

How Customers Create Tickets and Raise Queries for Vendors
Once the "Allow customers to create tickets for vendors" option is enabled in the addon settings mentioned above, customers get a chance to contact vendors using the "Raise Ticket Query" buttons present on their product pages. Also, vendors will see two new menus in their panel: "Customer Tickets" and "Ticket Types".
However, for customers to contact a specific vendor and to see all menus in the vendor panel, the admin must also tick the “Enable Ticket for Vendor” checkbox in that vendor’s plan. Once both settings are active, all features and options will be available for that vendor.
Go to the Addon Settings tab ➡️ enable “Allow customers to create tickets for vendors” ➡️Then, open the Vendors menu and select Vendor Plans ➡️ open the plan and tick “Enable tickets for vendor”.

- Below is how the “Raise Query” button is shown on the vendor products list page and the single product page when the settings are enabled in the vendor’s plan and the addon settings.
Open the storefront ➡️ click Vendors ➡️ select any vendor to view its product list ➡️ the Raise Ticket Query option appears ➡️ Also, open any single product to see the Raise Query option on the product page.


- With the same settings enabled, two menus appear in the vendor panel. Customer Tickets shows all tickets raised by customers for that vendor and allows the vendor to create tickets on their behalf. Ticket Types allows vendors to create and organize their own ticket type for easy management.

Vendor Ticket Type Creation in Vendor Panel
Open the Ticket Type menu to view all ticket types created by this vendor. Click the (+) icon to add a new one. The New Ticket Type pop-up window provides a field to enter the ticket type, shows the owner’s name, and allows setting its status. Then, press the Create button.
Now, when a customer creates a ticket for this vendor, only the ticket types created by this vendor will be available for selection.

Customer Ticket Creation for Vendor
Let’s see the process of how a customer can create a ticket for a vendor from the storefront, vendor panel, and admin panel. First, start with the Raise Ticket Query option on the storefront.
- Log in to the storefront using any customer ID and open a product or vendor products list that has the “Raise Ticket Query” button. Tap the button to create a ticket for any issues related to the specific vendor’s products.

- In the “Create Support Ticket” Pop-up window, the customer can edit the user name, select a vendor ticket type from the dropdown, enter the subject and message, and attach a file if needed.

- This page shows the ticket message on the storefront. Customers may add new messages or wait for the vendor/admin reply.

- The Customer Tickets menu opens the Manage Customer Tickets page in the vendor panel, which shows all tickets raised by customers for this vendor. Here, each ticket can be managed by updating its priority, status, and other settings. The “Select Agent” option allows the vendor to assign a specific agent to handle the ticket.
- Tickets can be deleted by the admin, vendor, or agent, but they go to the trash first. Only the admin can permanently delete tickets from the trash or restore them.

- Pressing the (+) icon above, opens a pop-up where the vendor chooses a registered customer as a user and fills in the details, just like on the storefront.

Vendor-Customer Support Tickets (Admin Panel)
This Manage Vendor-Customer ticket page shows all tickets raised by customers from the product page or the vendor’s product page, as well as tickets created by the vendor/admin for specific vendors. Similar to the vendor, the admin can create a new ticket on behalf of a customer using the plus (+) icon, and they can also reply, update the ticket status, assign a vendor agent, and perform other actions.
Vendor ticket type creation by admin
The same page shows a section that allows the admin to create vendor-specific ticket types for different vendors.
Let’s see how to create:
- In the Vendor ticket Type section, select a Vendor using the dropdown arrow, and then click the “Search” button.

- This page shows the list of ticket types of the selected vendor.
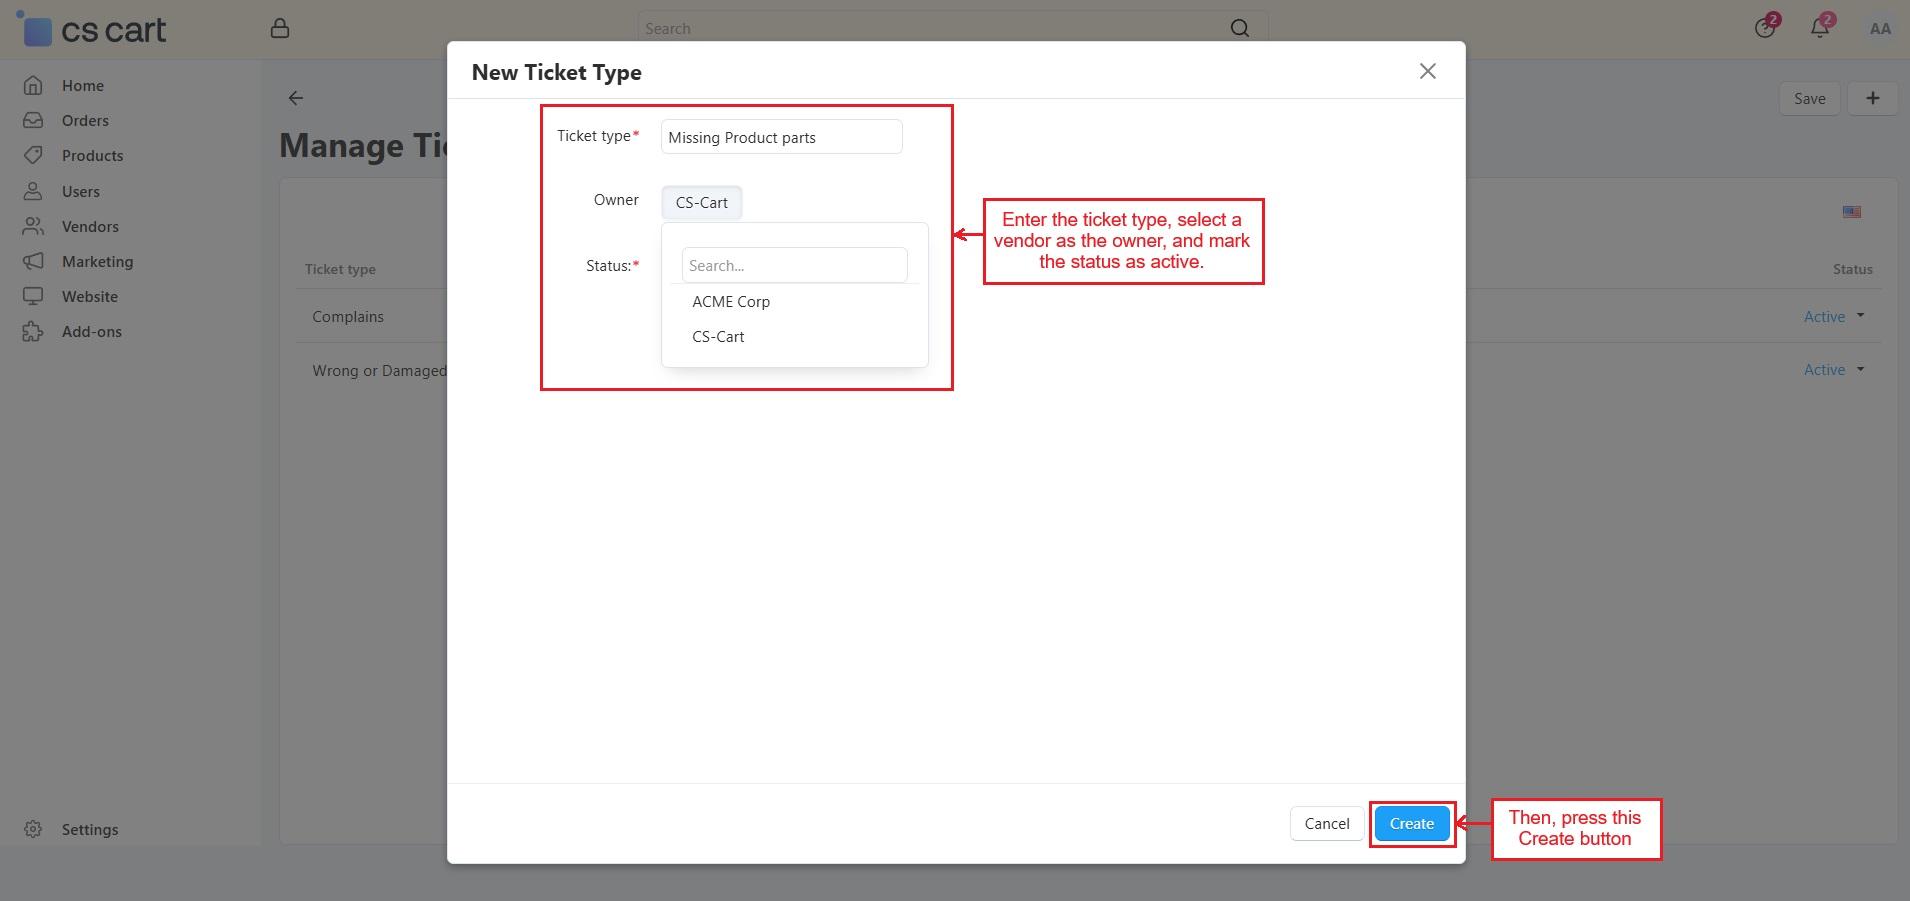
- Click on (+) icon to add new ticket type.

- Enter the ticket type, select a vendor as the owner, and mark the status as active. Then, press the Create button.
- Now, this ticket type will appear on the selected vendor’s Manage Ticket Type page.
Vendor Agent Creation Process
Once a ticket is created for a vendor, the vendor/admin can assign a vendor agent to the customer. The assigned agent then handles all further communication. Each vendor can create and manage their own agents from their panels. Let’s see how agents can be created and assigned to customers.
- In the vendor panel, click the vendor profile and open Seller Info.
- Then, tab on “view vendor admins”.


- These are created vendor sub-administrator accounts. They act as agents when selected in the “Select Vendor Agents” field and then assigned by the vendor/admin using the agent selection option.
- The vendor can add more accounts using "Add User".

- Go back to “Seller info” page and switch to the Add-ons tab.
- Now, select the vendor sub-administrators in the field of “Select vendor agent” to assign them as vendor agents later.

Note: If a vendor logs in using a vendor sub-admin account and that is not selected as a vendor agent, the account works as a regular vendor sub-admin. All customer-created tickets are visible on this page.
If the vendor sub-admin is selected as a vendor agent, only the tickets assigned to that agent appear in the sub-admin panel.
- This vendor sub-admin account is set as a vendor agent, and the panel functions only as an agent panel. Once the vendor/admin assigns this agent for a ticket, the ticket will appear on this page.

- Now, the vendor is choosing agent for the ticket.

- Below is the agent panel. The highlighted message shows the vendor has assigned this agent to the ticket. The agent can now handle further communication with the customer. Although both vendor and admin can access the complete chat. The agent can also update the ticket’s priority, status, type, and add collaborators as needed.

✅Final thought
The Support Ticketing for CS-Cart Addon keeps all support communication in one place. It connects customers, vendors, agents, and the admin through well-organized tickets. With ticket types, agent assignment, and real-time updates, every query stays easy to track. This addon helps stores handle support queries faster and more efficiently.
Addon-Version:
Version-1.0
Supported Versions:
CS-Cart, CS-Cart Multivendor 4.8.x, 4.9.x,4.10x,4.11x,4.12,4.13x, 4.14x, 4.15x, 4.16x, 4.17x, 4.18x
Support:
This app is developed and published by Ecarter Technologies Pvt. Ltd., a CS-Cart developer. You are guaranteed a quality add-on supported by future versions. If you need help, please contact us via email support@ecarter.co
Need modifications or any assistance? Please, feel free to contact us via email support@ecarter.co


Ecarter Support
Typically replies within a minute

© 2020 - 2026 Ecarter Technologies Pvt Ltd.