
WhatsApp Chat Support
WhatsApp Chat Support Add-on for CS-Cart allows customers to connect with support teams quickly through WhatsApp.
The WhatsApp Chat Support add-on for CS-Cart lets customers reach a store's support team directly through WhatsApp. It places a WhatsApp icon on the storefront that either redirects shoppers to WhatsApp Web or opens a chat box with preset text, image, and colours. Because it supports separate settings for the main store and for individual vendors, each seller on a marketplace can manage its own WhatsApp support number and appearance. It is aimed at CS-Cart store owners and Multi-Vendor sellers who want faster query resolution and a familiar messaging channel for customer support.

WhatsApp Chat Support Add-on for CS-Cart allows customers to connect with support teams quickly through WhatsApp. A WhatsApp icon appears on the storefront, making it easy to start a chat. The add-on supports separate settings for the main store and individual vendors, so each seller can manage their own WhatsApp support.
The add-on includes both admin and vendor-level controls. Admin manages global settings, layout placement, redirection options, and vendor plan permissions. Vendors can update their own support number, contact image, chat text, colors, and display options from the vendor panel.
Customers either get redirected directly to WhatsApp Web or see a chat box with preset text, image, and color settings. This setup ensures quick communication, faster query resolution, and a smooth support experience through a trusted messaging platform.
Features
- Direct WhatsApp Integration: Addon connects customers with support teams through WhatsApp instantly from the storefront.
- Redirect customer to Whatsapp Web Chat: Enable this to redirect customers directly to WhatsApp Web when they click the support icon.
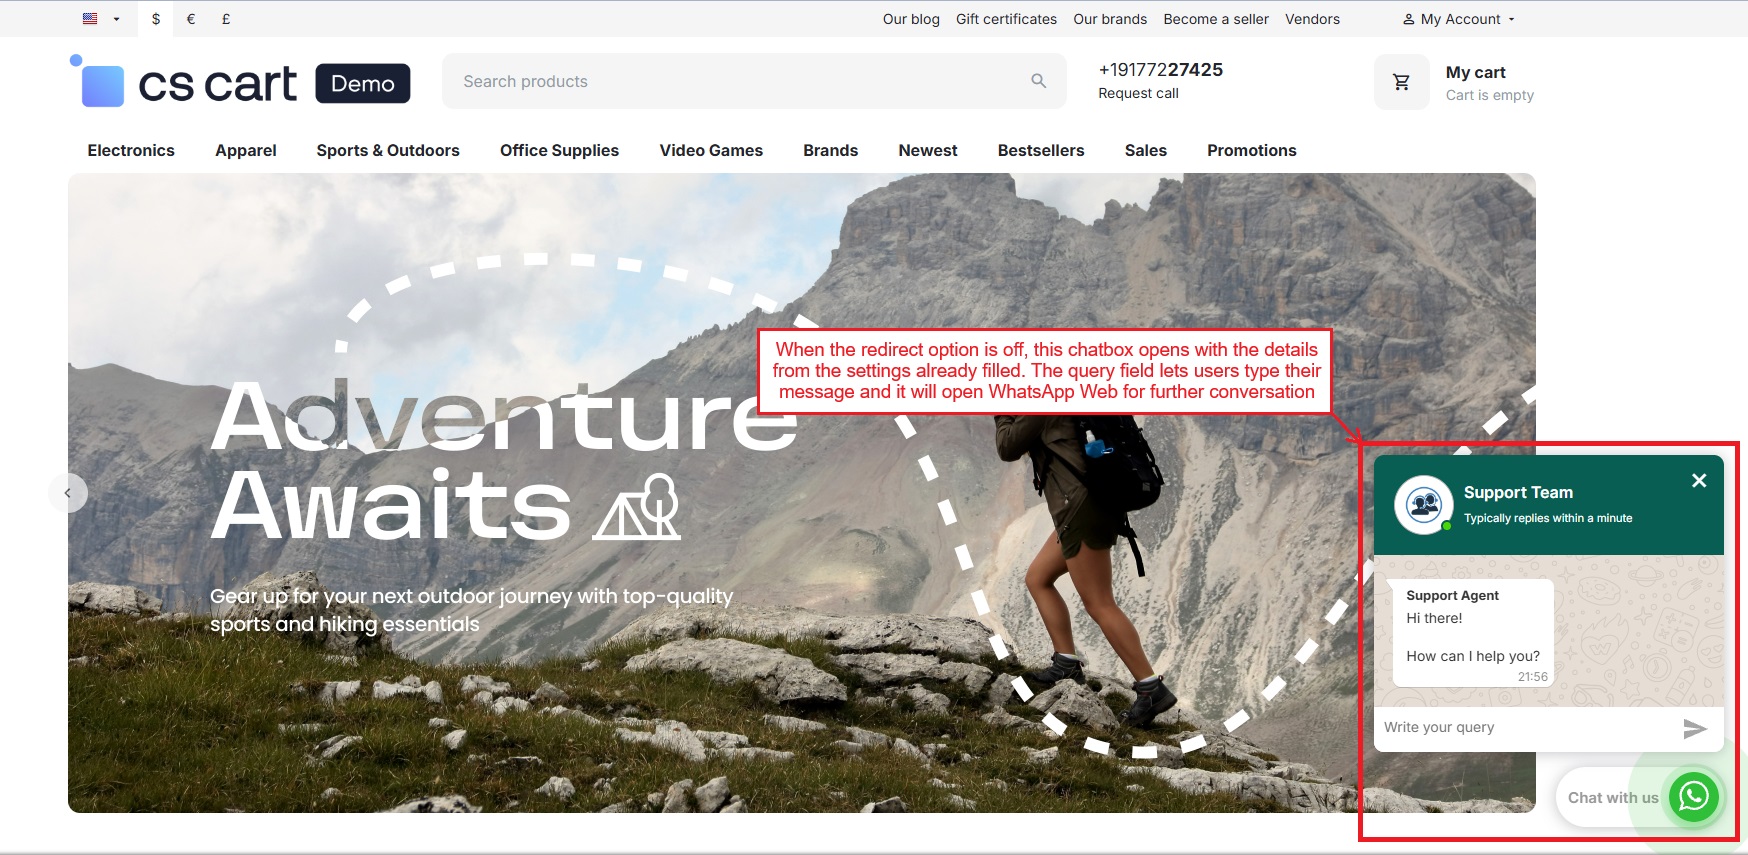
- Built-in Chatbox option: When the redirect option is disabled, it opens a WhatsApp chat box with the text, colors, and support image set in the Settings tab.
- Admin-Level WhatsApp Settings: Provides global settings for the store to manage WhatsApp support.
- Layout-Based Placement: The Admin manages WhatsApp Support directly from the Layout section and controls where it appears on the storefront.
- Vendor-Level WhatsApp Support: Enables vendors to manage their own WhatsApp support settings.
- Vendor Plan Control: Admin enables or disables WhatsApp support for vendors through vendor plans.
- Vendor-Specific Contact Details: Vendors can add their own support number with country code.
- Custom Contact Image: Admin/Vendor can upload or select a contact image from local storage, server, or URL.
- Editable Chat Content: Admin/Vendor can manage header text, subheader text, agent name, message text, and button text.
- Show or Hide Profile Picture: Option to show the agent’s profile image in the chat window.
- Show Current Time: Displays the current time inside the chatbox.
- Open Chat by Default: Automatically opens the chatbox when the page loads.
- Show Close Button: Adds a close button to hide the chat window.
- Position: Place the support icon on the left or right side of the screen.
- Header Background Color Setting: Choose the background color of the chat header.
- Header Text Color Setting: Set the color of the header text.
- Subheader Text Color Setting: Define the color for the subheader text.
- Agent Name Color Setting: Change the color of the agent name text.
- Message Text Color Setting: Customize the color of chat messages.
- Button Text Color Setting: Select the color of the chat button text.
- Footer Background Color Setting: Set the background color of the chat footer area.
- Layout Management for Multiple Storefronts: Add and manage the WhatsApp block separately for multiple storefronts.
Installation:
How to install Addon
https://store.ecarter.co/blogs/how-to-install-addon/
How Addon Works
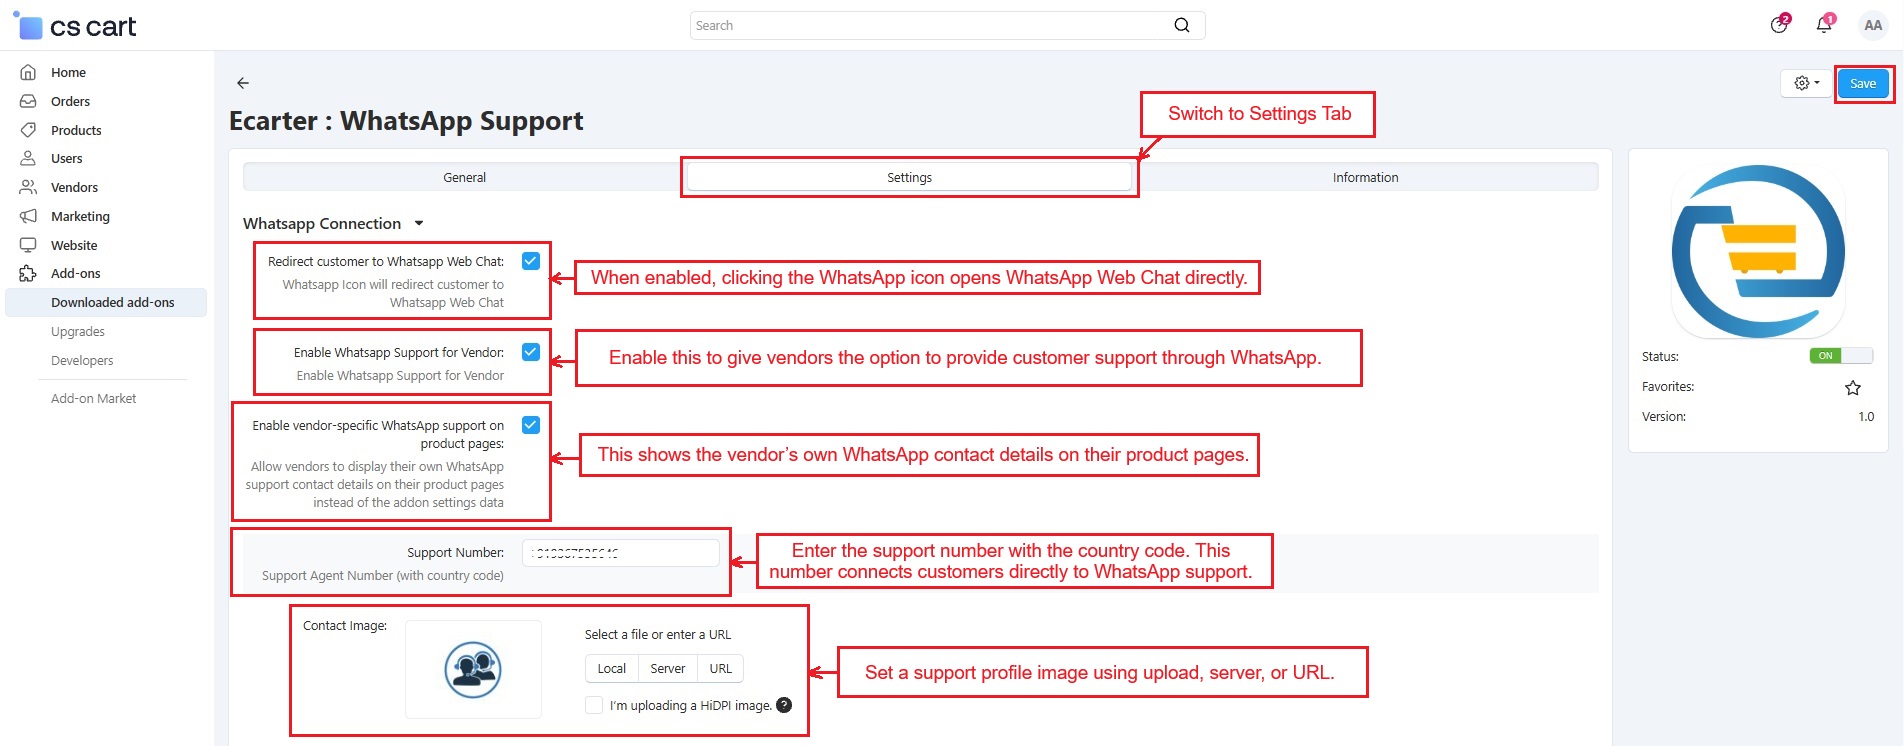
Access the add-on and move to the Settings tab to manage all available controls.
- Redirect customer to WhatsApp Web Chat: When checked, customers will be taken directly to WhatsApp Web Chat when they click the WhatsApp icon.
- Enable WhatsApp Support for Vendor: When enabled, vendors can provide WhatsApp support to their customers.
- Enable vendor-specific WhatsApp support on product pages: When turned on, vendors can show their own WhatsApp contact details on their product pages.
- Support Number: Enter the phone number used for support, including country code.
- Contact Image: Upload or select an image to show as the support contact picture, with options for local upload, server selection, or URL link.
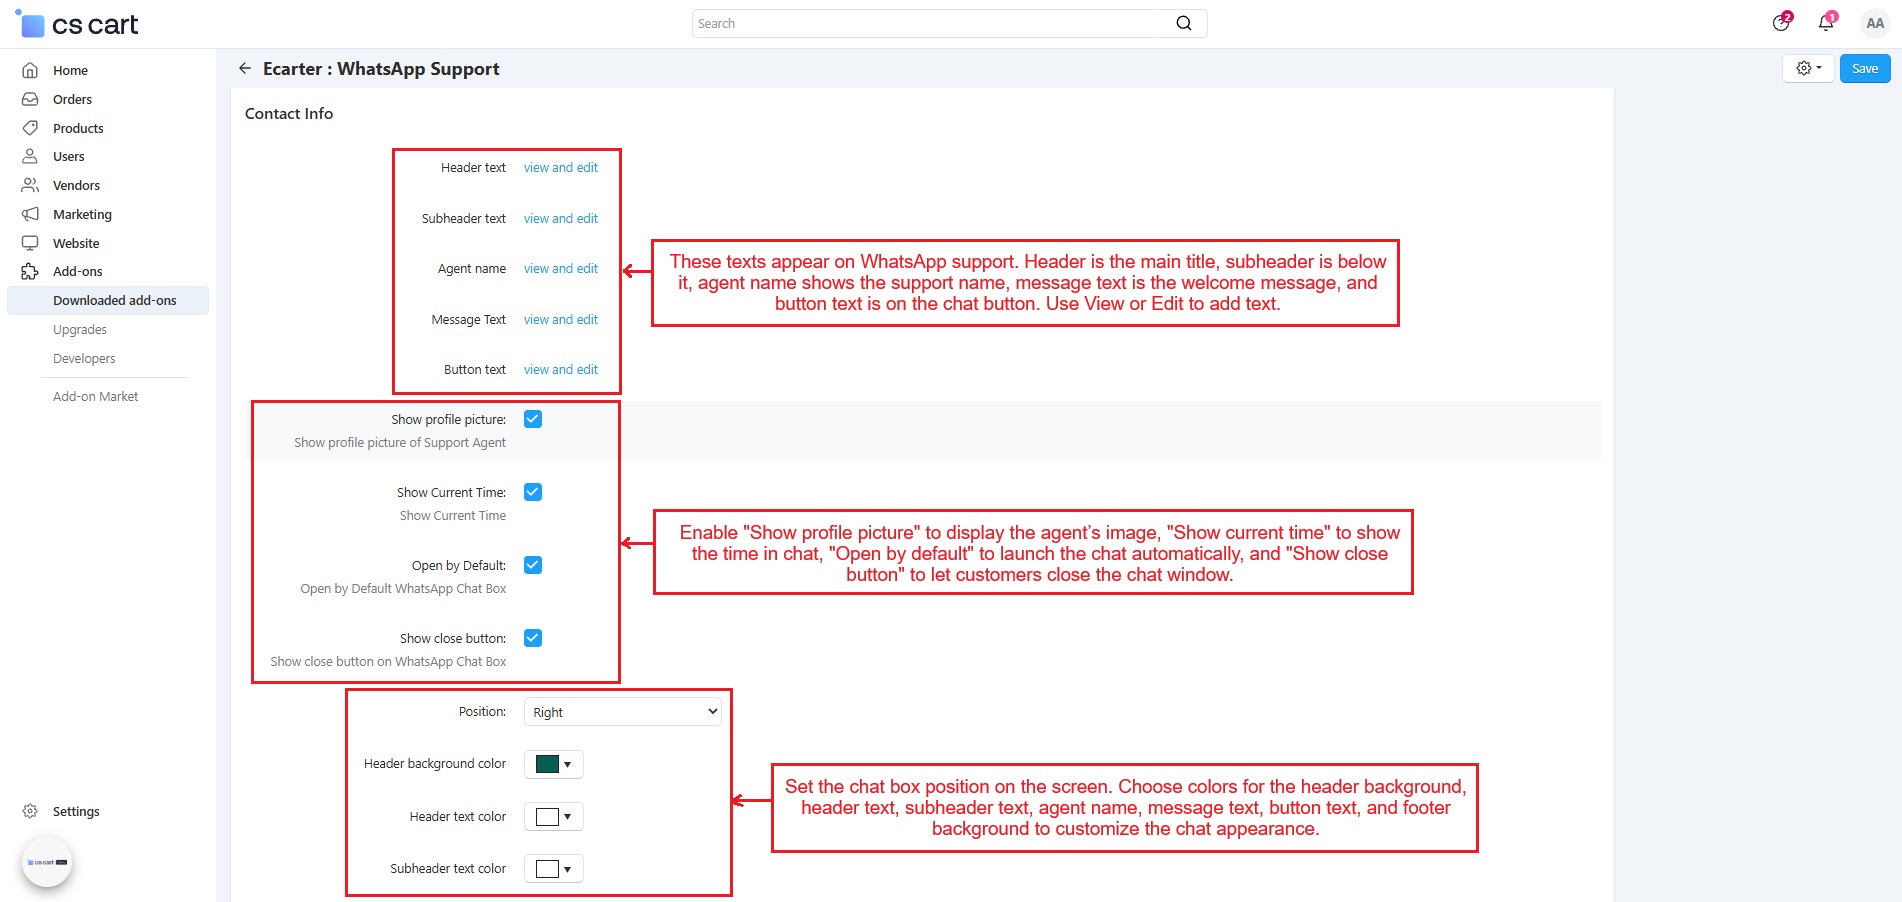
The Contact Info section shows View and Edit options, checkboxes, and theme settings for WhatsApp colors and text.
Use View or Edit to add and manage WhatsApp support text.
- Header text: The main message or title shown at the top of the chat window.
- Subheader text: A smaller message or subtitle below the header.
- Agent name: The name of the support agent that appears in the chat.
- Message Text: The message shown to customers when they start chatting.
- Button text: The text on the chat button that customers click to start chatting.
- Show profile picture: When checked, the support agent’s picture will be visible in the chat window.
- Show current time: When checked, the current time will be shown in the chat box.
- Open by default: When checked, the WhatsApp chat will automatically open when customers visit the page.
- Show close button: When checked, a button will appear to close the chat window.
- Position: Choose where the chat box appears on the screen (right or left side).
- Header background color: Pick a color for the top part of the chat box.
- Header text color: Pick a color for the text in the header.
- Subheader text color: Pick a color for the text in the subheader.
- Agent Name color: Set the color of the text for the agent's name.
- Message Text color: Choose the color of the chat messages.
- Button Text color: Select the color of the text on the chat button.
- Footer background color: Pick the background color of the chat footer area.

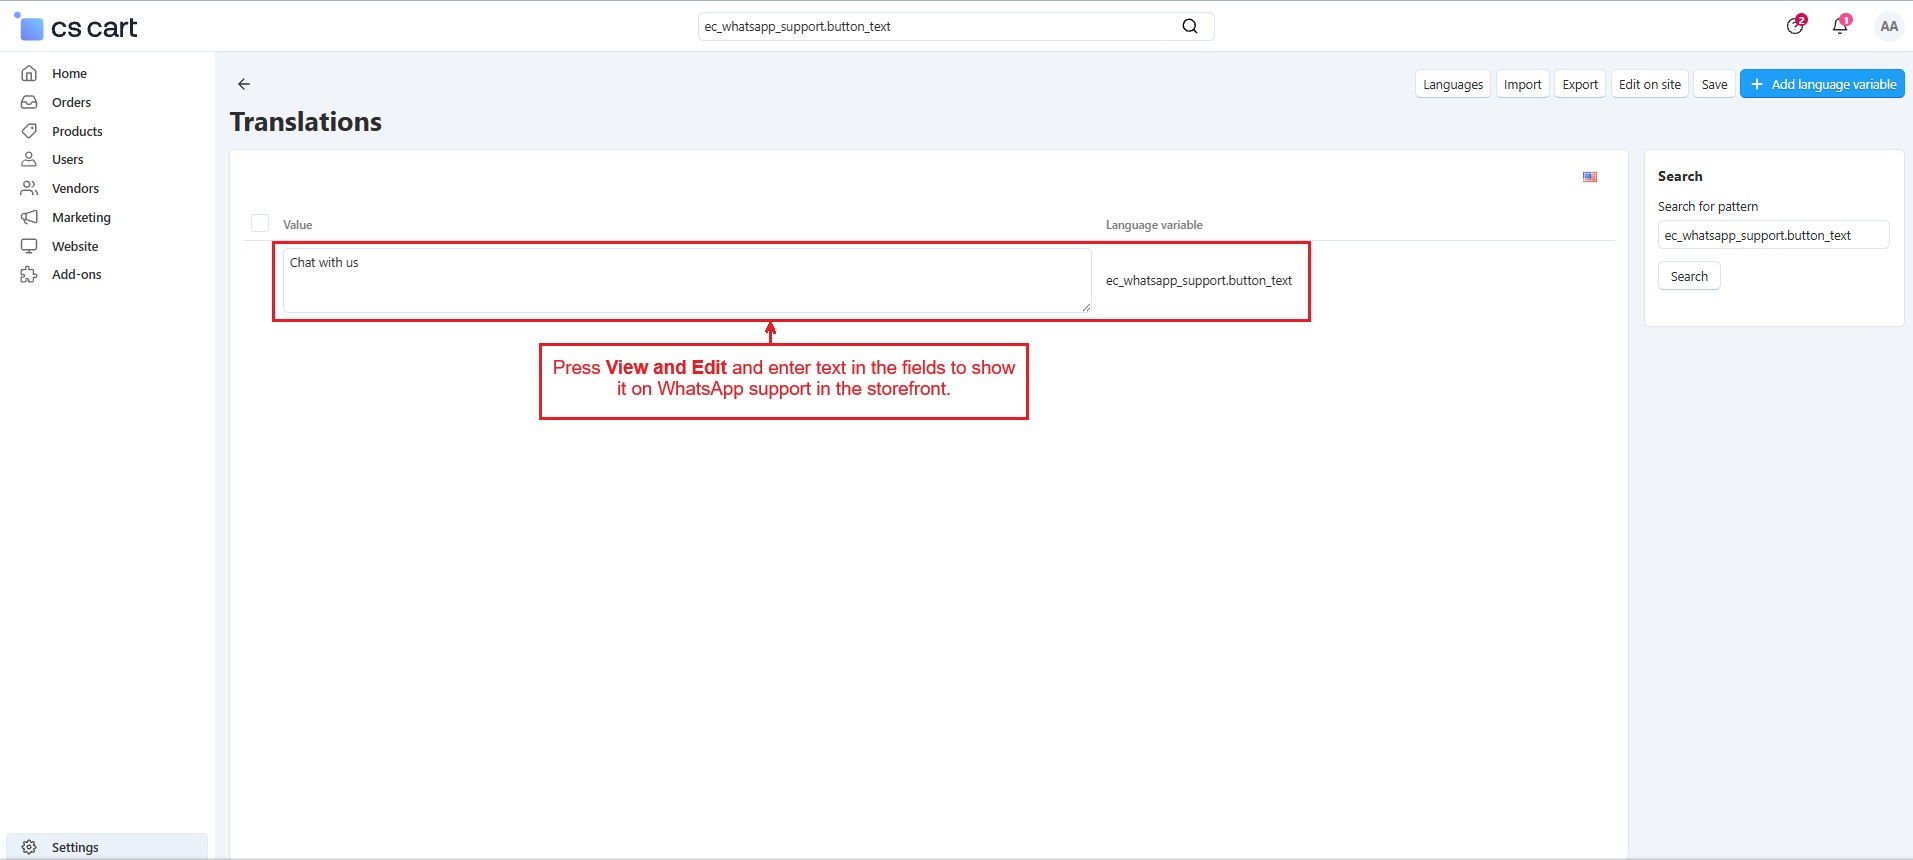
- Press View and Edit, and enter text in the field to show it on WhatsApp support in the storefront. Then, press Save.
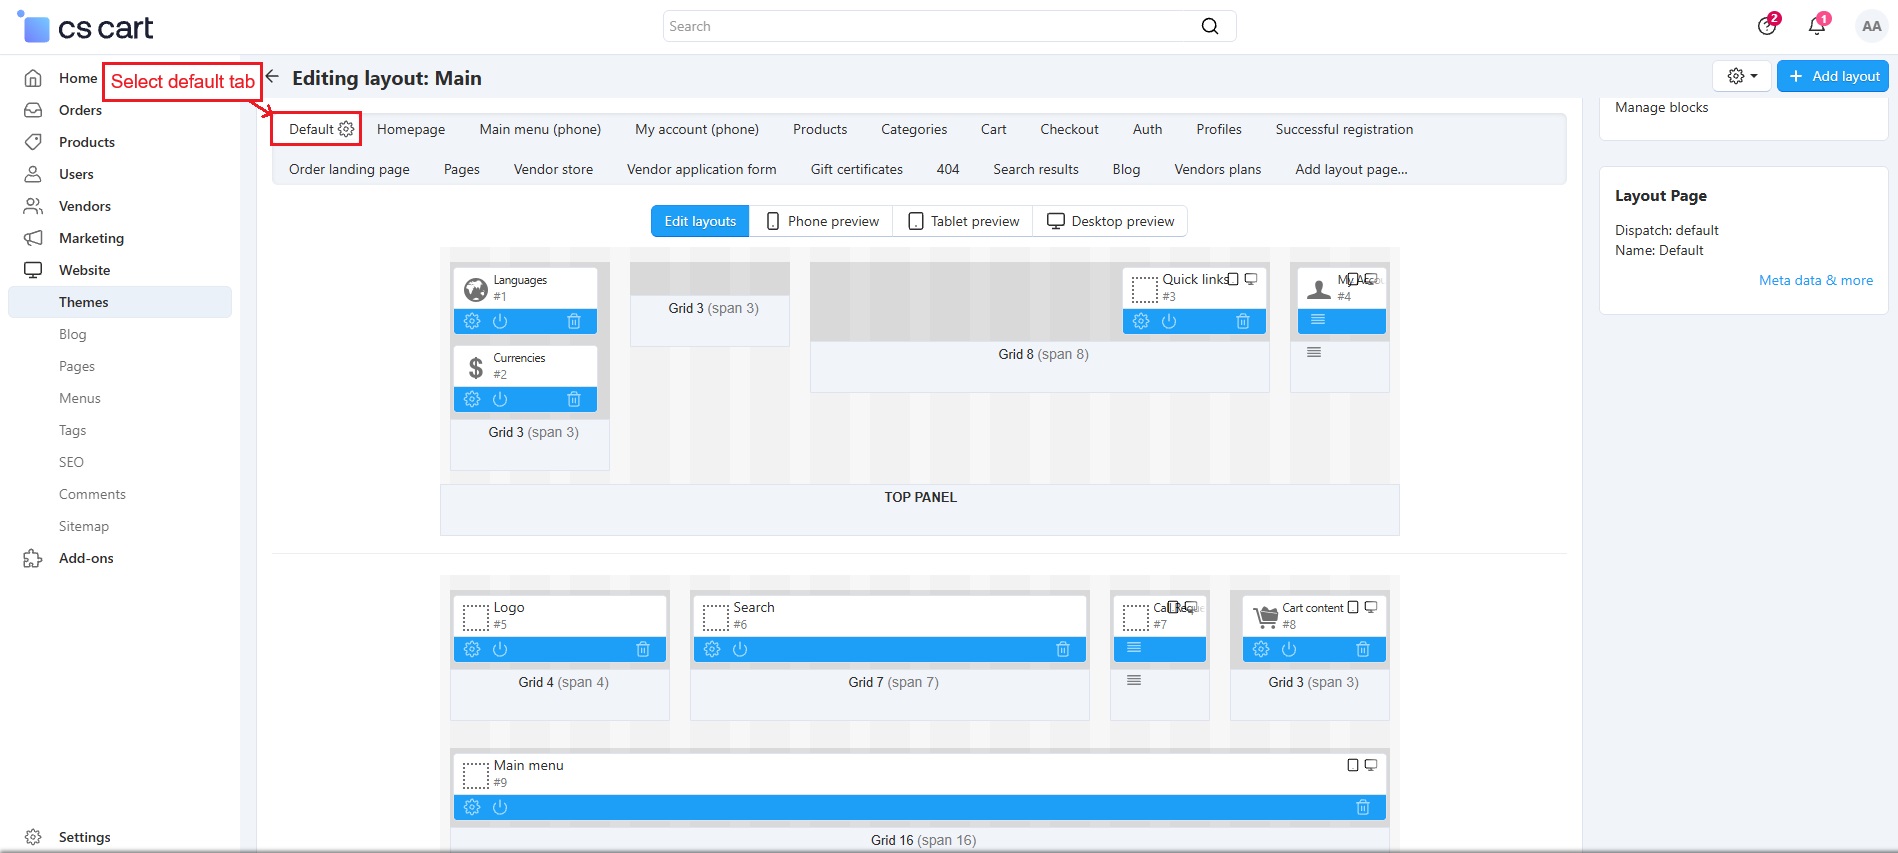
Set Up Layout for WhatsApp Icon
In website, select themes and press layouts tab. Then, select the default tab.
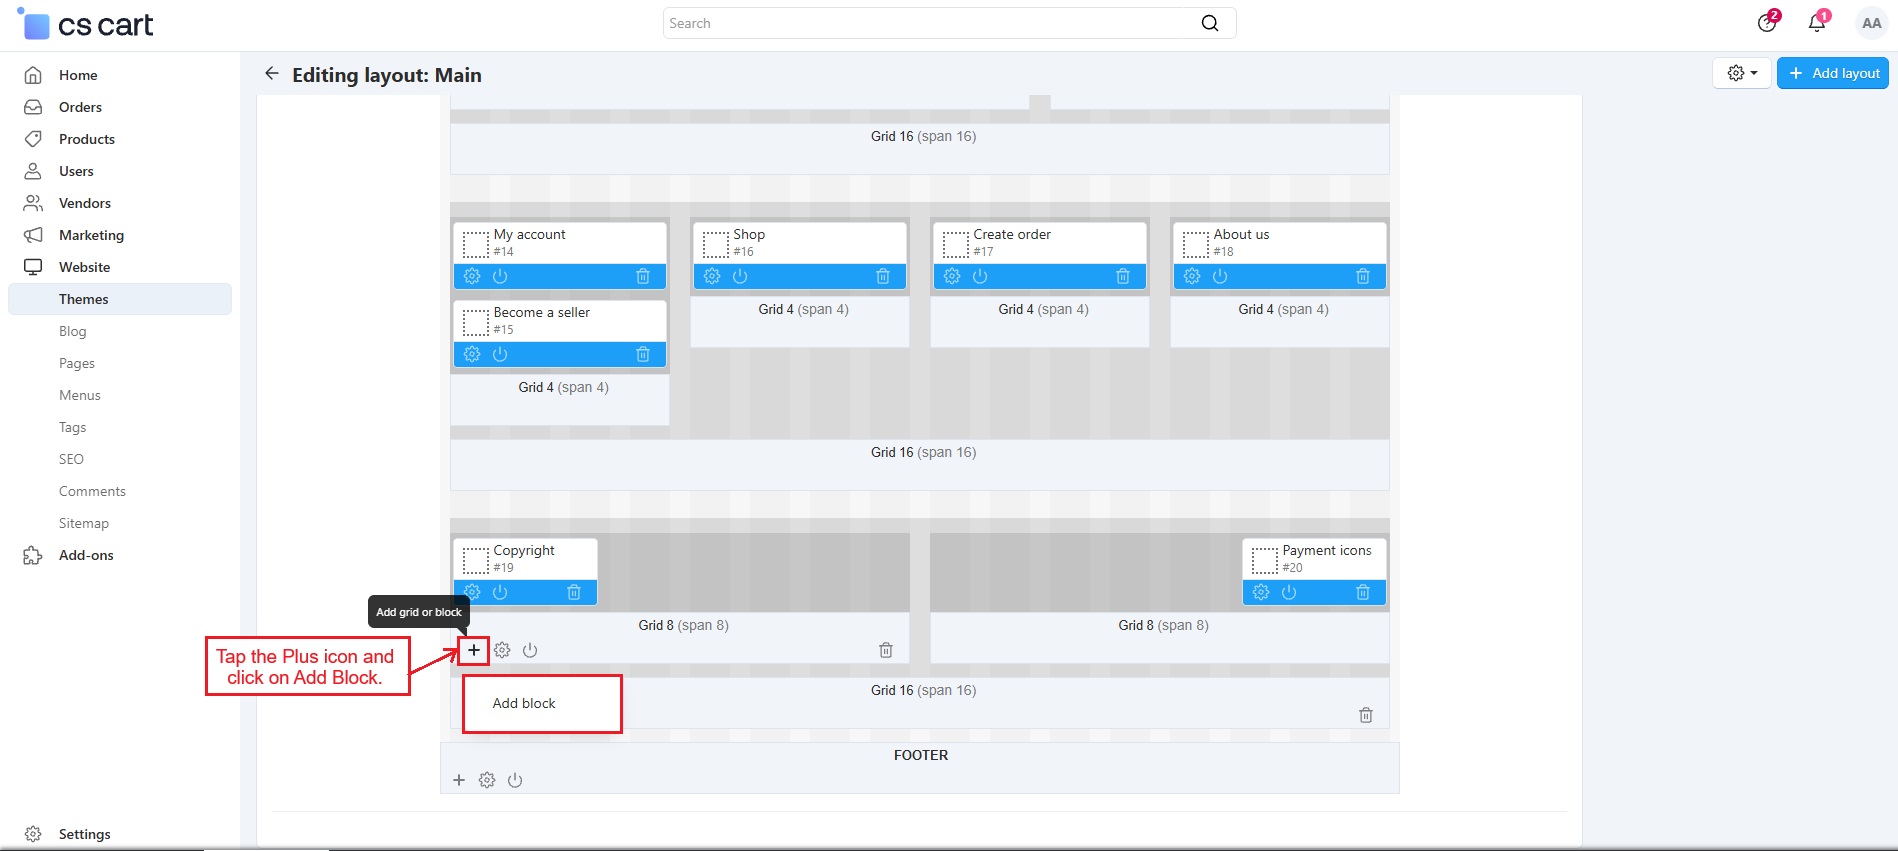
- Scroll down, tap the plus icon, and select "Add block."
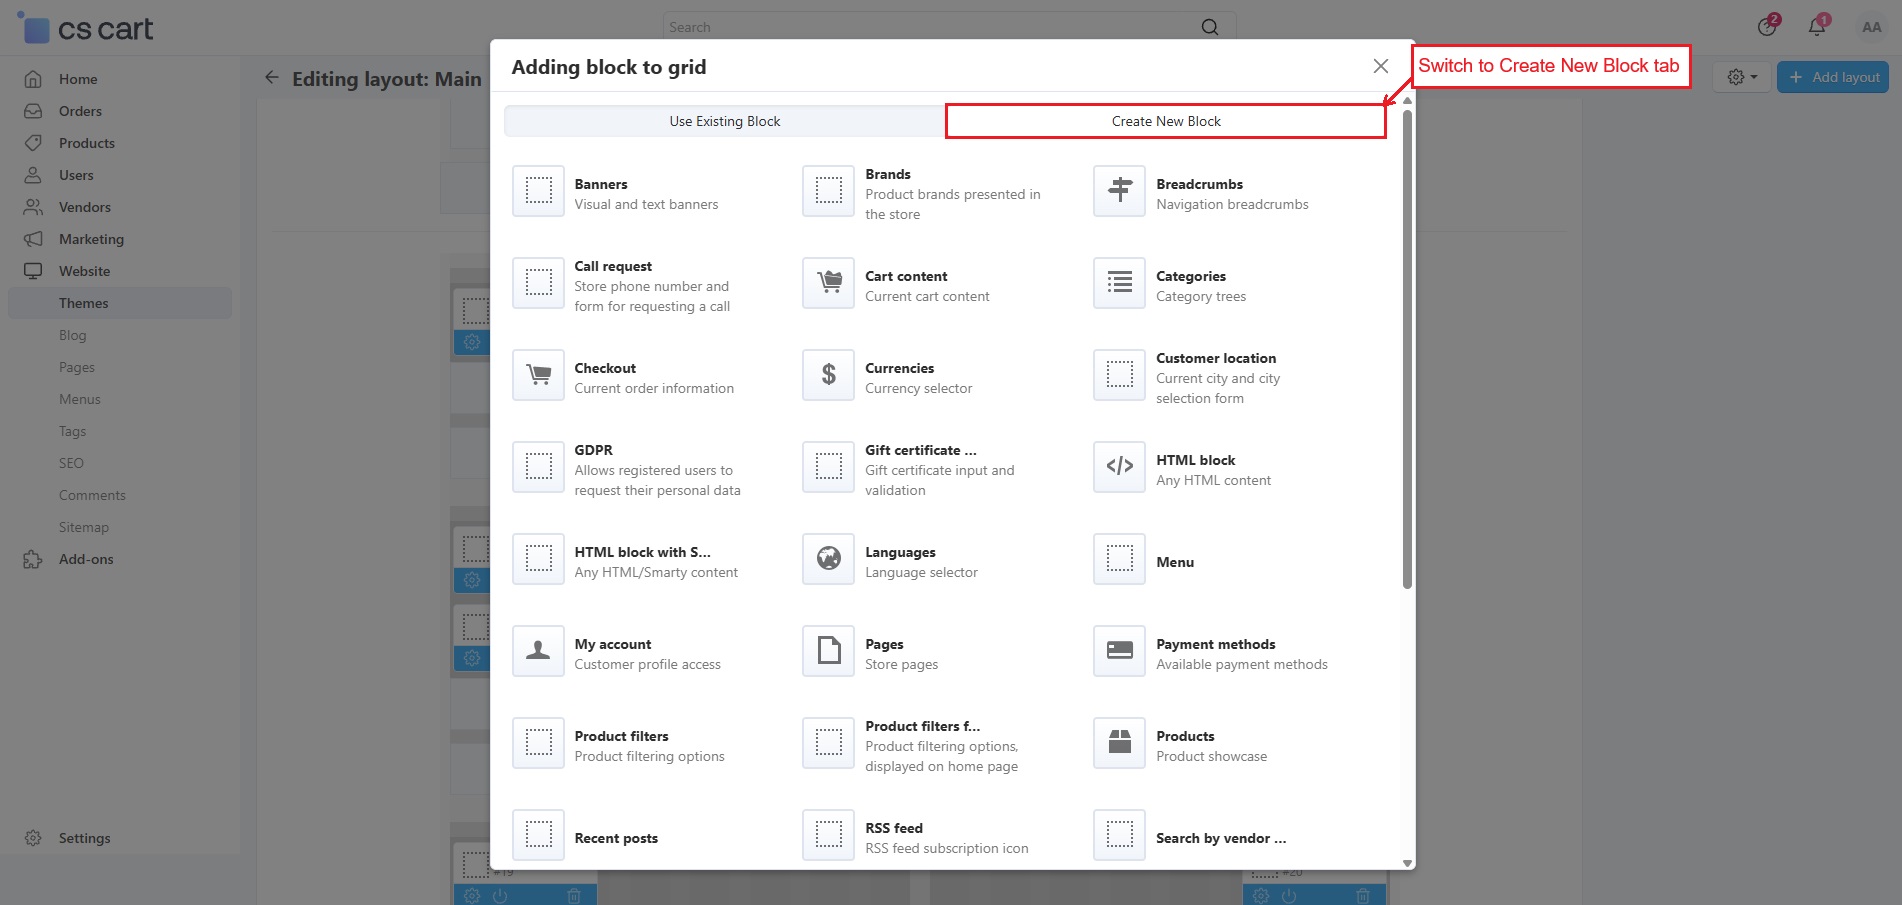
- Select Template and open it.
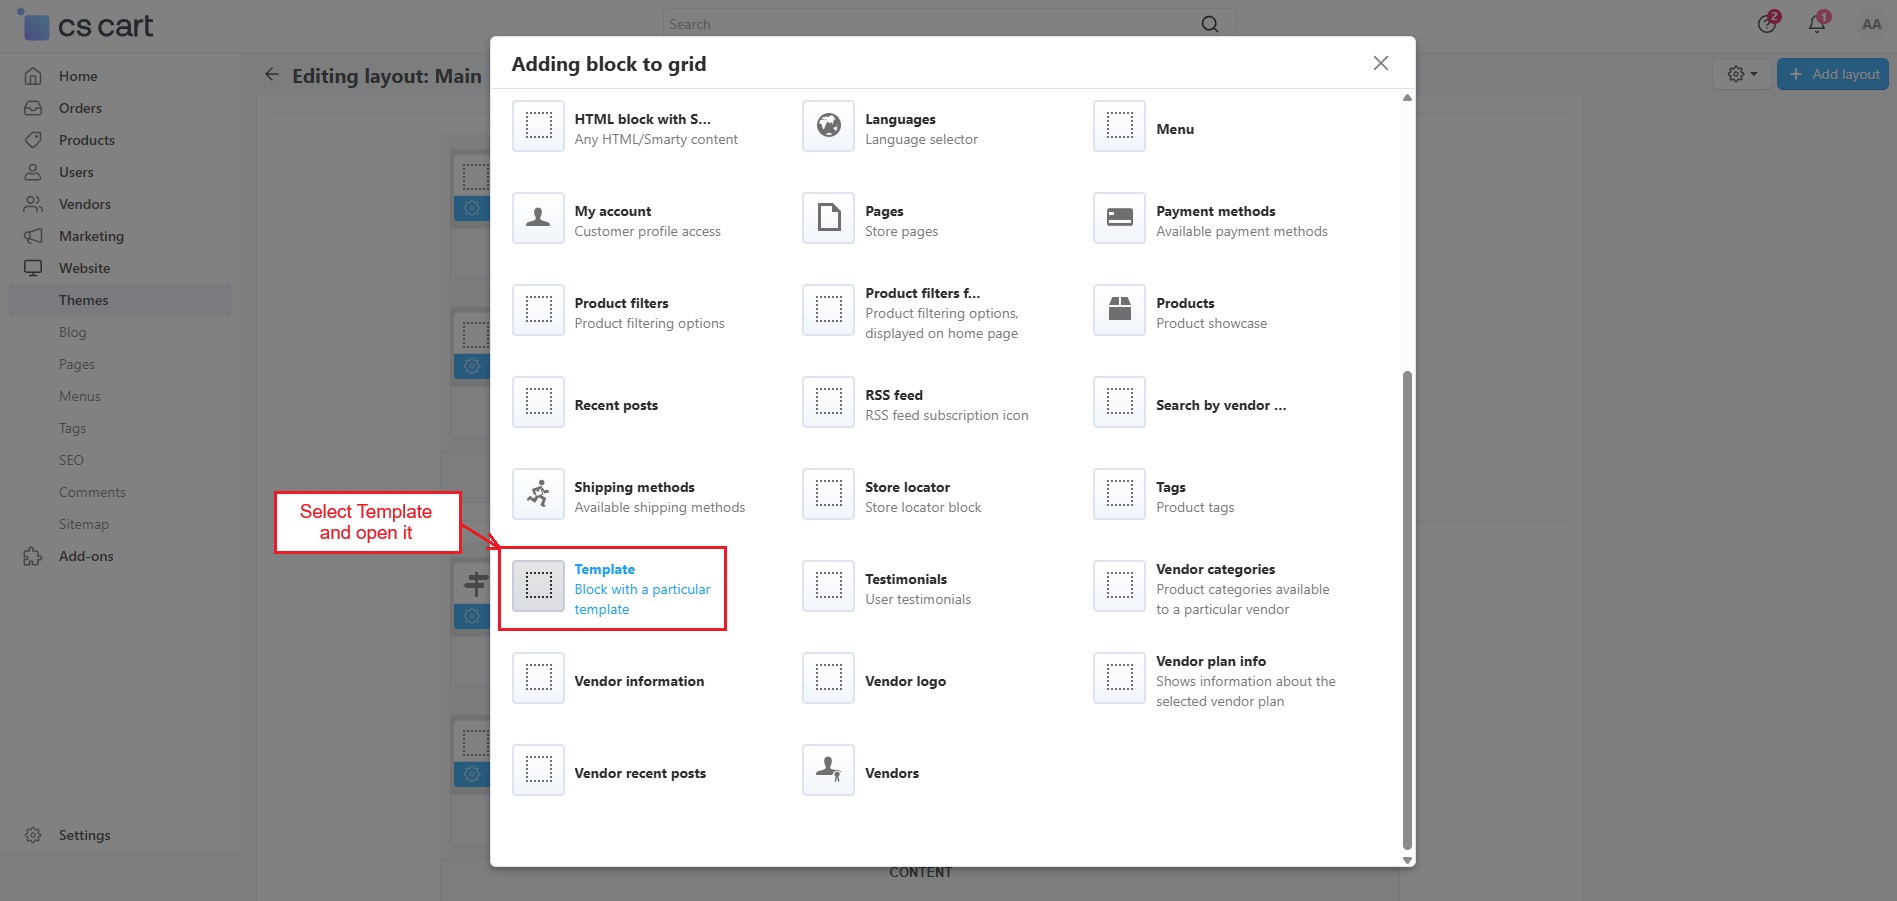
- Name: Enter name of the template.
- Template: Select WhatsApp Support template.
Then, press the “Create” button.
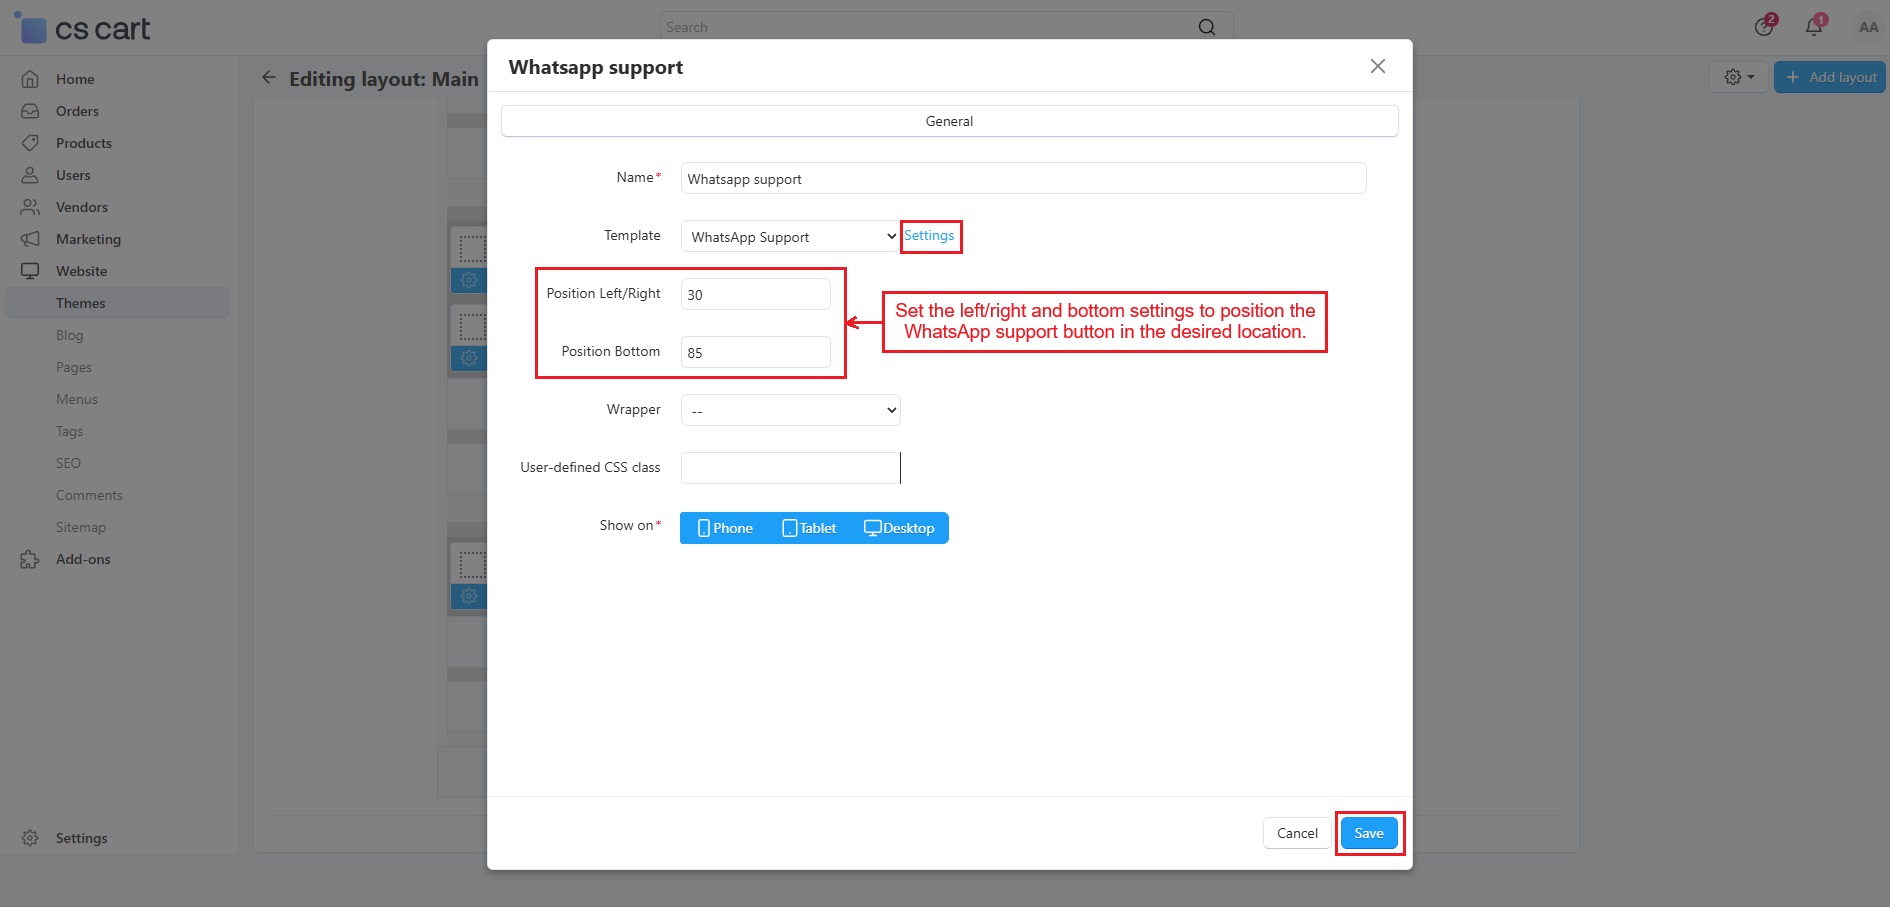
- Tap on Settings to customize the left, right, and bottom positions of the WhatsApp support button for the storefront.
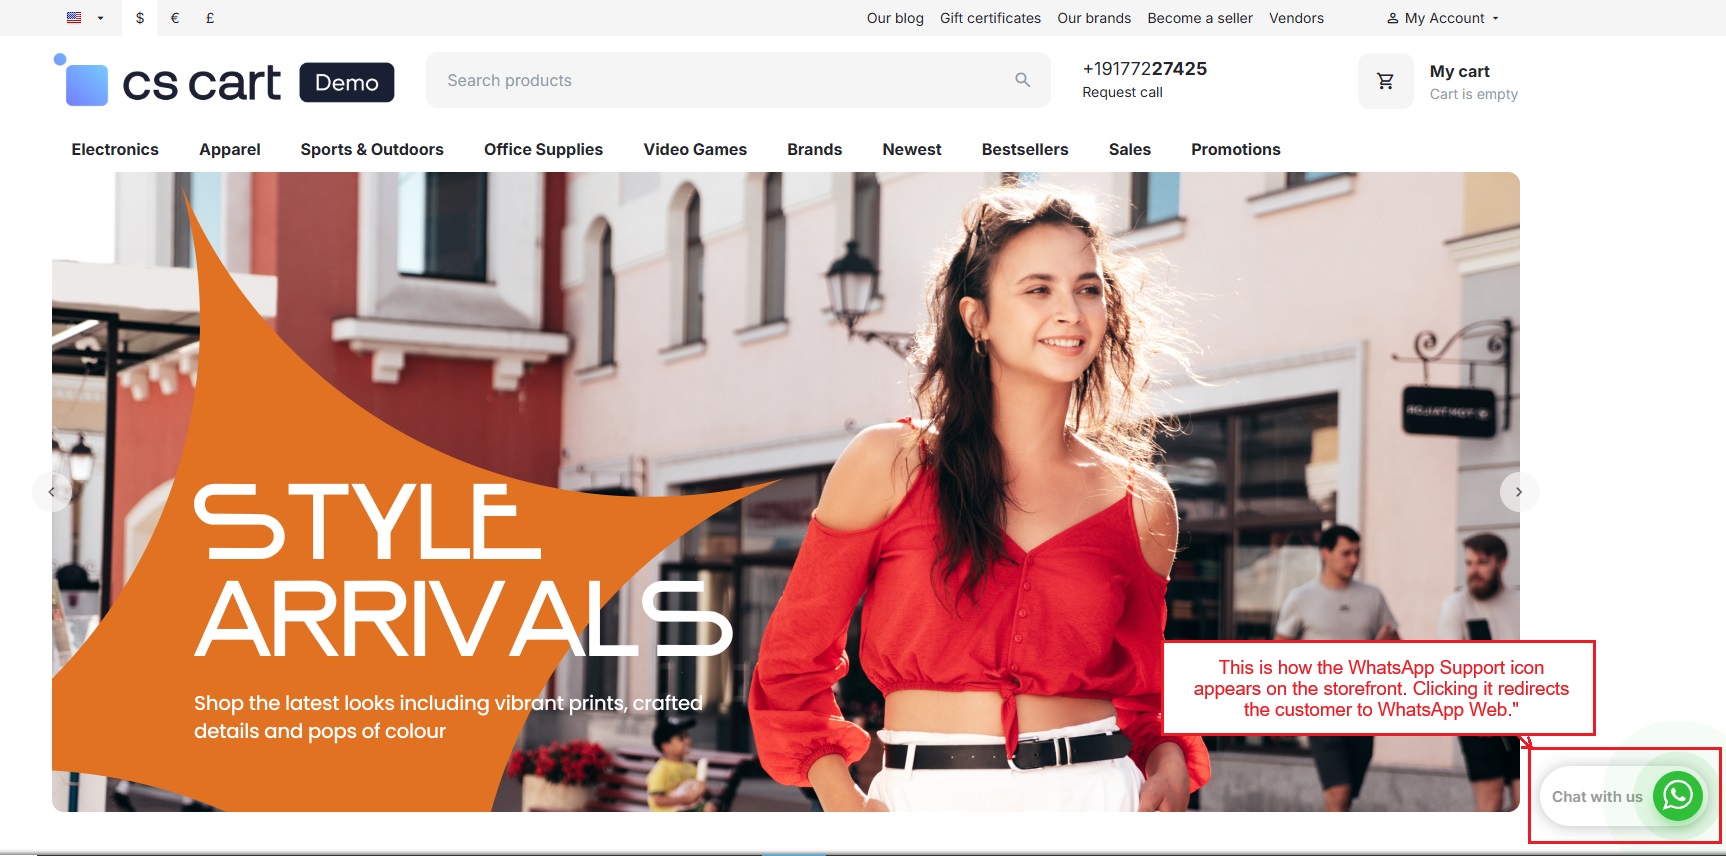
- This is how the WhatsApp Support icon appears on the storefront when the redirect option is enabled in the add-on settings. Clicking it opens WhatsApp Web for the customer.
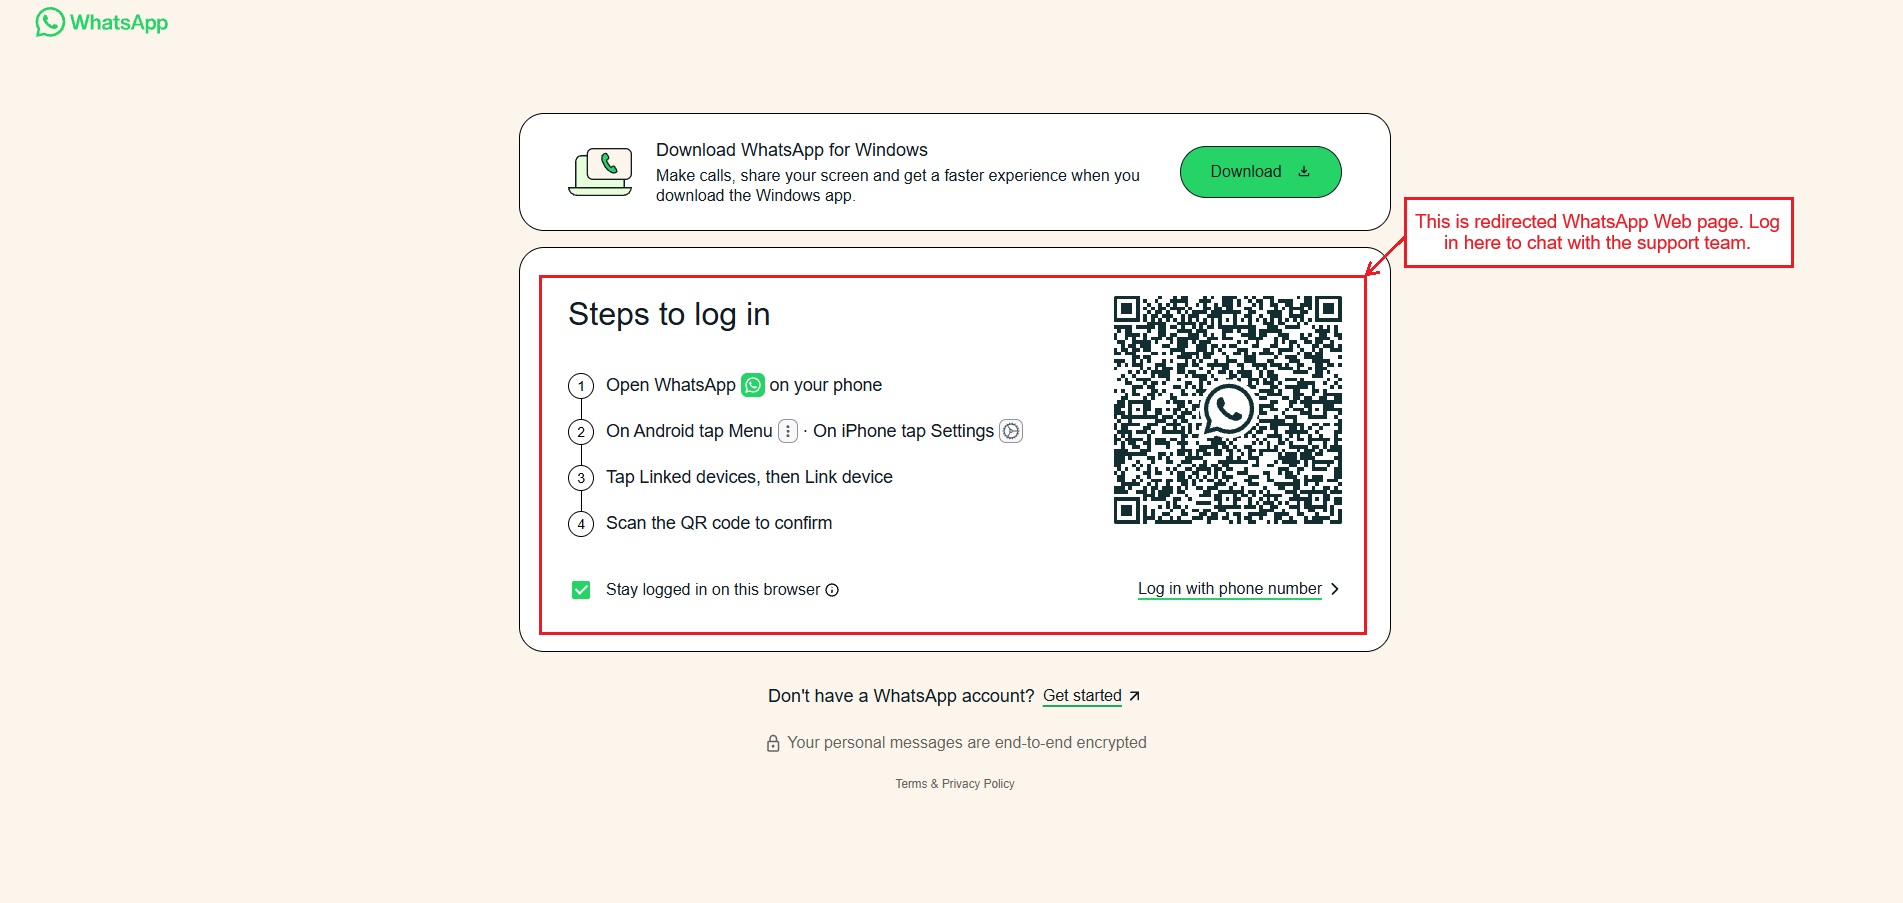
- This is the redirected WhatsApp Web page. Log in here to chat with the support team.
- When redirect is off, the chatbox opens with preset details (text, color, image) from the settings. Users can type their message in the query field, and WhatsApp Web will open for further conversation.
Vendor-Specific WhatsApp Support
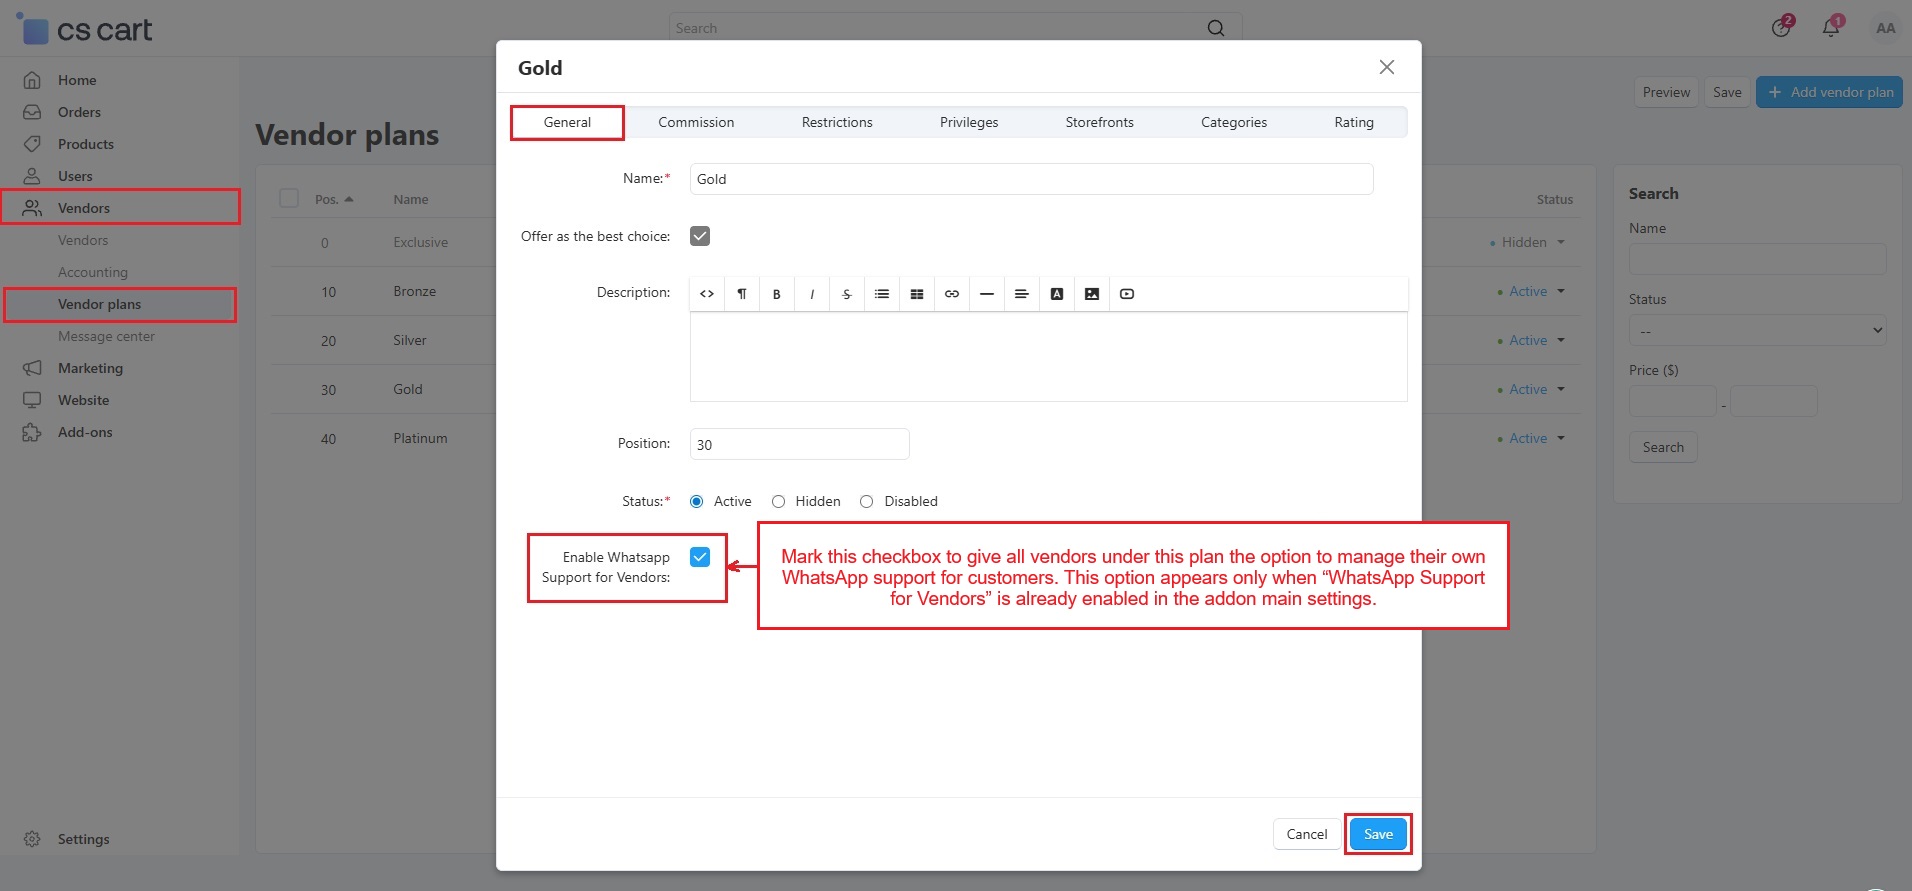
- Go to Vendors, select Vendor Plans, and open the plan where the admin wants to enable WhatsApp support.
- Under the General tab, check “Enable WhatsApp Support for Vendors.”
- Mark this checkbox to give all vendors under this plan the option to manage their own WhatsApp support for customers. This option appears only when “WhatsApp Support for Vendors” is already enabled in the main settings.
- Then, Press “Save” button.
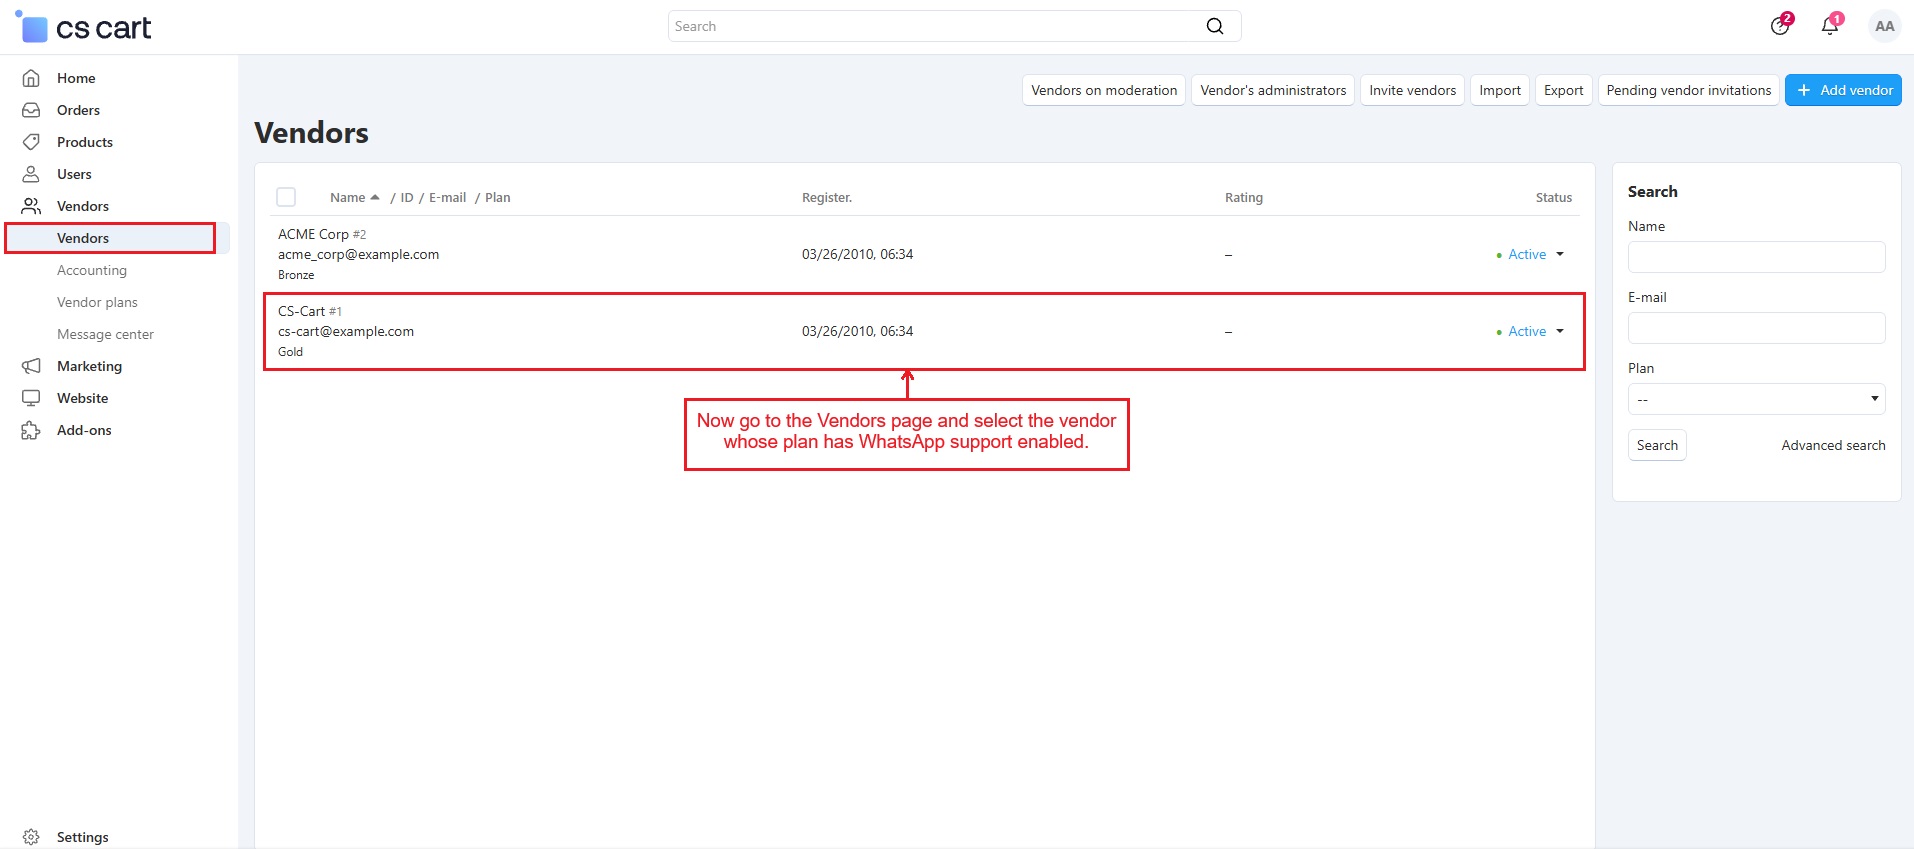
- Now go to the Vendors page and select the vendor whose plan has WhatsApp support enabled.
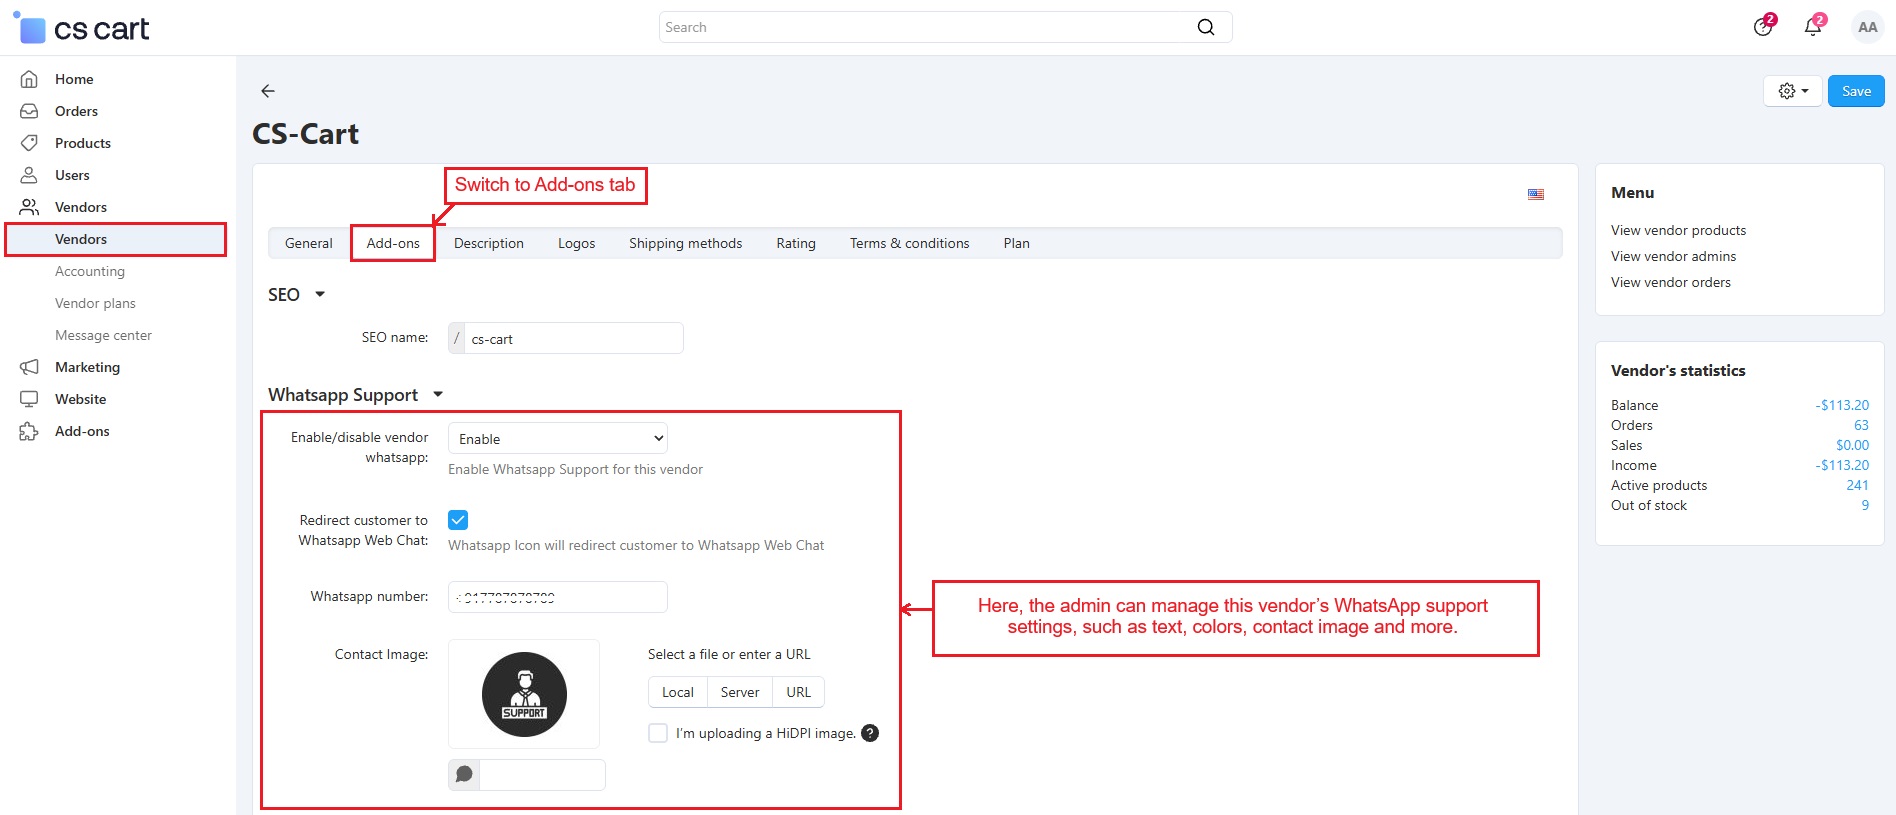
- Switch to the Add-ons tab.
- Here, the admin can manage this vendor’s WhatsApp support settings, such as text, colors, contact image and more.
Vendor Panel: WhatsApp Support Settings
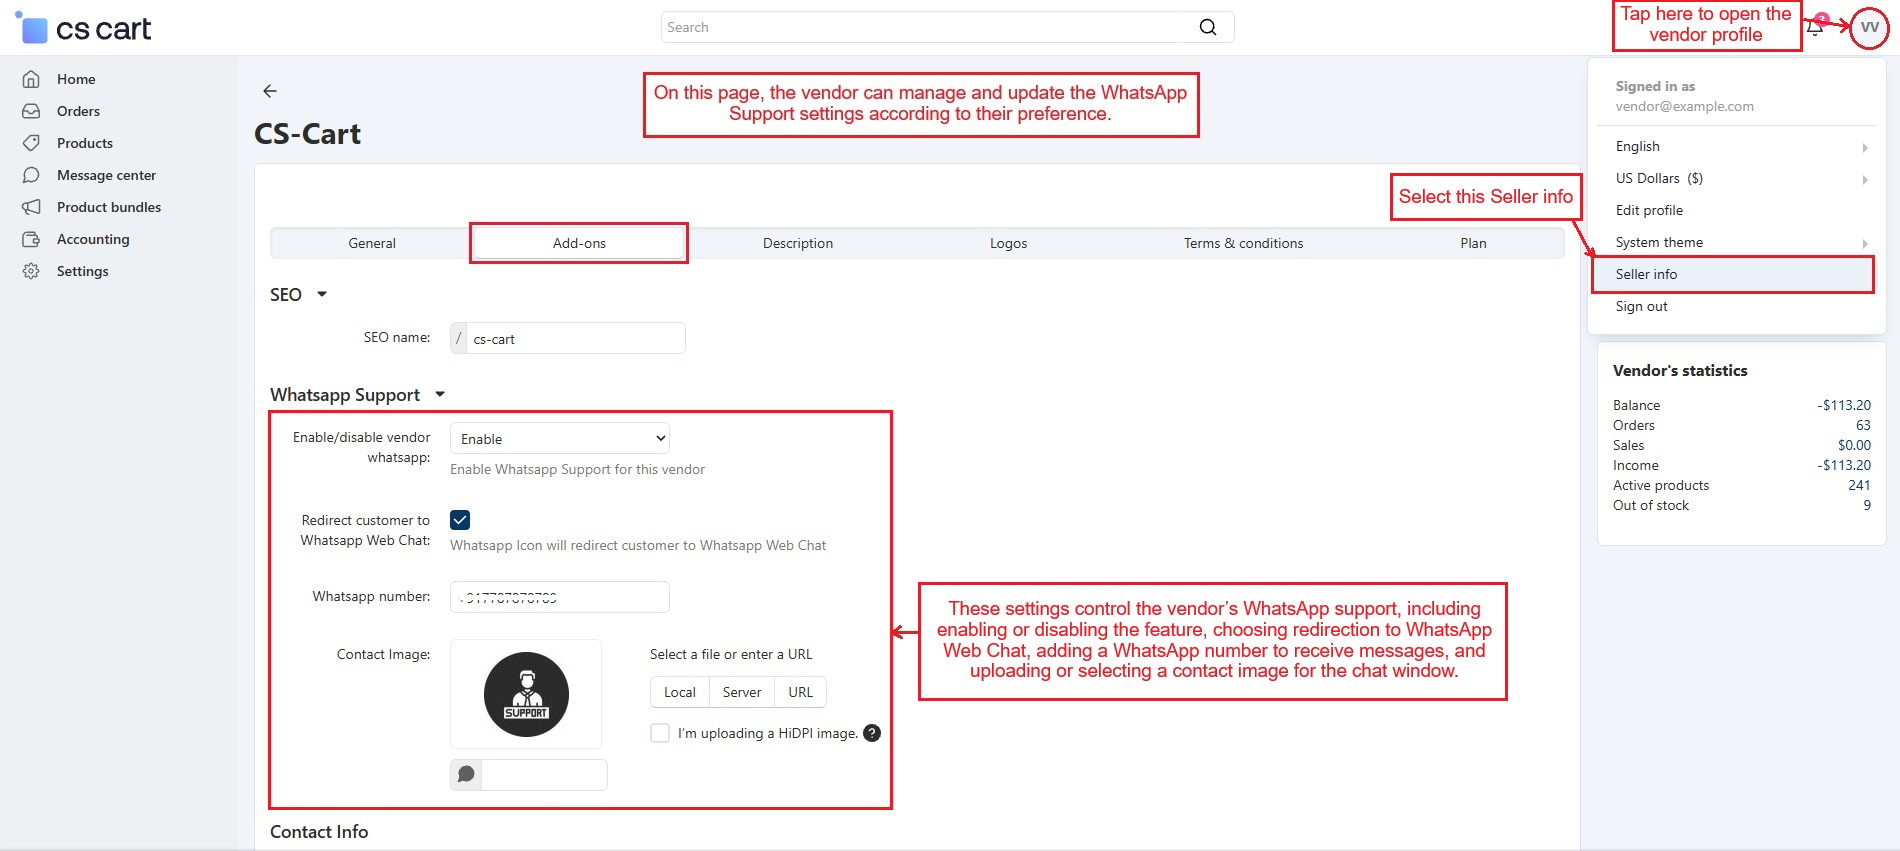
- Open the Vendor Panel, go to the Vendor Profile, select Seller Info, and switch to the Addons tab.
- Here, the vendor can manage and update their WhatsApp Support settings as needed.
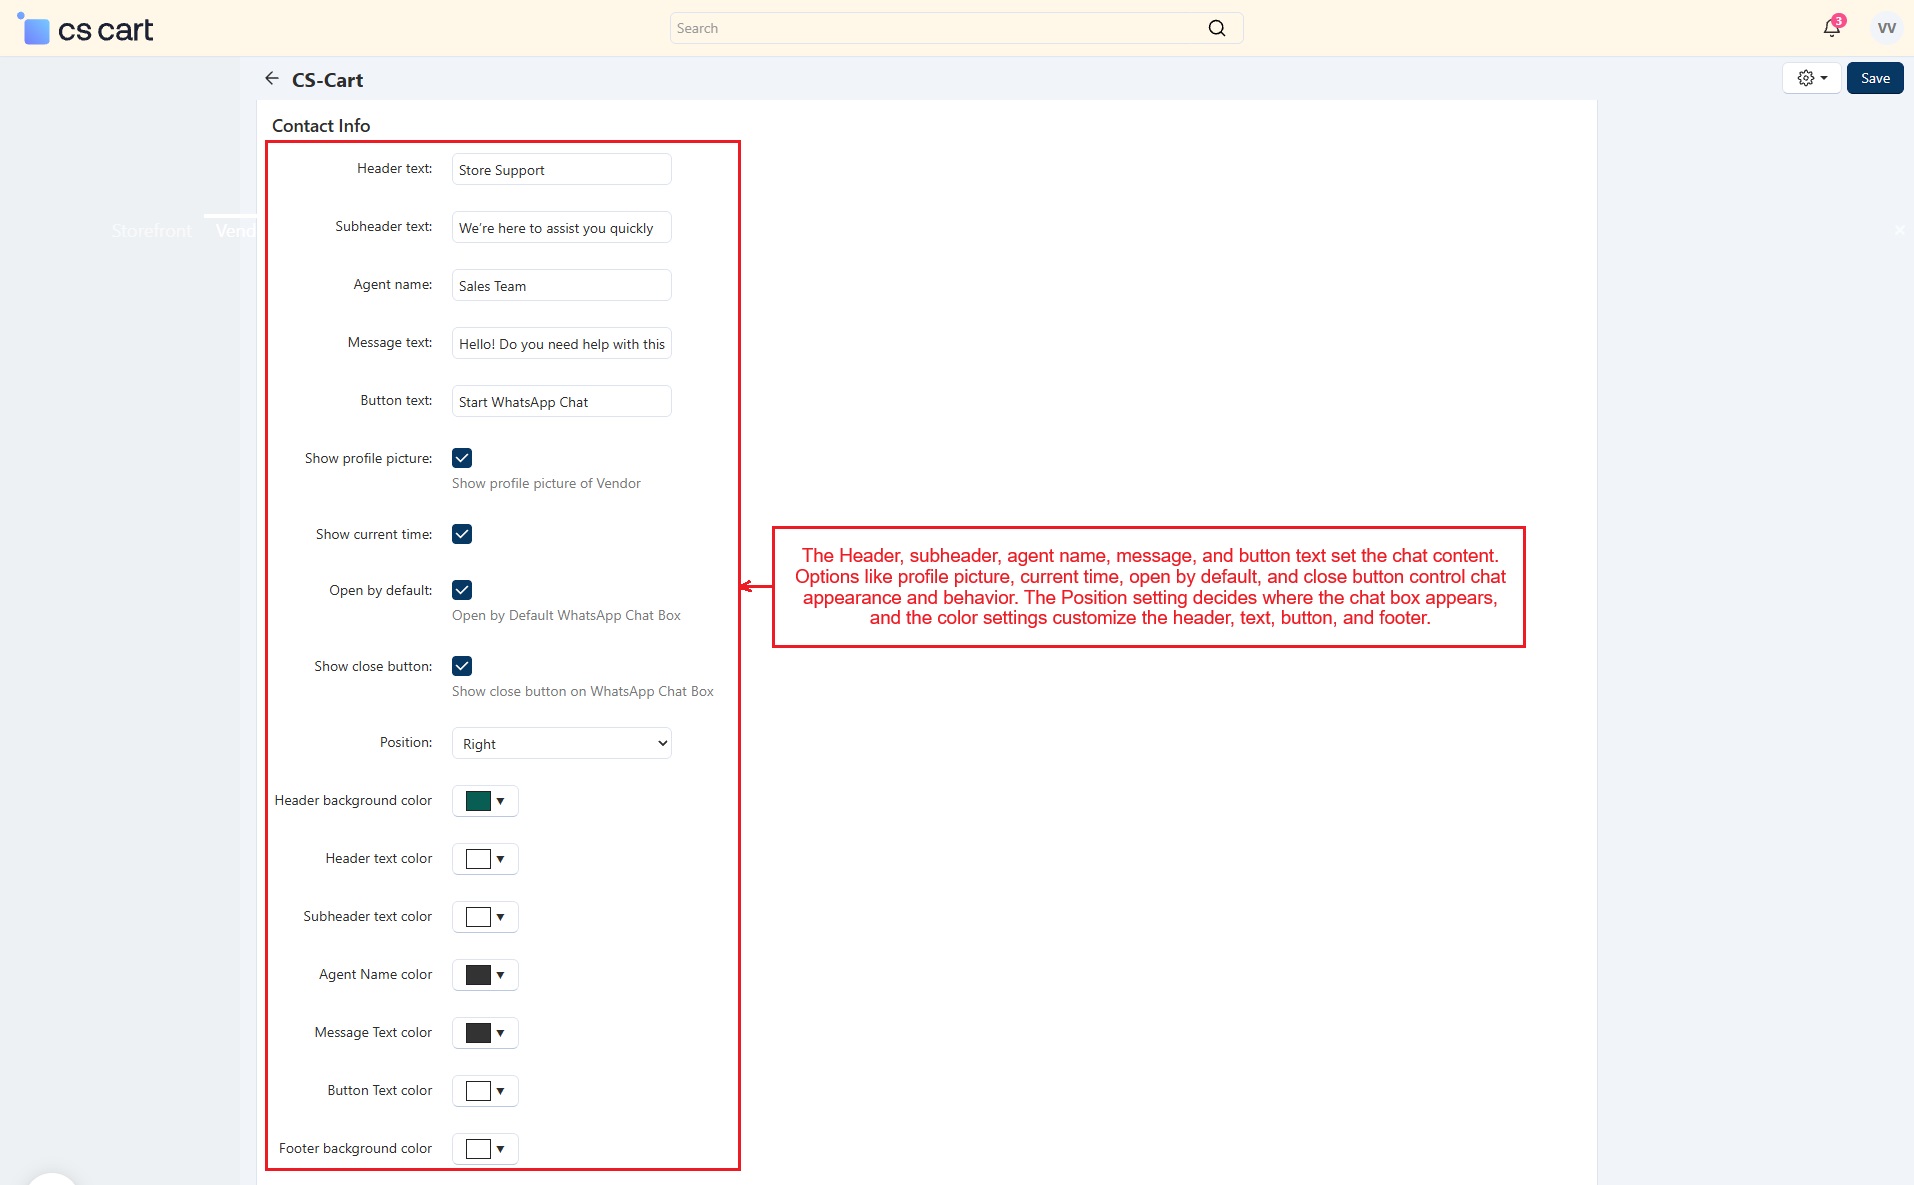
- The WhatsApp Support section’s all settings control how this vendor’s WhatsApp support works for customers, including enabling or disabling the feature, choosing redirection to WhatsApp Web Chat, adding a WhatsApp number to receive messages, and uploading or selecting a contact image for the chat window.
- The contact information provides fields for header, subheader, agent name, message, and button text to set the chat content. Options like profile picture, current time, open by default, and close button control chat appearance and behavior. The Position setting decides where the chat box appears, and the color settings customize the header, text, button, and footer.
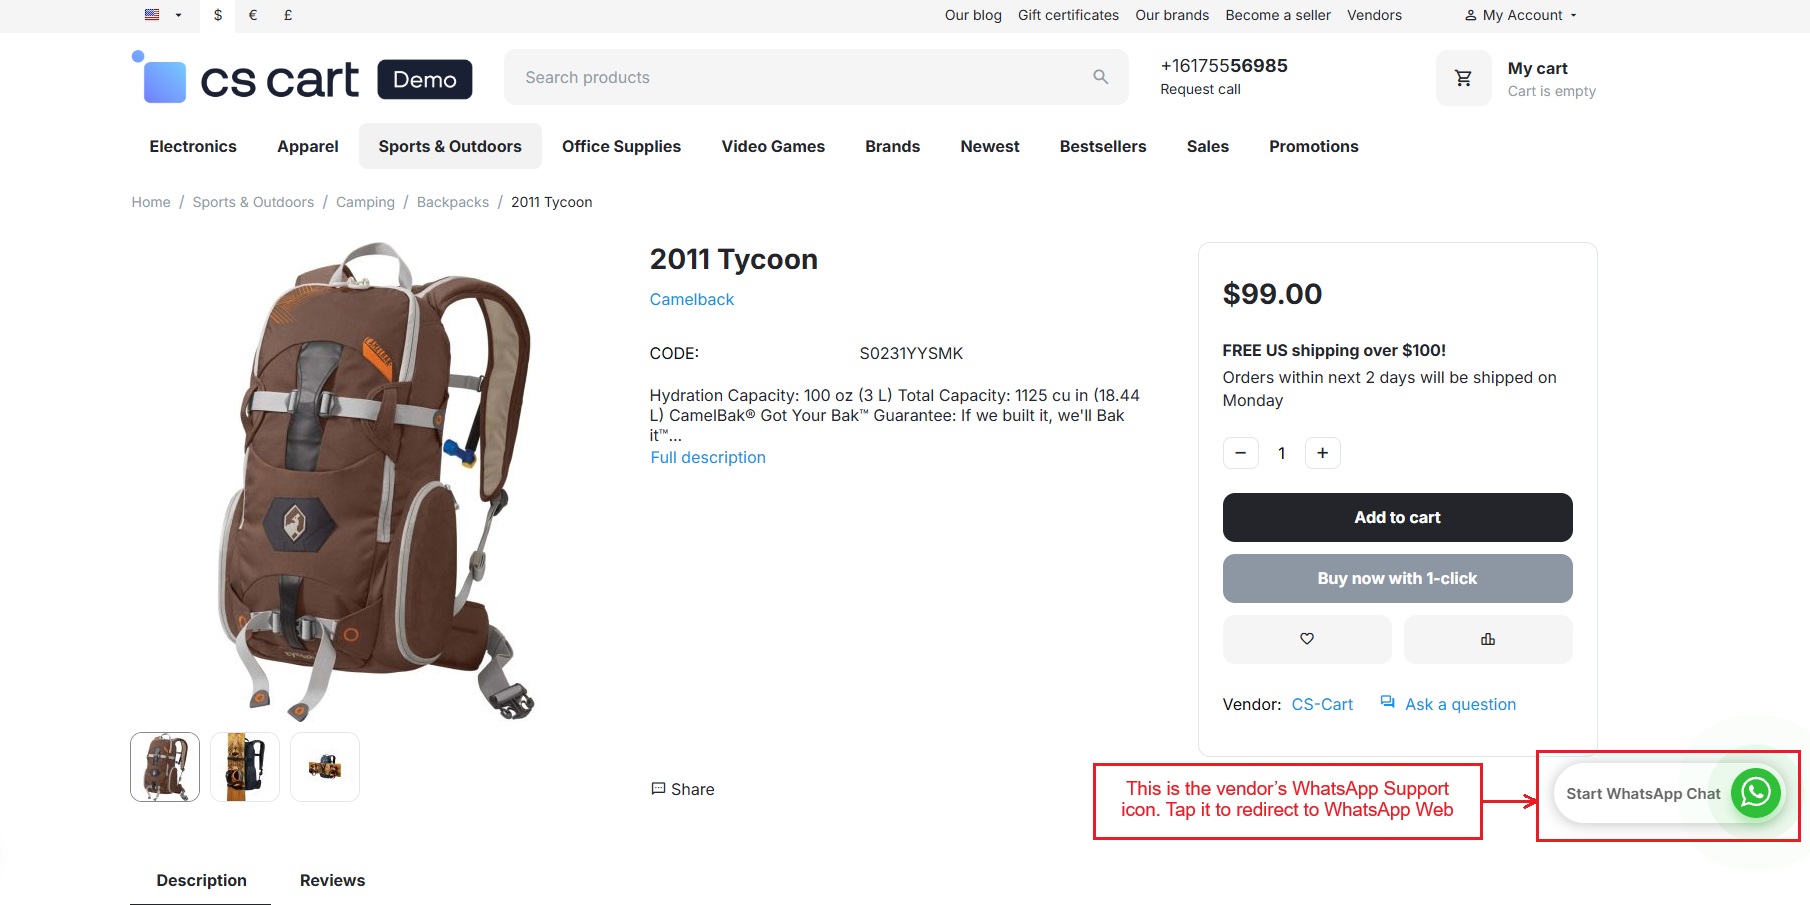
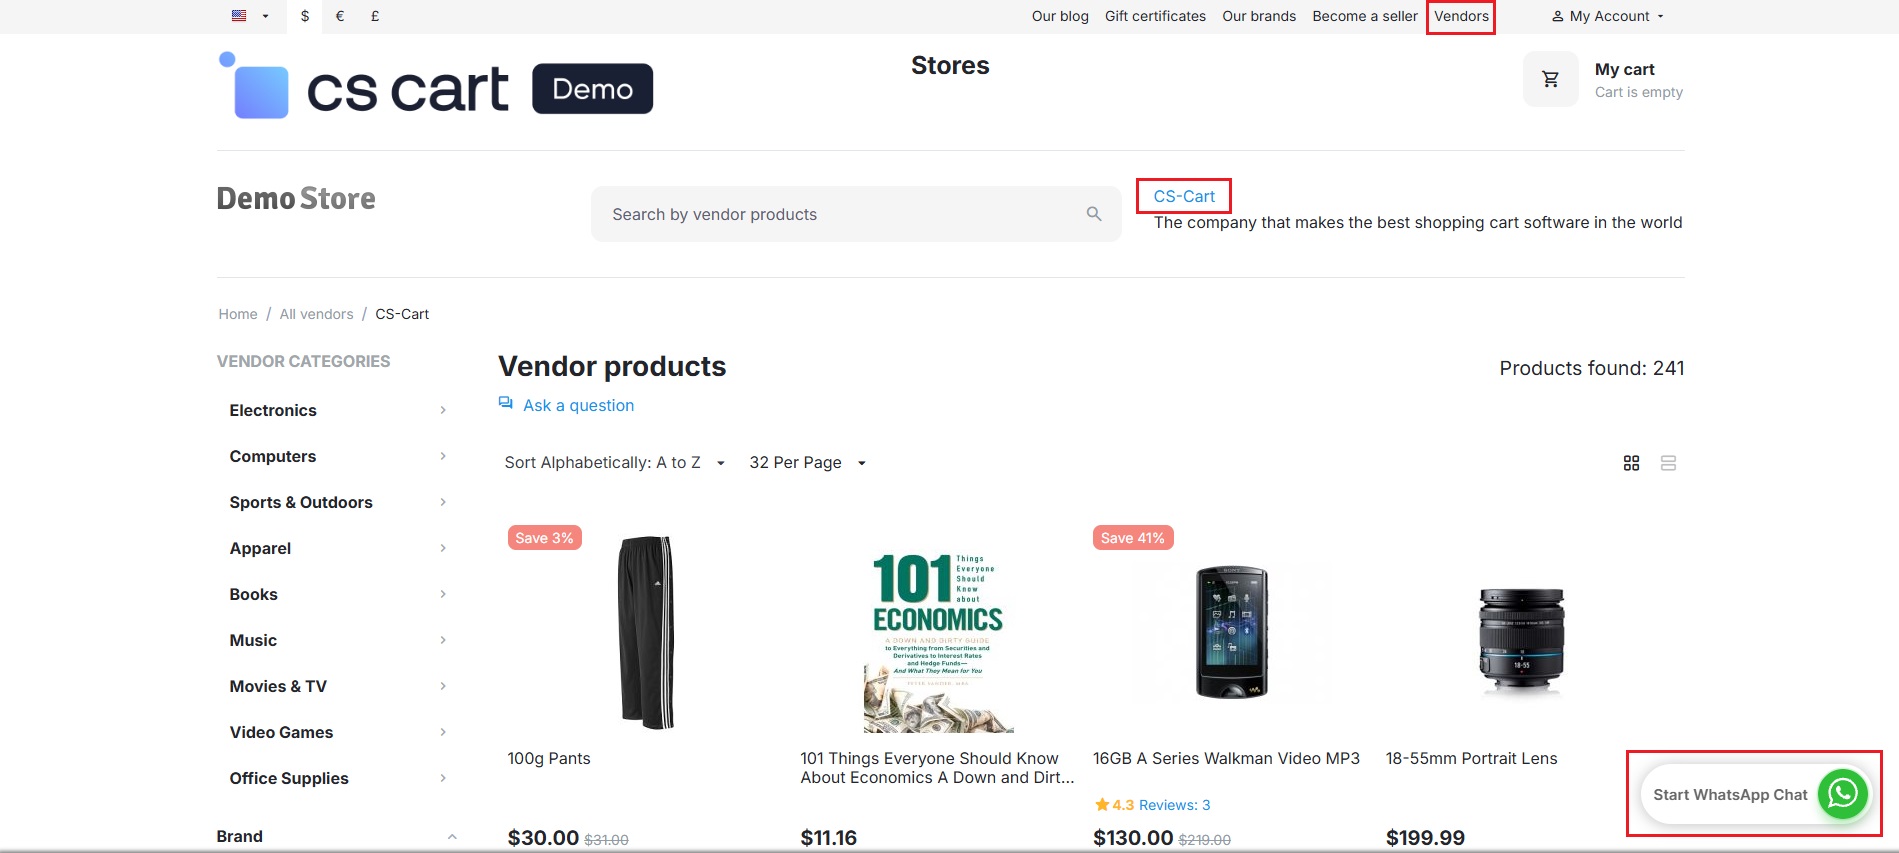
- This page shows the vendor’s WhatsApp Support icon. Tap it to redirect to WhatsApp Web. It appears on the vendor’s store and its individual product pages.
Manage Layout for Multiple Stores
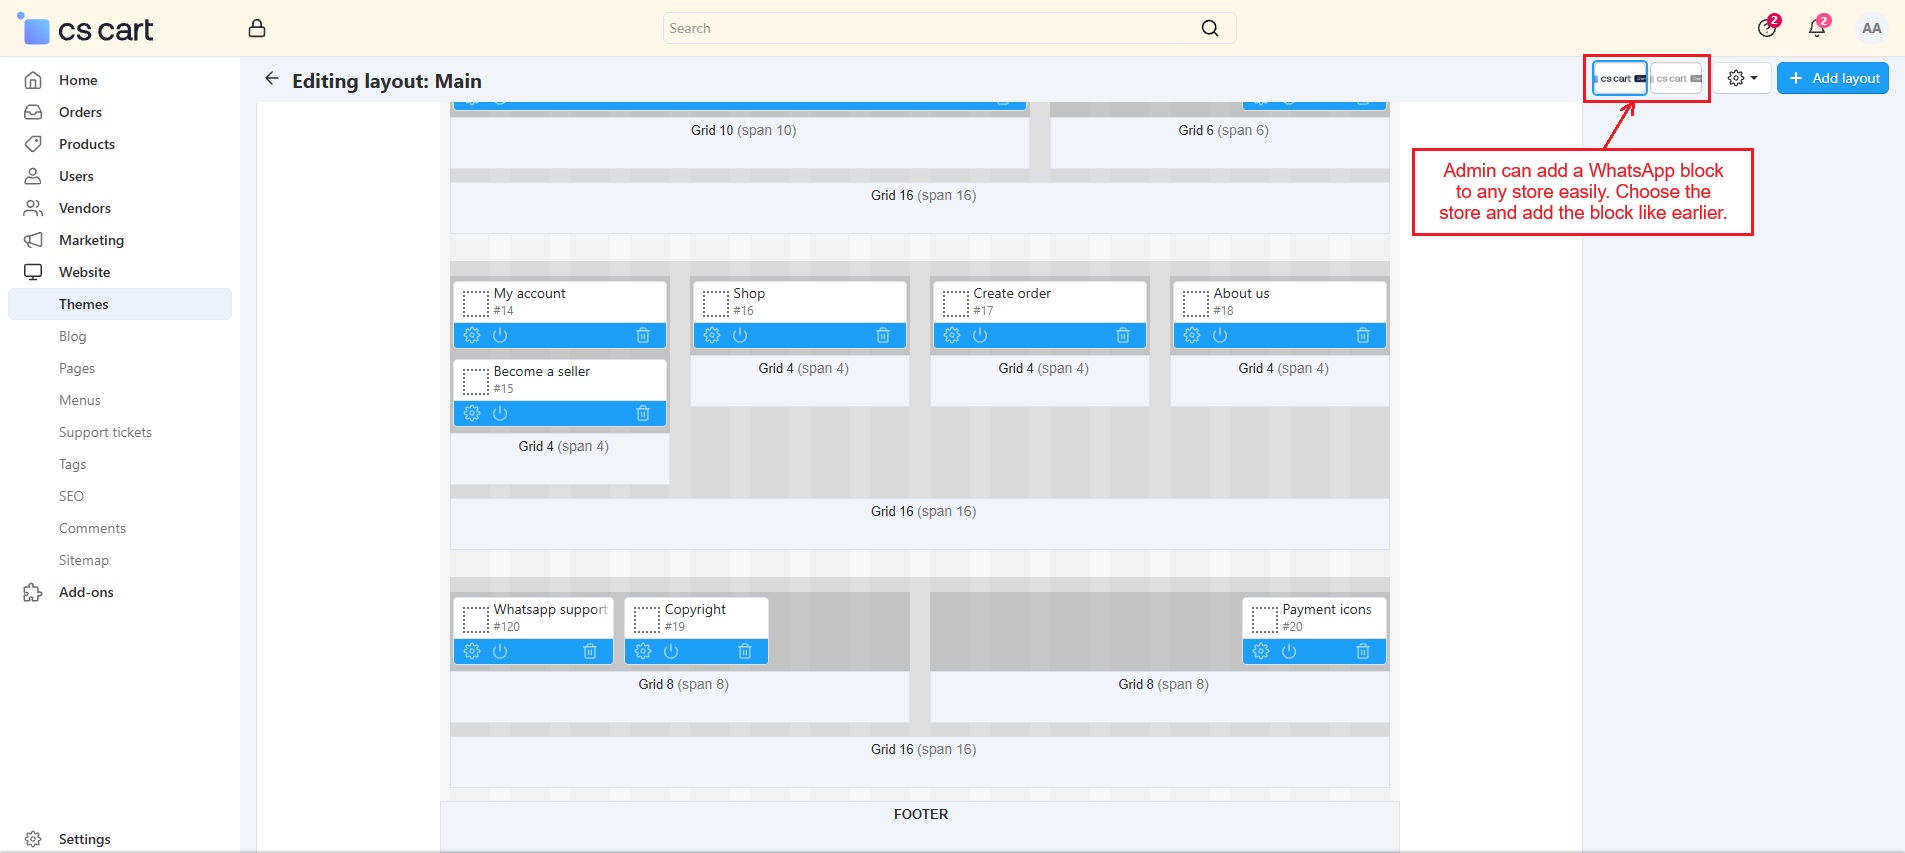
- Admin can add a WhatsApp block to any store easily. Choose the store and add the block like earlier.
Addon-Version:
Version-1.0
Supported Versions:
CS-Cart, CS-Cart Multivendor 4.8.x, 4.9.x,4.10x,4.11x,4.12,4.13x, 4.14x, 4.15x, 4.16x, 4.17x, 4.18x
Support:
This app is developed and published by Ecarter Technologies Pvt. Ltd., a CS-Cart developer. You are guaranteed a quality add-on supported by future versions. If you need help, please contact us via email support@ecarter.co
Need modifications or any assistance? Please, feel free to contact us via email at support@ecarter.co
Frequently asked questions
How do customers start a WhatsApp chat from the storefront?
A WhatsApp icon appears on the storefront. When a customer clicks it, they are either redirected straight to WhatsApp Web or shown an on-page chat box with preset text, image, and colour settings, depending on how the store has configured the redirect option.
Does it work with CS-Cart Multi-Vendor and per-vendor support numbers?
Yes. The add-on supports separate settings for the main store and individual vendors, so each seller can set its own support number, contact image, chat text, colours, and display options from the vendor panel.
What can the admin control versus the vendor?
The admin manages global settings, layout placement, redirection options, and vendor plan permissions. Vendors control their own support number, contact image, chat text, colours, and display options for their storefront.
What is the difference between the redirect and the built-in chat box?
When the redirect option is enabled, clicking the support icon sends the customer directly to WhatsApp Web. When it is disabled, the icon opens a WhatsApp chat box using the text, colours, and support image set in the Settings tab.
Nisha Gaur is a Technical Content Writer at Ecarter Technologies. She writes technical documentation, tutorials and buying guides covering CS-Cart, Magento, Shopify and eCommerce development.